We can do Sound Deadening of a wall or walls in various different manners. And we are going to discuss it so that we can understand what it is and how we can achieve it.
Many people get confused between these two things i.e. Soundproofing and Sound-absorbing(main things needed). I have included it in some of my other posts too. These two things are very different from each other.
These two are very much needed if we want to deaden sound in a room as they go hand in hand and both will be required for our deadening projects.
Sound Deadening Process
Let’s understand the two things that we are going to do (as mentioned above) before we get into “how to do” these things. A clear understanding of what they are and how they are different from each other will guide you in a better direction or perhaps help you accomplish your goals a little bit faster.
- Soundproofing – It is the process in which all the unwanted noise is blocked. It can either be sounds coming from the outside environment to your room, Studio, etc., or prevent the sounds from leaving your room onto the outside world.
- Sound Absorption – It is the process in which sounds are absorbed using special panels that are meant to absorb sounds. These panels are used to reduce echoes in a room and also to prevent serious reverberations that occur inside a bare room with smooth surfaces. And more importantly, they are not meant to block sound waves.
We need to deaden your walls to soundproof the walls first – to minimize the noise coming from outside and leaving from inside on the other hand. Then, add sound Absorbing panels to the walls so that you can reduce echoes and reverberations inside the room.
These two steps are crucial to achieve a better ecosystem inside your studio or room. Moreover, I wanted to make sure you understand the difference between the two processes needed in our project.
Read our complete guide to building a home recording studio here!
Why these two are needed?
Let’s take some example: Suppose you have done only the first step and left your room like that, then you will observe all the echoes and reverberations when using that room.
You can test this out for yourself after you have done the first step and before going to the Second Step – say something loudly or shout something like “Hello!!” and you will surely be able to hear all those echoes and reverberations from your walls.
It will be those annoying sounds that you don’t want in your records or mix if you are Building a Studio, the same goes for a normal room that you are trying to build where you want to isolate it. So, this is the reason why the second step – Sound Absorbing Process comes into play.
On the other hand, let’s say only the second step i.e. Sound Absorbing process is done then you will not be able to block the noise coming from outside the room and vice versa. Moreover, you will hear all the unwanted noise that you were trying to get rid of at your mix or record.
You may be able to reduce the noise but I can guarantee you that you will not be able to eliminate the noise as compared to when you already had done the first step.
Process
Step 1: Sound Proofing the Walls
We can do this in various ways and one of the easiest ways is to increase the thickness of the walls. When I say increase the thickness, I mean to increase the mass of the walls. More the mass of the walls and the more rigid nature of the substance used – it will be a better one at blocking the sounds.
It is because of the fact that heavier and rigid substances will be hard to vibrate. As we know sound waves travel through a medium by vibrating the particles. If we limit these vibrations then the sound waves will not be transferred and therefore the sound will be blocked.
This is the principle that we are going to use to get rid off the noise altogether.
Required steps –
- First of all, what you should do is to increase the mass of your walls and after that check if it has reached the desired level that you are aiming for. If you are still not satisfied then let’s put on some more mass plus use some other technique to make it more efficient.
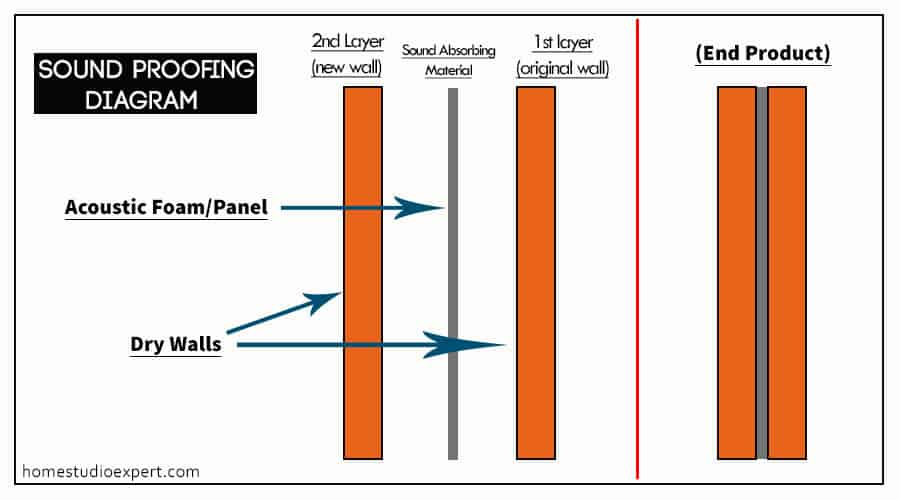
- Add another drywall by putting a gap from the original wall so that it acts as an isolation wall from the original wall and therefore the transfer of sound waves is reduced. Hence, the noise won’t be transferred from inside the wall and from outside of the walls too.
Breakdown of the above (You can skip this part if you know about it)
You may be wondering why we left a small gap between the two walls or some of you who are reading this might know the reason, if not I will tell you the reason – we left a small gap between the two walls so as to create an “Isolated Environment” that is not in direct contact with the outside environment.
There are many factors as to which sound waves can transfer from one medium to another, and what we are doing is just limiting these factors.
If we had not kept a small gap between the two walls and say that they were in contact with each other, then there will be a transfer of sound waves (it will not be that much of high-frequency ones) of low frequencies which have the right frequency to vibrate the particles that made up the wall and these vibrations will be transferred very easily. This is due to “Conduction”
Note: Conduction is the phenomenon in which energy or waves or anything like this is transmitted through the particles in a solid substance – (to put it in simple words).
There is also another factor such as Resonance – in which the sound waves couple with one another and form a higher amplitude wave which could vibrate the particles of the wall and hence the transfer of sound waves will occur.
So, we had to keep a small gap between them.
- After this, you could add another insulating blanket or foams or soundproof fiberglass blanket between the two walls which would further help in reducing the noise/sound from entering and leaving out of the room.
Here is a simple diagram for the above process :

You can also use this technique to Sound Proof the walls between two Apartments, thin walls, or any other room.
The main part of Soundproofing is already done and now you could observe the difference. You can test your newly upgraded room or studio with different experiments.
Some Small and easy but necessary things to check
Don’t forget to check for any possible holes or cracks that could ruin your Soundproofed walls. If you find any of those, seal them using a noise proofing sealant glue.
And don’t leave the door and the windows (if your room has) without doing anything. You need to soundproof those things too.
You could use Weatherstrip for soundproofing the doors and I would suggest you have a solid core door if you don’t have one. On the other hand, you could hang a soundproof blanket to cover it.
You could also build an additional door. Now, let’s not forget about the windows – get a double glazing window if you don’t want to compromise the light (you can use triple glazing if you want). If not then you can just seal the window with soundproof blankets as I have mentioned above.
With this, the SoundProofing process of our Sound Deadening project has come to an end.
Step 2: Sound Absorption treatment
It’s the last step for our Sound Deadening Process and an easy one too, but not something that we can leave out.
Now let’s discuss how we can fill this part of the puzzle. Sound waves will be reflected right back to your room or Studio if we don’t do this step, as we have prevented the sound waves from leaving our room in the above step.
We need to absorb these waves so that they are not reflected back to the room and further create things such as echos, reverberations, etc. which would be a problem when we try to record something inside the studio/room. Moreover, you won’t be able to analyze the tracks properly or even hear a piece of simple music inside it.
I can guarantee you that – the different characteristics of the music will get mixed and produce an annoying one.
Requires Steps –
- To achieve this you should add sound-absorbing panels to your walls i.e. acoustic panels. There are various types of acoustic panels from different companies which come in different sizes, shapes and colours. You can choose something that will go with the color and size of your studio walls. And You won’t be covering all the area of the walls with these panels.
- After that, you can try and add some “Soft but Thick materials” (more of like a DIY way) which are ideal for sound absorption inside your room/studio. Fill up those empty bare walls with any kinds of soft materials which you can add as decoration pieces – such as wall arts, hang textiles, etc.
Note: Remember “Soft but Thick” – these types of materials will do the trick considering this part of our Sound Deadening Process.
Some Tips :
- You should check the STC (Sound Transmission Class) ratings for any Sound Proofing materials that you are going to use. They have their own STC ratings and you will know how much one can block the sound waves. So, you better have a check on that too. The higher the rating – the better it will be.
- You can add a Sound and Vibration Absorption Mat on your floor so that you can further reduce the transmission of sound waves from other parts of the room.
If you enjoyed this article and want something that goes into detail about soundproofing the whole room or studio, then check my Sound Proofing article.
Recent Posts
QuickTime is a vital app for many Mac users, and if you’ve recently bought a new microphone, you might wonder how to use it optimally. QuickTime cannot record audio content if it doesn’t have...
Every microphone leaves a unique signature on the quality of its output. If you’re a podcaster trying to melt your way into your audience’s hearts, a muddy, distorted recording won’t cut it....
