Practicing guitar can be a lot of fun, watching yourself gradually get better and better, and before soon being able to play your favorite songs. However, not every part of your guitar is going to stay in prime working condition forever.
Sometimes, you’ll have to remove and replace bits of your guitar. The guitar nut is just one of these bits. But how do you replace it?

Well, we’ve got the answers for you! Below, you’ll find a detailed guide on how to successfully replace your guitar nut, as well as an explanation of just exactly what this part is!
It should be easy to change, so there’s no need to get professional![]()
![]() help – just make sure that you follow our steps slowly and carefully. If you do have any trouble, though, don’t be afraid to get some help.
help – just make sure that you follow our steps slowly and carefully. If you do have any trouble, though, don’t be afraid to get some help.
What Is A Guitar Nut?
Let’s get the simple part out of the way first, and have a look at what the nut is. You’ll likely have noticed it, but you may never have known the name!
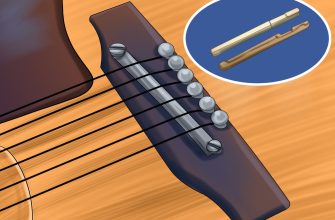
The guitar nut is the (often beige colored) strip that’s at the top of your fingerboard and just below the headstock. The purpose of the nut is to hold the strings![]()
![]() in their places, keeping your sound correct and precise.
in their places, keeping your sound correct and precise.
Why would you ever need to change one, though? Well, there are a few common reasons. For example, it could break, and the strings could become misaligned.
This could be because the slots in the nut that they go into have worn down and lost their shape, turning the strings loose.
On the other hand, the nut may just be not getting the best sound out of your strings, so you need to put in a new one that should do a better job.
Whatever the reason, the below guide will tell you how to replace your guitar nut!
How To Replace A Guitar Nut
Step 1: Remove The Old Guitar Nut
The first thing you’re going to need to do is remove the old guitar nut, leaving room for your new one. To do this, you’ll need to remove your guitar strings. How do you do that?
Turn the tuning keys gradually, which should allow you to unwind each string at the top. At the bottom, however, you’ll need to use some needle-nose pliers to pull out each bridge pin that’s holding them in.
Once you’ve got the strings out, put them safely away somewhere. You don’t want to lose them! On the other hand, you could buy some new strings, and put those back in at the end of this instead.
Step 2: Gently Cut Around The Guitar Nut

Now take a craft knife and delicately put the tip of its blade to the edge of the guitar nut, where it joins the guitar. Dig it in very gently and then trace the blade around the whole rectangle of the nut.
This should gradually get rid of the glue that’s been holding the nut in. Go around the nut with the knife about three times, because it will make it looser and looser each time.
You must be very careful and slow, though! Not only to avoid damaging yourself, but also the guitar itself. If you dig the blade in too deep, it could damage the wood, and it would be expensive to repair.
Step 3: Hammering The Old Nut Out
Now get a tiny wooden block and hold it lengthwise across the top of the fingerboard, with its back against the guitar nut. Then get a hammer.
If you’ve ever hammered something and put an object in between the hammer and your object in order to soften the blow, this is what you’ll be doing here.
Put your hammer in your dominant hand, and hold down the wooden block with a few fingers from your other hand. Now lightly tap the hammer into the back of the block.
The block should hit the nut and, hopefully, dislodge the guitar nut. If it doesn’t try a couple more taps. If it still hasn’t worked, trace around the nut another time with your craft knife, before trying the block technique again.
Step 4: Test Your New Guitar Nut
Now get the new guitar nut that you’ve bought, either at a music store or on the internet. Put it into the gap where the old nut was, seeing if it fits into it, or is too large. A guitar must be clear of the first fret, so that the strings can sit comfortably.
Step 5: Sand Down Your New Nut To Size
Your new guitar nut is probably not the exact correct size, so you need to sand it down into the right fit. To do this, get some sandpaper (800 or 1000 grit will do well) and fasten it down to a flat surface, so you can sand freely and evenly.
Sanding your nut down is going to be a delicate task. Make sure to only sand a little off at a time, regularly trying it out again on the guitar and seeing if it now fits.
This is because if you shave off too much, then it’ll be an even worse fit! And you’ll have to get a new nut. On top of this, make sure that your nut is shaved down evenly, not misshapen and sloped.
Step 6: Glue The Nut In
Now you want to secure the new nut into the guitar by putting 2 tiny dabs of glue across it. Try to use a soft glue rather than a permanent one. Leave it for 24 hours.
Step 7: Restring Your Guitar
First, use a pencil to color in the slots where the strings will go, so they won’t get caught during installation. Then take your strings, old or new, and put them into place, passing through the slots.
At the tuning posts, wind the tops of the strings around. Then go down to the bottom, at the bridge, fasten down the strings with the bridge pins. Tighten up at the tuning post, and the strings should become taut and tense.
Final Thoughts
There you go! You should now be able to remove your old guitar nut and put in a new one, allowing you to play your guitar again in no time. Be sure to follow these steps very carefully, so you don’t do any damage to your guitar.
References
- https://www.youtube.com/watch?v=Pi7LtmdOrFw