I bet everyone wants to make your home studio sounds more good and professional without having to spend a fortune.
In fact this is what I wanted when I started recording and I still use the techniques that I am going to share with you guys. (No, I am not an expert who knows all the ins and outs of this.. just sharing some tips that worked for me and I am sure that it will help you guys too).
Some the questions that comes too your mind are “Can I really make my studio come close to that a professional studio?” and “How can I achieve it?” Yes, you can come close and achieve it.
There is no exact or right method to achieving it as it depends on different criteria such as the room you are using to record in, the microphone, the tone you are trying to achieve, the instruments you are recording, etc. Here are some of the most actionable tips that can help you achieve a professional sound quality.
1.Room
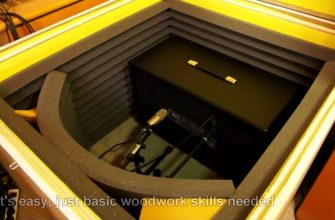
A room plays a very important role and contributes significantly to the sounds of the various instruments. If you are in a room where the walls are bare and reflective, then try moving out to some other place where there are more rough surfaces, maybe a place having some carpets, cushions, curtains, etc. to absorb some of the reverberant tone from your bare room.
On the other hand you can make some panels for insulation (a dense one) – thin and lightweight foams are not going to work at all.
You can also move some heavy bulky furniture in the room and other stuffs to break up the bare walls in your room. Put some curtains over the bare walls or maybe a book shelf with full of books which will help in reducing unwanted audio sounds such as echoes and nodes.
When you record try to move away as much as possible from a bare wall. The goal is to have the room work the best for you and not against you.
Note: A bedroom is a good example room as the mattress, blankets or a wardrobe with full of clothes are good sound absorbers. You can record inside a closet too, fill up the closet with clothes and the shelves with pillows or cushions if they are empty – picked up the trick somewhere but works like a charm.
2.Microphone and Pop Filters
Always have a pop filter, it will filter the unwanted popping sounds created by blasting and Splitting of airs (created by “P” and “T” sounds). I can guarantee you that it will improve your recording a lot and the best part is that it doesn’t cost a fortune (pop filters).
If you don’t have a good microphone then we have listed some of the best microphones for a home studio on my Resource page
Now, position the mic at the right position, placing the mic at a distance will make your recordings sound thin, hollow and bad. Again, placing the mic too close will make the sound more bassy due to the proximity effect.
When you move your head or gear around the mic, you will get different variants, signatures, etc. of your sound. So, the best way is to test various position and pick the one which gives you the best sound.
Recording vocals can be very tricky at some point but do the above things as I said and adjust your mic to get the best out of it. The distance will vary for different instruments, you have to figure it out yourself. Trial and error is the best teacher here.
You can also direct the back of the microphone on the direction from which you want to reject any of the unwanted sound as most of the mics are made to pick up sounds from the front.
Like if you have a PC on that direction when recording and given your PC makes some noise, it will be picked up by the microphone. A simple yet important adjustment you can do to improve your sound quality.
3.Preamps
Getting yourself a preamp would be one of the best investment you can make. When you record your guitar or other instruments by directly plugging into your audio interface, the sound produced will be a very transparent sound.
Also, the volume would not reach the level of great quality. So I highly suggest you get a preamp if you don’t have one. (I suggest you You buy this only if you have the budget cause its expensive and you can go about without it – Preamps– a cheap one but will do its job)
- CONVERTS PHONO SIGNALS: A turntable preamp that converts phono signals to Line Level Signals This state-of-the-art circuitry phono preamp can accommodate magnetic pickups with an input sensitivity of 3mV at 50K Ohms
- LOW NOISE OPERATION: Offers outstanding performance with it’s Low-Noise Audio Operational Amplifiers The output is 2V max (P-P) at 10K Ohms It’s better to position the preamp close to the source to reduce unwanted noise and interference
- CONNECTS TO TURNTABLES: Connect any turntable to modern sound equipment without specialized phono input for amplifying music For the receiver, this can be connected to speakers, computers, laptops and more
4.Headphones
Now, invest in a decent pair of closed-back headphones (completely enclosed ones). Why do I say headphones? Because you will be able to monitor and weed out if there are any unwanted extras recorded without your knowledge.
It will be of good use if you are recording in a noisy environment like I did. You can process your recordings with ease using these kinds of headphones as it will cover your ears from the surrounding noise.
Moreover, making adjustments will be a lot easier as you will be able to hear the subtle changes as you make any adjustments to your setup. I would suggest this headphone – my opinion.
- Dynamic, closed ear headphones.Weight w/o cable: 285 gram Ear coupling is circumaural
- Lightweight and comfortable, ergonomic design, Cord Length 3.3 9.8 feet Coiled
- Extended frequency response and warm, natural sound reproduction. Nominal impedance 64 ohm. Sound pressure level (SPL) 113 dB
By the way, check out my post on Headphone vs Monitors – gives you insight on how they are different from each other.
5. Editing Vocals
I see a lot of people go crazy and heavy when it comes to this part. My advice is that “Please don’t overdo it and go crazy with all the things trying to improve your vocals”.
I am not saying that having an experience with all the editing tools and plugins is bad – it’s a good thing. But when you use these things, it might kill the original nature and vibe of your vocals.
On the other hand play with some of these things and the tools. You can fill up the part where you need it the most, and most the software nowadays are easy to master, user-friendly… don’t require much time.
You can learn alot from Youtube videos and web forums. Other then the part where you can use it and make a difference, please refrain yourself from using it too much.
6.Warm Up
Last but not the least, Do a warm up session before you go into your main recording session. Get yourself comfortable to set into the right mood, relax yourself in a comfy place.
You could also do 2 or 3 takes as a warm up before your main take and going into details. I think you get what I am talking about. You should do your recording in a neutral and dry room (not too much dry as it will lead to a dead sound situation).
Now you can improve your recording with these techniques as I mentioned above. Try different adjustments and see what works the best for you and stick with it. I hope you could achieve in improving your studio sound and come close to that of a professional studio.
All of the information provided is based on my experience and other info that I looked up from various reliable sources.
Last update on 2021-05-11 / Affiliate links / Images from Amazon Product Advertising API