Ceilings can play a crucial role in how much noise you hear from the room above your workspace and how much of that noise ends up in your recordings. While soundproofing your ceiling won’t be the first thing that pops into your mind when it comes to soundproofing your home recording studio, there are several reasons why you should do it anyway.
Soundproofing a ceiling is worth every penny because not only does it minimize the structural noise that’s hard to remove from your recording, but it also ensures that you have a nice, quiet recording space for your studio session.
Soundproofing a ceiling requires planning because it’s not as simple as covering it with acoustic materials or foam tiles. There are several things you should consider first before undertaking such an extensive project. This article will guide you safely through ceiling soundproofing with a few insights from experts.

- How Does Noise Travel Through the Ceiling?
- Noise Transmission Through the Ceiling’s Structure
- Noise Transmission Through the Air
- The Cost of a DIY Ceiling Soundproofing Project
- Soundproofing Your Existing Ceiling
- What Room STC Rating Should I Aim For?
- Other Potential Sources of Noise
- Doors
- Adjacent Walls and Floors
- Fans
- Air Conditioning Units
- Electronic Equipment
- Windows
- Conclusion
- References
How Does Noise Travel Through the Ceiling?
Sound travels through many different paths, including through the air, through the ground, and through walls and ceilings. Ceilings are the second most significant barrier to sound after walls and significantly impact what you hear in your home studio![]()
![]() .
.
Sound travels at different speeds through different materials. But, as the physics of sound has taught us, sound travels fastest through solids and slowest through gasses. That’s because molecules in the structure of a solid surface, like your ceiling’s drywall, are packed closely together.
There are two main ways in which noise travels from the rooms above and into your recording space:
Noise Transmission Through the Ceiling’s Structure
Structural noise is one of the hardest types of noise to get rid of completely. When someone in the room above walks around, their feet knock on the floor above. The floor’s molecules then transmit that sound through the joists holding the ceiling in place, then your drywall, and then into your recording room.
Unfortunately, it’s not that simple to separate the floors and eliminate the noise once and for all. (As you will see later in the article, a lot more goes into room acoustics.) A “soundproof” ceiling material needs to be specially designed to reduce the amount of sound that travels through to the room below.
Noise Transmission Through the Air
Experts call this “airborne noise.” Quiet Mark’s co-founder Poppy Szkiler noted that most people tend to overlook noise because it’s invisible. On that note, airborne noise is easily eliminated when you know where it’s coming from.
The principle behind airborne noise is simple; noise travels through air molecules and seeps into your recording room through tiny cracks and openings and other points that fail to absorb it.
You can’t seal a room entirely from outside noise simply by adding a thick layer of insulation for soundproofing materials. Sound travels in different ways through different materials and can be blocked, reflected, and absorbed by other objects in your workspace. Ceilings are a great place to start when you want to soundproof a room, as they are an important barrier between rooms.
The Cost of a DIY Ceiling Soundproofing Project
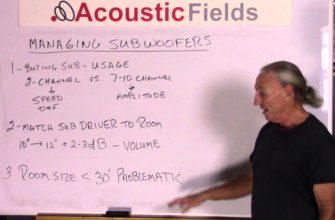
Generally speaking, there’s no fixed cost of a DIY ceiling soundproofing project. But, we can make a rough estimate by looking into the materials you need to acoustically treat a standard 16×16 ft (4.9×4.9 m) room.
First, you must determine how much disruption the noise brings to your work and if you have access to the noisy room above. If there isn’t much damage to your recordings’ quality, you may try simple and cheaper solutions like soundproofing the floor above with thick rugs and carpets. If you don’t have access to the floor above and live in an apartment with upstairs neighbors, don’t fret. There are several ways to resolve the issue.
That said, here are the approximate costs of soundproofing a 16×16 ft home recording studio’s ceiling based on the materials you may need to buy:
- Soundproof sealant (sometimes called acoustic caulk). Soundproof sealant is a jelly-like substance that can reduce noise by up to 15% by covering tiny cracks and openings in the ceiling. A can of high-grade acoustic caulk goes for as little as $20; you would need more for the entire room if you haven’t caulked it already.
- Fiberglass or mineral wool batt insulation. Fiberglass is made of microscopic strands of molten glass that bear acoustic properties. You may need approximately 4-5 bags of batt insulation for a 16x16ft (256 sq ft) room ceiling. Some bags may hold up to 16 pieces of insulation. A single pack of ROCKWOOL Safe n Sound® batt insulation goes for as little as $80.
- Acoustic foam. Acoustic foam does not soundproof a room
 but prevents unwanted airborne noise and structural noise from going through the ceiling. Acoustic foam is inexpensive, and you don’t have to cover the entire ceiling. You would need between 8-10 panels sold at about $3 per square foot.
 - Soundproofing drywall. Soundproofing drywall does a much better job of preventing noise from going through your ceiling than regular drywall. However, this comes at a hefty cost: soundproofing drywall costs $40 per sheet of soundproof drywall. This is a high price to pay for a small home recording studio in need of 8-10 sheets of soundproofing drywall.
If you plan on soundproofing your existing ceiling, you can expect to spend around $1,000 for the materials you need. This cost does not include labor for removing and replacing your ceiling, which can add $1,000 or more to the cost, depending on the size of your room.
If you plan on removing and replacing your ceiling, you can expect to spend around $5,000 for the materials you need. Should you need help from seasoned soundproofing experts, some companies will offer complete packages that include installation and materials. This can be a great option if you want a quick, professional solution.
Soundproofing Your Existing Ceiling
Soundproofing your ceiling is an essential step in reducing the noise that ends up in your recordings. However, we understand that if you’re renting or don’t want to commit to a renovation, soundproofing your existing ceiling may be your only option. This isn’t as easy as it sounds, and there are some things you need to know before moving forward with the project.
- The first thing you’ll want to do is assess the existing structure. After all, you may not need to add or remove much of the already existing ceiling. A quick assessment will let you know what needs to be done to soundproof the ceiling and will help you determine whether or not you need to replace the existing ceiling.
- However, if the ceiling is too noisy to soundproof effectively with the existing materials, you may want to consider taking it down and starting from scratch. In order to soundproof your existing ceiling, you will want to add some type of soundproofing material to the underside of the ceiling. This can include materials like fiberglass or silica sand, which are designed to reduce noise transmission.
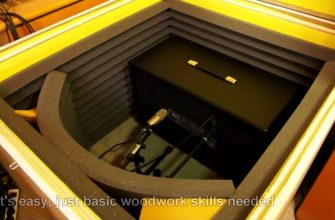
- If you have a suspended ceiling, you can remove the existing drywall and pack the ceiling full of soundproofing materials underneath. If you have a dropped ceiling, you will need to add more soundproofing drywall.
- Don’t be afraid to mix and match your soundproofing options depending on how much you have to invest in your ceiling soundproofing project. Combining your soundproofing options will give you much better results than just relying on one option.
For instance, you may remove the existing drywall and pack soundproofing foam into the ceiling. Next, install soundproofing drywall sheets. This combination will boost your room’s STC (sound transmission class) rating more significantly.
What Room STC Rating Should I Aim For?
Your room’s STC rating is a measurement of how soundproof the room is. The higher the STC rating, the better your room will be at blocking out unwanted noise.
The recommended STC rating for a room that’s being used as a recording studio should be between 50-60 or higher for every wall. An STC rating below 40 would let speech through the ceiling. At an STC rating of 50 and above, loud sounds can be heard, but faintly.
Read more about STC ratings and what they mean in this article: Understanding Sound Transmission Class (STC) Rating.
A high STC rating is an excellent way of keeping your neighbors happy and ensuring that you can get the best possible sound for your recordings.
Other Potential Sources of Noise
Quiet Mark’s podcast host Simon Gosling once said that nuisance noise doesn’t always come from external sources. That’s true since background hissing, humming, or other sounds that might interfere with your recording are not usually brought about by ceiling leaks. But, while the ceiling is definitely a key contributor to noise in your recording room, it’s not the only place to check.
Doors
Doors allow a considerable amount of noise into the recording room. What’s more, noise from slamming or creaking doors, especially in a room that can be heard from the recording space, can dramatically affect the sound of your audio. Luckily, there are a few ways you can prevent this from being a problem in your home studio.
Start by closing the door to the room with the door. Doing so will prevent outside sound from coming into your workspace. Or, invest in a soundproof door. If the walls and door of your studio are thin, you may want to consider getting a more soundproof door. Doors come in various soundproofing qualities, so you can choose one that will reduce noise the most in your particular situation.
Adjacent Walls and Floors
The walls and floors of your studio can also contribute to unwanted noise in your studio. Walls and floors that are heavily padded will help to block out sound, which can be helpful if you have a neighbor nearby.
Fans
Fans have a tendency to make a low-frequency noise that is similar to the hum of an idling car. Because of the low frequency of this noise, it can be extremely difficult to remove with basic sound editing software and even professional software. It’s best to avoid this noise altogether by putting fans out of earshot of your recording space.
Air Conditioning Units
If the AC unit is right next to your recording space or if you can’t turn it off due to the climate, you’ll have to find another solution. As with a fan’s hum, the AC unit’s low-frequency sound can be difficult to remove from the audio with standard sound editing software. Air conditioning units may also generate a loud-enough hum that will distract your recordings.
Electronic Equipment
If you have other devices causing noise in your recording space, like a computer or an old stereo, try to shut them off. You may be able to move them to another room where they won’t be heard in the recording. If the noise comes from a device you can’t turn off, try covering it up with a blanket.
Windows
If you’re recording in an apartment or other type of residential building, you may hear sounds coming through the windows. You can try to reduce the amount of sound that comes through by closing the windows and closing the drapes.
You can also consider using soundproof curtains to help keep sound from getting in if you have windows in your studio. Last but not least, noisy appliances, like a fridge within earshot of your recording space, should be turned off or moved to a different room.
Soundproofing your entire workspace may be a bit of a challenge, but it’s an essential part of creating a recording environment that you can control.
Conclusion
Soundproofing your ceiling is a great way of reducing noise in your studio, but it’s also an expensive and time-consuming project. If you plan on soundproofing your ceiling, you will want to consider the best materials for the job and may want to hire a professional to help you avoid costly mistakes. This will ensure you’ve got the job done right so you can make the most of your studio space.
References
- https://www.schoolnet.org.za/PILAfrica/en/webs/19537/physics4.html
- https://www.quietmark.com/
- https://soundproofguide.com/cost-of-soundproofing-a-ceiling/
- https://www.thespruce.com/soundproof-a-room-with-caulk-1822845
- https://www.angi.com/articles/how-much-does-soundproofing-cost.htm
- https://www.acousticalsurfaces.com/blog/acoustics-education/sound-transmission-class-stc-rating/