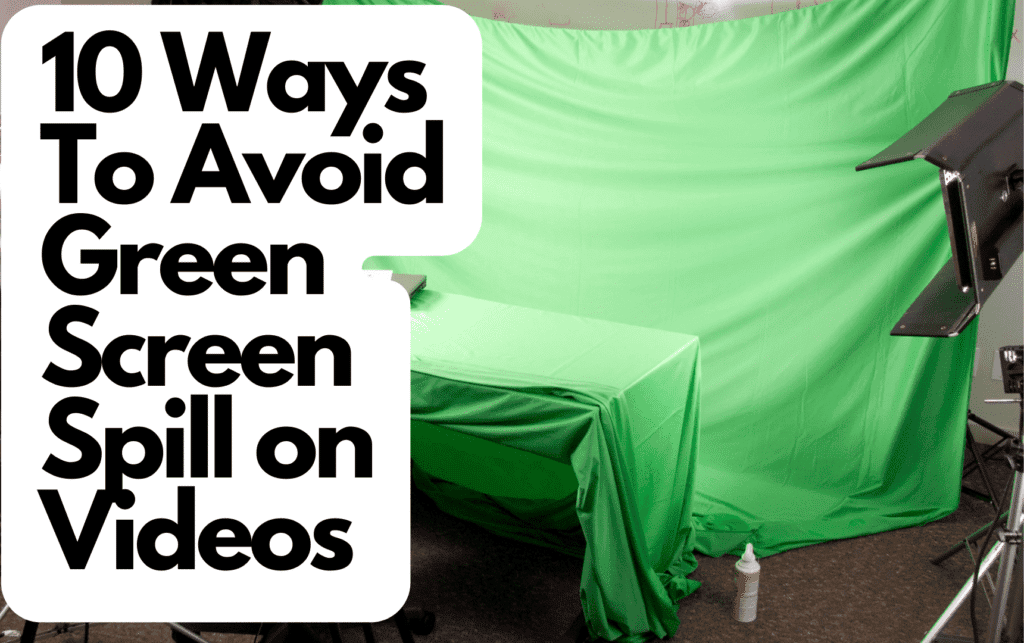
The unwanted appearance of a key color within an opaque foreground subject is considered a spill. A green screen spill occurs when the green color from the green screen spills onto the photo or video. Any object affected by the green screen bounce looks like it’s surrounded by a green halo, which is undesired.
Here are ten ways to avoid green screen spill on videos:
- Use proper lighting techniques.
- Lock the bias controls together.
- Change the way the keylight handles pixels on video.
- Use a soft color replace method.
- Use the Spill Suppressor Effect within After Effects.
- Use the curves effect.
- Use Adobe Premiere Pro.
- Use Adobe After Effects.
- Optimize screen and floor size.
- Use the Blender 3D Software.
If you’ve been struggling with green screen spills in your videos, you’ve arrived at the right place. In this article, I’ll discuss the ten ways how you can avoid green screen spill in your videos.
- 1. Use Proper Lighting Techniques
- 2. Lock the Bias Controls Together
- Despill Bias
- Alpha Bias
- 3. Change the Way the Keylight Handles Pixels on Video
- 4. Use Soft Color Replace Method
- 5. Use the Spill Suppressor Effect Within After Effects
- 6. Use the Curves Effect
- 7. Use Adobe Premiere Pro
- 8. Use Adobe After Effects
- 9. Optimize Screen and Floor Size
- 10. Use the Blender 3D Software
- Video Lights To Help Avoid Green Screen Spill
- Neewer 2-Pack Dimmable 5600K USB LED Video Light
- GVM RGB LED Video Light
- Sutefoto P80 Studio Led Video Light
- FOSITAN FL-3060 Video Lighting
- Sources
1. Use Proper Lighting Techniques
Most of the green spills happen due to improper lighting conditions in your studio![]() . Almost always, a clean video can be obtained without any green spills if the shoot is done behind a green screen under natural light.
. Almost always, a clean video can be obtained without any green spills if the shoot is done behind a green screen under natural light.
Resolving the green spill problem requires a proper and elaborate understanding of the lighting techniques. You could always consider hiring a VFX supervisor or marker to assist in camera movement to consistently capture adequate lighting. Experts also help avoid green spills by correctly moving and placing the camera in a position that doesn’t disturb the lighting and aggravate the green spill.
Of course, if you’d rather do things yourself, here are a few tips to keep in mind:
- Ensure the light is neither too dim nor too bright.
- Use a light meter to measure the amount of light on the screen and verify that the readings match the iris of the camera lens.
- Try using tungsten lamps because they help to distribute light on a green screen from both sides evenly.
- Use spiked green tubes to light green screens effectively.
- Increase the distance between subject and screen so that the light from the green screen doesn’t fall on the subject.
- Use floppy flags placed outside the frame on either side of the screen.
- Avoid creating more susceptible dark areas on subjects by using excessive lighting.
An excessive use of backlighting is one of the easier and more effective ways to avoid green screen spill. Check out my suggestions for which video lights to purchase at the end of this article.
2. Lock the Bias Controls Together
In Keylight, one of the best ways to get the desired result is by locking the Bias Controls together. The Controls include Despill Bias and Alpha Bias. There’s an option where you can lock both. Doing this ensures a good color key is achieved.
Despill Bias
Let’s say you have an image where the green color is persistent in the background, or some of it has spilled over onto your image. To remove it, simply select a natural skin tone from the image and apply it where you want the green to be removed.
Alpha Bias
Usually, the Despill Bias and Alpha Bias are linked together. There’s no need to change the Alpha Bias. However, on some occasions, when it’s more about the tone of the background compared to the foreground, this option can be used to fix the issue. But before you can do that, you need to uncheck the ‘Lock Bias Together’ option.
3. Change the Way the Keylight Handles Pixels on Video
Keylight is an excellent tool for video correction and post-production. Apart from Bias Controls, another way to remove green spills is by changing the way you handle pixels.
Keylight has a method that intelligently blends the pixels that are similar to the screen color. This is known as the replace method. Although, it may be a tricky color replacement or a soft color replacement.
You can also stick to the source method, where the original screen color will be what the pixels try to match. It can be added and removed whenever the alpha is altered. You can also switch your view to see which pixels Keylight is modifying.
4. Use Soft Color Replace Method
The soft color replacement method is crucial because it’s an efficient way to remove the green spill. Here, Keylight modulates the pixel’s luminance to match the original by adding the required amount of color into the image.
This is unlike the hard color replacement method, where the alpha channel is increased to add the required amount of replacement color in the image.
5. Use the Spill Suppressor Effect Within After Effects
The after-effects option is an integral part of every video creator software. In Keylight, Spill Suppressor can suppress a color by a required amount which doesn’t cause any further color issues.
Here’s how to use it:
- Select a screen color that matches the Keylight setting.
- Select ‘Spill suppressor’ from the keying menu.
- To use it effectively, remove the replace method and put back the source method.
- Click the ‘color to suppress’ eyedropper in the spill suppressor effect.
- Select the screen color to match your Keylight setting.
The Spill Suppressor works on specific parameters, as follows:
- Ultra Key. Helps you set specific default values which can be adjusted. It can be used to get rid of the background, but some green tinge can be seen in the footage. Thus, the Ultra Key is deemed effective in only extreme cases.
- Desaturate parameter. Desaturates the pixels that are close to being transparent.
- Range parameter. Controls the amount of spill to be corrected.
- Spill Parameter. Adjusts the amount of color that the spill is to be replaced with.
- Luma Parameter. Works with the alpha channel to restore the original luminance of the source.
6. Use the Curves Effect
If you’ve shot in an overall green foreground, you can use the curves effect in after effects to select a more natural color. It’s available in the color correction menu. This can be done by setting the color drop-down box as green, then changing the curves required to change the color cast.
7. Use Adobe Premiere Pro
Adobe premiere pro has been appreciated for its clear and flexible interface with many organizational tools and responsive speed. It’s believed to be a robust tool in green spill removal among other video production apps with multiple camera angles.
You can remove green spills by using the 3-way color corrector technique. Simply use the color wheel interface in the color correction folder by adjusting the three parameters: shadow parameter, mid-tone parameter, and highlight parameters.
Here’s an excellent tutorial on how to master the 3-way color corrector on Premiere Pro:
8. Use Adobe After Effects
Adobe After Effects is yet another great and effective tool to remove green spills. It’s one of the best tools in the market for spill suppressors.
To hide the shadows and remove the green spill, you can use different effects. Type the effect in the channel, and the apply button will include the channel mixer. This means multiple effects can be applied at once.
To remove the color effect, start by selecting a scale of color you want to use. The scale ranges from 1-50. Once you’ve found a good color, use layers to remove objects in the image.
You can also reduce the negative effects of color cast by using the “Keylight + Key Cleaner + Advanced Spill Suppressor” preset. Increasing the Alpha Contrast in the “Key Cleaner” plugin and enabling the “Advanced Spill Suppressor” should remove all but the most severe color cast.
To learn more about removing green spills, check out the following video:
9. Optimize Screen and Floor Size
Sometimes, the most complicated issues can be solved with simple adjustments. Green spill on videos is one such issue that can often be solved by adjusting the lighting condition or the room arrangement.
In this case, directly reduce the green screen and floor size by placing a small floor and small screen where the person stands. Less surface area leads to less reflection on the person being photographed.
10. Use the Blender 3D Software
If you’re not comfortable with either Adobe software, it’s possible to use the blender 3D software to reduce green spill. The Blender 3D software helps to quickly change the things around the screen, i.e., the screen and floor size in the picture and its effect on the green spill in real-world lighting.
When the image is clicked on, the spills, if any, become noticeable. In the extracted image, you’ll notice the pixels are precisely the same color as the non-extracted image. The ‘Greenspring’ option will try to neutralize the green spill, which is effective in many situations. Keep in mind, the spill settings can be changed at any time.
One of the most significant advantages of the Blender 3D software is it can be used to fix your settings in the real world. In a way, this can be considered a pre-production tool that removes the headache of applying post-production effects.
To learn more about the Blender 3D software, watch this beginner’s tutorial video:
Video Lights To Help Avoid Green Screen Spill
Creating an excessive use of backlighting is one of the more fundamental ways to avoid green screen spill in the first place. Here are some excellent options for video lights (all available on Amazon.com) for you to consider:
Neewer 2-Pack Dimmable 5600K USB LED Video Light
These Neewar Dimmable LED video lights are perfect for video. They have an adjustable brightness ranging from 10% to 100%. This means soft and even lighting on video calls and fewer spills from green or blue screens.
The lights are USB powered, but a USB wall charger should be used instead of a laptop or power bank. The other items included in the pack are colored filters, an extendable tripod, extension rods, and a USB cable.
-
PACKAGE INCLUDES: (2)USB LED Light Panel with USB Cable, (2)Mini Tripod Stand, (2)Extension Rod…
-
MULTIPLE-USE LED LIGHTING SET: The small LED panel light (5.51×3.714 inches/14×9.5 centimeters)…
-
OPTIONAL SHOOTING EFFECT: Comes with 4 color filters (white, red, yellow and blue), they can…
Last update on 2025-05-23 / Affiliate links / Images from Amazon Product Advertising API
GVM RGB LED Video Light
The GVM RGB video light has a simulating option where you can use eight kinds of scene lights. So it doesn’t matter if you’re shooting in strong or weak light, it’ll adjust accordingly.
In addition, there are two different modes. In the first one, the color temperature can be adjusted between 3200K and 5600K, and the second allows for an adjustment of the hue output and color saturation from 0% to 100%.
This light can also be controlled via a mobile app, making it extremely useful in different settings. It has 168 LED Beads and 84 RGB beads and has adopted the American Chip. This means the light is sturdy and has enough power to last a long time.
- Update Simulate Scene Modes:The video light simulate 8 kinds of the scene lights. It enrich your…
- Two output ways: The first mode is where the color temperature is between 3200K and 5600K. The…
- App Intelligent Control System: the video light Equipped with Mobile App control function, download…
Last update on 2025-05-23 / Affiliate links / Images from Amazon Product Advertising API
Sutefoto P80 Studio Led Video Light
The Sutefoto P80 video light is a high-power 80W LED light that provides high brightness with built-in five pre-programmed light effects. It’s excellent for video recording, photography, and filmmaking.
It can also be controlled via a remote control that supports a 2.4G wireless radio remote with a control range of ≥50m.
Last update on 2025-05-23 / Affiliate links / Images from Amazon Product Advertising API
FOSITAN FL-3060 Video Lighting
The Fositan FL-3060 is super lightweight, making it perfect for travel filmmakers. The super bright LED provides the equivalent of a 400W incandescent light while only consuming 40W of power, and it’s ideal for outdoor use.
The panel can be used alone or with the flexible light, which bends 360° for complete control of the light’s direction. It also comes with a 25% diffusion panel for additional diffusion. The aluminum frame is attached using clips, and each side has a mount to allow for use on either a tripod or a light stand.
Though one of the more expensive options, this light isn’t lacking in features. You get an LED mat (weighing just 1lb or .45kg), a remote control, a white cloth diffuser, a connecting frame tube, and a power adapter. Not to mention, it’s a great option for photography, as well!
- 🌲[Smaller & Lighter] LED mat net weight only 1lb, Shipping weight only 3lb, it’s a must have for…
- 🌲[Powerful output] Featured in 384pcs super bright SMD LED, deliverys maximum 8000LM, equivalent…
- 🌲[Accurate Color] 5000K color temperature stepless dimmable, CRI 90+;
Last update on 2025-05-23 / Affiliate links / Images from Amazon Product Advertising API
Sources
- Videomaker: Fixing Unwanted Green and Spill for Green Screen
- Neil Oseman: 5 Tips for Lighting a Green Screen

