Lighting a green screen is a fairly straightforward process. However, things can get a bit dicey in a small room, leading to some mistakes that will ruin your production. How can you get it right?
Proper green screen lighting in a small room is mostly about getting the right mood and contrast. You can achieve this by maximizing the space and balancing out the shadows and light. Consistency and evenness are two main factors to watch out for during the setup process.
Below are some of the top tips to help you get proper light in any small green screen room.

- Maximize the Space
- Get Dimmable Bulbs
- Use Big and Soft Light
- Place Your Lights Strategically
- Use the Same Lights
- Consider Going With a Digital Screen
- Light the Actor or Subject First
- Use Your Camera
- Check for Exposure on the Camera Monitor
- Adjust the Aperture if Necessary
- Reduce Digital Noise by Lowering ISO
- Conclusion
- Sources
Maximize the Space
Proper lighting starts with making good use of the space you’ve got. Your green screen shouldn’t be too close to the wall, and the actor shouldn’t be directly in front of the wall. Both scenarios will give you a flat appearance, and the actor will get in the way of light meant for the green screen.
Your green screen light should ideally be 3+ feet away from the wall to avoid creating a spotlight effect. You should also position your actor 3 feet in front of the lights so the light won’t mostly be on them. Your camera should then be around 6 feet in front of your actor. However, this is dependent on the scope of your wide-angle lens.
If you don’t have enough space for these dimensions, try to maintain the distance ratio between the lights, wall, and camera as closely as possible.
Get Dimmable Bulbs
Lights dedicated to lighting the background are important for this process. However, you need to exercise caution to avoid using too much light on the green screen. Directing too much light will cause a bounce off the sheet and onto the actor in the foreground.
When this happens, your shots will appear to have a bright green light from behind, giving an unnatural look. The problem won’t be very pronounced for static shots, but it will become more visible with more motion in the video.
Moving the actors, lights, and cameras further away is usually the best solution to go with, but for a green screen in a small space, this is not always an option. This is where dimmable bulbs come in handy. Instead of moving things around, you can dim the lights a bit until you have the right levels.
Use Big and Soft Light
Pointing hard light sources—such as tungsten without diffusion—at the green screen will lead to poor quality results. Such lights tend to have a hot spot, and you’ll find some gradient surrounding it. This will give you an uneven light to shoot with. If you only have a strong light to point at the screen, you should use a large 8×8 frame with a silk sheet for diffusion. This way, you can be sure your light is as soft and even as it should be.
Place Your Lights Strategically
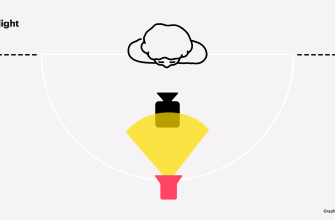
In many cases, you only really need two strategically placed lights to illuminate the green screen in a small room. For the best results, place each of the light sources (set for diffusion) on both sides of the green screen. Place them a few feet back, at an angle of 45 degrees.
This setup should give you a decent result. Make sure the two light sources are not overlapping too much down the center. You’ll end up with a hotspot if both lights are spilling into each other. So, adjust the angle of each light where necessary to make everything as even as possible.
If you want a dramatic look on your actor, consider lighting them from the side. If you’re going for even flat light, you can achieve it using two more flood lights on the talent’s face.
Use the Same Lights
Whatever lighting hardware you choose for your green screen room, you need to get as many of them as you need. Don’t mix and match. This is especially true for the lights on the two sides of the screen. Using different lights from different manufacturers can make it harder to achieve consistency (if not impossible).
When you use two different lights, you’ll have to worry about exposure or color temperature![]()
![]() issues—two headaches that will take a lot of time to rectify in post-production.
issues—two headaches that will take a lot of time to rectify in post-production.
Consider Going With a Digital Screen
Chroma green screen is popular in most productions, but the density means that it is generally less reflective. This is why getting the lighting right can be a bit difficult. The digital green screen is on the opposite end of the spectrum. It is highly reflective, which means that you need a bit less light. This is why digital green screens are easier to work with. Try digital with your existing light setup and compare the results.
Light the Actor or Subject First
Sometimes fixating on getting the green screen lighting perfect first can be problematic. Once you’ve achieved that, your setup can be thrown off when it is time to light the actor. You’ll find the lighting needing further tweaks to achieve a balance.
To ensure the scene isn’t too bright to contaminate the actor’s skin, it’s a good idea to light the talent first and then shift focus to your background green screen. This is especially true when you’re using the highly reflective digital background green screen. With this approach, you can be ready to shoot as soon as you’ve sorted the lighting for the background.
Use Your Camera
The cameras in the market today are very light-sensitive and more powerful than ever. So, if you have one of these, you should allow it to guide your lighting. The best ones don’t require as much lighting for you to effectively pull off an effective green screen, especially compared to cameras from a decade ago.
Learning the capabilities and limitations of your camera can go a long way to help you achieve the perfect lighting in that small room. In some cases, increasing light sensitivity and raising ISO can drastically cut down your lighting needs. You should experiment as much as necessary to figure out just how much light your camera needs to pull off the perfect result. Here are a few things you can do here:
Check for Exposure on the Camera Monitor
The exposure is how much light your camera is taking in and the brightness of the picture. With a green screen, you should ensure the brightness is a little weaker than what you’d have for other videos. Otherwise, you may end up capturing colors that aren’t green. Waveform monitors do a better job here than standard camera monitors.
Alternatively, you can work with mobile apps like Green Screener or Cine Meter. They can help you check exposure and lighting evenness.
Adjust the Aperture if Necessary
The aperture is the part of the camera lens in charge of drawing light into the camera. Widen it if your green screen is too dark or underexposed, or narrow if the screen is too bright.
Reduce Digital Noise by Lowering ISO
Digital noise refers to random color specks that can appear in your shots. The ISO setting can brighten or darken a picture, so higher ISOs may lead to more noise, making the green screen color isolation a lot harder. Don’t lower it too much to avoid underexposure.
Conclusion
When lighting a green screen in a small room, your focus should be on ensuring that all the backdrop areas that appear in the frame are correctly exposed and evenly lit. You can achieve this by using the right lighting hardware and positioning them correctly in the room.
A backdrop underexposed on one side and lit properly on the other side often equates to too much work for the editor or compositor when pulling the chroma key. This will also be the case if the backdrop is over or underexposed. If the backdrop isn’t showing as green on camera, pulling a key from it won’t work.
For more information, check out this article about the best fabrics for photo backdrops.![]()
![]()
Sources
- Wiki How: How to Light a Green Screen
- Premium Beat: The Basic Fundamentals of Lighting a Green Screen
- Lite Panels: 5 Tips for Lighting a Green Screen
- 7 Simple Tips For An Amazing DIY Green Screen