It isn’t always necessary to go out and buy the most expensive equipment when wanting to shoot a project. Sometimes, without realizing it, you have everything you need right in front of you — or at least spread out around your house. Studio lights are expensive, so if you don’t have the budget, there are alternatives, fortunately.
Here are 7 effective DIY alternatives to studio lights:
- Natural lighting
- DIY reflectors
- Table lamps
- Fairy lights
- DIY diffusers
- External flash
- DIY softbox
Let’s move a bit deeper into each of these DIY alternatives to studio lights. Some are entirely free, others will take a bit of time and effort on your part, and others will cost a bit of money but not as much as studio lights would.

1. Natural Lighting
You may think this alternative of using natural lighting instead of studio lights is only for influencers or Insta-savvy teens. However, this isn’t the case.
You can produce beautiful, natural-looking photos by using the sun as your light source. All you need to do is place your subject in front of a big window that allows in a lot of light. Or, you can take your subject into nature and use the direct sun to light up your subject.
When using natural light, always face your subject towards it. If you take a photograph of the subject with the natural lightning behind it, your subject will be dark.
If you’re outside, the perfect time to use the light from the sun is either at sunrise or sunset because it’s soft, whereas the sun may be too direct or sharp during other hours of the day, leaving your subject blotched with shadows or overexposed.
A few benefits of using natural light are:
- It’s free.
- It’ll provide light on your whole subject.
- It’s easy to find and use regardless of your photography skill level.
Natural lighting offers variety. Although “Golden Hour” offers beautiful, soft lighting, you may desire a gloomier picture. You can create this look by shooting your subject when it’s overcast or starting to get dark in the evenings.
However, a few downsides to natural lighting are:
- It’s unpredictable and inconsistent.
- You can’t use it whenever you desire, as the weather may prevent good lighting.
- You can’t use it at night.
- You’re constantly pressured for time because you can’t pause the sun from rising or setting when you’ve got the lighting you like.
If you plan to do a shoot that’ll take a few hours, natural lighting isn’t always going to be easy for you, as the light changes as the day clocks on.
Typically you’d want consistency throughout your photoshoot for lighting, and you won’t achieve this by using natural lighting.
2. DIY Reflectors
A reflector in photography doesn’t provide light, as studio lights do. However, it’s used with light sources to direct the light to go where you want it.
Reflectors can redirect light so that it can light up a poorly lit subject. The reflectors amplify the light. They can also diffuse direct light, lighting up the subject more evenly without it looking overexposed.
Reflectors can also create special effects to the photograph as you can play with the light, make it go exactly where you want it, and bring about more creativity than a standard untouched light source would.
These light sources include the sun, as previously mentioned, and many other household light sources such as table lamps, flashlights, and even fairy lights. You can also use reflectors with external flashes and professional LED lights.![]()
![]()
Whether you’re a professional or beginner photographer, you can use DIY reflectors.
Cardboard and styrofoam are a few items you can use as part of your DIY reflectors. Whether you use cardboard or styrofoam, glue crinkled aluminum foil to one side — the crinkles in the foil will diffuse the light, allowing the light to spread evenly on your subject.
Use the aluminum side of the cardboard to reflect the light. Otherwise, you can use your car’s silver windshield protector. It’ll do the same trick.
3. Table Lamps
If you need to get creative with your shots and need a little bit of light, a lamp, preferably a table lamp, will do the trick.
Although table lamps are great to use in photography, many people forget about them because they fall part of their bedtime routine and nothing else. Start locating yours because they’re very useful in photography.
Not only does a table lamp provide a light source to illuminate your subject, but the lamp cover acts as a diffuser that creates a softer, romantic light.
Table lamps are easy to move, especially if they’re battery-powered, giving you freedom with your location within your house or studio. Different table lamps vary in size. If you require a more considerable amount of light, find a larger table lamp. You can also place them on top of books or chairs to create added height, if necessary.
If you’re shooting a model, you can ask them to hold the lamp at the desired height, or you can ask them to slowly move it around themself while you take photos, creating different effects or allowing you to find the perfect lighting spot.
You can even put your subject (if it’s small and lightweight) on a transparent glass tile on top of the table lamp in order to get a fun and creative shot with the light coming from underneath the subject.
Find the right light by using different table lamps around the house. Some bulbs are brighter or warmer than other bulbs. You could also use more than one table lamp simultaneously to brighten your subject and eliminate as many shadows as possible.
I recommend the LIFX Light Bulb (available on Amazon.com), a smart bulb that fits most table lamps’ bulb holders. You can control the brightness, the warmth, and the color of the bulb. Also, you can change the settings on the app on your phone or through voice commands, making it brilliant for light variety in photography.
- Why Wi-Fi: Control from anywhere. No bridge or hub required. (Use 2.4GHz). Does not support dimmer…
- Full color: 550 billion possible color steps. RGBW LEDs for richer colors and huge 1500-9000K white…
- 800 lumens: Bright! But also dimmable via voice or app.
Last update on 2023-12-08 / Affiliate links / Images from Amazon Product Advertising API
4. Fairy Lights
Fairy lights are versatile and can make your photos stand out. You can use fairy lights to light up dark settings or use them with other light sources, such as your table lamp.
These little lights are cheap to buy, easy to carry from one studio or location to the next, and lightweight. You can place them around your subject, in the background or foreground of your subject, or you can place them on your subject, depending on the vision you have in mind.
Another great thing about fairy lights is that they’re available in different colors. They come in cool tones, warm tones, and in changing colors. You can purchase the color that best suits your theme or pull out those old fairy lights that you packed away from Christmas for your next shoot.
I recommend these color-changing Minetom Fairy Lights (available on Amazon.com). They’re USB-powered, allowing you to plug them into a power bank or your computer. These lights are waterproof and come with a remote, allowing you to change the color or brightness from a distance.
- 7 Single Colors & Multicolor: 33ft length 100 LED fairy string lights can change into 7 different…
- Twinkle Fairy Lights with Remote: The remote effective range can reach 16 ft. You can use the remote…
- USB Powered: USB plug is suitable for power bank, car charging, adapters, notebook computers, USB…
Last update on 2023-12-08 / Affiliate links / Images from Amazon Product Advertising API
5. DIY Diffusers
A diffuser is a material that goes between the flash and the subject. It softens the harsh light if that’s what the photographer desires for the shot. The material must be semitranslucent, allowing the light to go through it and scattering it to soften it.
If you have a flashlight that’s too bright and therefore overexposes your subject, you’ll need a diffuser. Thankfully, there are many ways to DIY a diffuser right in the comfort of your own home.
Whether you have a bright flashlight or a flash, you can use any translucent lid. You’re most likely to find one of these in your Tupperware drawer. Place the translucent lid in front of your light source and watch as it softens the light, allowing you to take much better photographs.
If you don’t have any translucent lids, you can use your see-through shower curtain. You can cut out a piece and attach it to the front of your flashlight or flash. If you don’t want to involve the scissors, you can hang the clear shower curtain between your light source and your subject, and it’ll have the same results.
You can use these DIY diffusers on many things found at home, such as flashlights, head torches, and even your cellphone’s flashlight.
6. External Flash
External flashes or camera-mounted portable flashes, known as “Speedlight” by Nikon but “Speedlite” by Canon, are battery-powered flashes that can provide high bursts of light when mounted onto your camera or unmounted. External flashes work well for still and action photography.
These high bursts of light are typically brighter than LED lights. They’re useful in adding light to conditions that don’t have enough light to illuminate your subject nicely or correct bad lighting. You can also adjust the flash’s settings.
With external flashes, you can zoom the light and adjust its intensity. They often come with diffusion panels to create softer light on your subject. These are features that your built-in camera flash doesn’t have.
If your newer camera doesn’t have a built-in flash on top of its body, or you need a little more light than your built-in flash provides, I recommend the Neewer Flash Speedlite (available on Amazon.com). This external flash is compatible with Nikon, Canon, and most other camera brands and offers both vertical and horizontal rotation.
- Vertical Rotation Angle: 0~90 degrees, Horizontal Rotation Angle: 0~270 degrees; Note: Don’t support…
- Compatible with for Canon Nikon Panasonic Olympus Pentax Fijifilm and Sony with Mi Hot Shoe…
- Power Management: Switch to the ON, the flash will start charging (the charging indicator is dim)
Last update on 2023-12-07 / Affiliate links / Images from Amazon Product Advertising API
An external flash is easy to use, lightweight, compact, can be used in or out of the studio, easy to transport, and you don’t have to worry about cables getting in the way.
You can mount it to your camera’s hot shoe mount, located on the top of your camera, turn it on, and shoot. It’s that easy to use. You can be mobile and follow your subject around without lugging big studio lights around with you.
External lights are about 3-4 times more powerful than your camera’s flash, allowing you to use lower ISO settings and have better quality photos without worrying if it looks grainy. It also gives you the freedom to move further away from your subject, bringing more background into your shot.
Because you can use an external flash off of your camera, you can place it wherever you want it. It can be close to your subject or further away, allowing you to manipulate light and shadows. You can pair your external flash with your camera if your camera has this feature, or you’ll need a remote trigger to set off the flash when you take a photo.
If you have a softbox, you can mount your external flash onto the bracket of the softbox and use it with one of those.
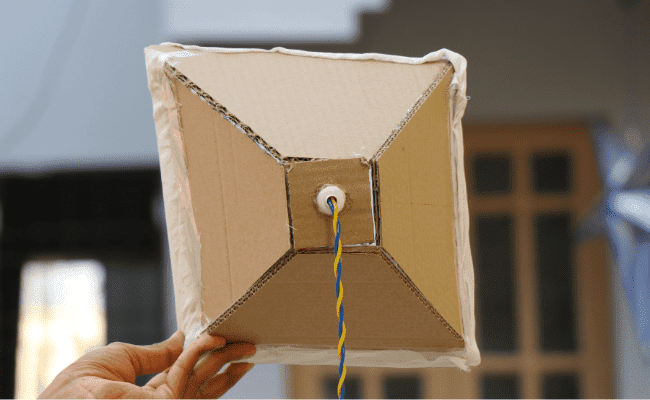
7. DIY Softbox
Talking about softboxes, you can DIY one yourself and save a lot of money! Most professional studios have softboxes that make up their studio light ![]()
![]() kit.
kit.
Softboxes make your light source bigger. They provide a large coverage area, yet they soften the light. This is why external flashes work so well with them. You can use softboxes for most types of photography, including food, portrait, fashion, and product photography.
Because softboxes are so important to you as a photographer, I’m going to walk you through the easy process of how to DIY one to save you money and space. Although this is a DIY project, it won’t take much of your time or effect, and it doesn’t require many materials.
All you’ll need is a big cardboard box, a white sheet, and a light source.
Here are the steps to make your DIY softbox:
- Place your light source (a table lamp or flashlight will do) into the cardboard box.
- Cover the cardboard box with a white sheet. If you want to adjust the brightness of the light, you can cover the box with another white sheet (or double it over if you have enough material), or you can line the inside of the cardboard box with aluminum foil.
- Face the cardboard box with the light source towards your subject and start snapping away!
Sources
- MasterClass: Photography 101: What Is Natural Light? Learn About Natural Light in Photography and 4 Tips for Using Natural Light in Your Photography
- Digitalrev: 7 Reasons Why Every Photographer Needs a Speedlight
- Lighting Rumours: Guest post: A photographer’s guide to the best budget lighting alternatives
- SLR Lounge: Diffuser Definition
- Shaw Academy: How to Use a Reflector in Photography
- YouTube: How to Make Pro Photography Lights at Home – DIY Tutorial


