If you need to soundproof a room, there’s no more accessible option than green glue. Green glue is an acoustic caulking agent that you can apply anywhere and everywhere. Typically you would apply green glue between two pieces of drywall or in window crevices.
Using green glue is a simple process involving four steps. Decide whether you want to use the glue on its own or in conjunction with other soundproofing methods. Then, prep your drywall and your caulking gun. Apply the green glue liberally, then let everything dry for at least one day.
Alright, so let’s get into the steps for soundproofing with green glue!
 1")
- 1. Decide How You Want to Use the Green Glue
- Using Green Glue in Conjunction With Other Soundproofing Agents
- Using Green Glue Alone
- 2. Prepare Your Drywall and Gun for Application
- 3. Applying the Green Glue
- Applying the Green Glue Only in Gaps
- Applying a Layer of Green Glue
- The Application Process
- 4. The Final Step – Let the Green Glue Dry
- Conclusion
- References
1. Decide How You Want to Use the Green Glue
This is a big decision when starting out with green glue because it can be used in multiple ways. You can use it to completely soundproof a room![]()
![]() , though it should be noted that while green glue is a sound dampener, it won’t entirely prevent sound from entering your room. You can also use green glue with other soundproofing agents to make the space even more soundproof.
, though it should be noted that while green glue is a sound dampener, it won’t entirely prevent sound from entering your room. You can also use green glue with other soundproofing agents to make the space even more soundproof.
If you choose to use green glue with other sound-dampening agents, you’ll need significantly less than if you use green glue alone to soundproof your space. The good news is that green glue is inexpensive, especially compared to many other soundproofing agents.
You have two options when purchasing green glue. You can either purchase in tubes or you can purchase by the bucket. Both have their own advantages.
If you purchase a bucket, you can get five gallons of green glue for about $400. While this may sound a bit expensive upfront, remember that five gallons of this stuff goes a long way!
Using Green Glue in Conjunction With Other Soundproofing Agents
Combining green glue with other sound-dampening agents is pretty common. This is partly because while green glue is relatively inexpensive and easy to apply, it also doesn’t give the best presentation.
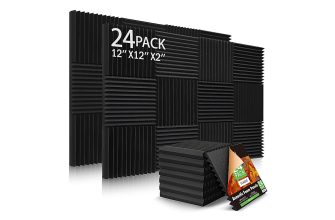
Green glue is often combined with acoustic panels that are glued to the wall![]()
![]() or mass-loaded vinyl. It isn’t usually combined with soundproofing agents that work the same way inside the walls. Otherwise, you may not get the intended result.
or mass-loaded vinyl. It isn’t usually combined with soundproofing agents that work the same way inside the walls. Otherwise, you may not get the intended result.
If you’re using green glue in conjunction with some other sound dampeners, you’ll do it one of two ways. Either you’ll only use green glue to fill in the gaps in the room, or place it between the sheets of drywall and then add other sound dampeners on top of the wall.
Many people use green glue in this way because they aren’t wholly taking apart their room or building from scratch. It’s challenging to utilize green glue as your only soundproofing agent with either remodeling or starting from scratch because of how it gets applied. We’ll get into that in a later section of the article.
Using Green Glue Alone
Green glue can make a great soundproofing agent on its own. When used over the entire room, it must be placed between two pieces of drywall. You’ll do this with a caulking gun.
It should be noted that if you’re using green glue alone, depending on how much sound dampening you’re expecting and the room size, you should expect to use at least five gallons of the glue. The more glue you apply, the better sound dampening you’ll experience.
You’ll also need to purchase a separate large caulking gun if you’re using five-gallon containers of green glue. There are many options, but one of my favorites is this AWF PRO Caulking Gun (available on Amazon.com), which holds about 29 ounces of green glue at one time.
- DRIPLESS & NO MESS DESIGN: Equipped with an on/off switch to prevent drips and waste, ensuring a…
- HIGH-POWER 18:1 THRUST RATIO: Designed for efficient dispensing, the 18:1 thrust ratio delivers…
- EFFORTLESS CONTROL: Allows seamless caulking and sealing around corners, curves, and tight spaces…
Last update on 2025-04-28 / Affiliate links / Images from Amazon Product Advertising API
If you use green glue alone, you can expect moderate sound dampening. It won’t absorb everything, but you will experience significantly less sound than you would without the green glue.
This is because green glue essentially traps the soundwaves as they pass through the wall. When the sound waves go through the first part of the drywall, they hit the layer of green glue. The soundwaves, which generally change direction at this point, cannot do so and become trapped within the wall. Over time, they are converted into heat waves and released.
No worries, though! Using green glue doesn’t produce much extra heat in your space. The heat that gets released is minimal and gets released slowly over time.
2. Prepare Your Drywall and Gun for Application
Once you’ve decided how to utilize green glue, the next step is to prepare your drywall and green glue gun for application. This step is applicable specifically if you are soundproofing a room from a remodel or building from scratch.
If you are only applying green glue in the gapping and combining it with other soundproofing agents, then go ahead and skip to the next step.
The first thing you’ll want to do to prepare your drywall is to lay it out in a line that is easy for you to pick up, walk around, and maneuver. After you apply the green glue, it dries fairly quickly, so it’s important to get it on, pick up the piece of drywall, and go ahead and get it into place as quickly as possible.
After your drywall is laid out, you’ll want to figure out exactly where you will place each sheet. The green glue should be applied in between two sheets of drywall. So you’ll put a sheet of drywall up, then apply green glue to another. Then you’ll put the two sheets together. The green glue is also an adhesive and will bind the two sheets together.
You’ll also need to prepare your caulking gun for application. Simply follow the instructions for the specific caulking gun you’ve purchased. Afterward, it’s a good idea to squirt just a bit of the glue on a throwaway paper. This way, you can ensure everything is working correctly before you start applying the glue to your drywall.
3. Applying the Green Glue
The application process looks different based on your use of green glue. I’ll go over each application in detail below.
Applying the Green Glue Only in Gaps
If you apply green glue in only the crevices and gaps throughout the room, chances are you’ll be starting with pre-done green glue tubes. This will save you a lot of mess.
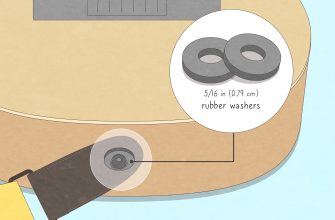
- Attach the nozzle to the tube. First, cut the end of the tube off, then attach the nozzle. Each case of glue should come with twelve nozzles, but it’s best just to save the nozzle and use the same one for each new tube. Some of the glue always sticks inside the nozzle, so this will prevent waste.
- Next, cut the end of the nozzle. You can cut the opening as large or small as you’d like, but the recommended cut is about ⅜ inch (0.95 cm).
- Begin the green glue application. Ensure that you get the gun deep enough into the gaps before you squeeze the glue out.
Apply the green glue around window cracks, in the gaps where the ceiling and walls meet, and in the gaps where the floors and walls meet. These small spaces are often where sound travels through the most and the places we least think about when soundproofing.
There’s no set amount that you should apply. You’ll just want to place the gun’s nozzle reasonably deep into the gap and squeeze until the green glue begins to reach the surface. You’ll also want to take your finger or a scraper and smooth it out.
This process is relatively simple, and it shouldn’t take too long. The main thing is to ensure that you’ve applied enough glue and that your application is smooth and even.
Applying a Layer of Green Glue
This is how green glue is most commonly used. The process is relatively simple, and there’s no set right way to do it. However, you’ll want to be aware of a few things as you move forward.
The first thing is that, while there isn’t a set way to apply the green glue, you want to try to have a set ratio of ounces to square feet. For example, if you start out with five ounces to ten square feet, you’ll want to stick to the same amount to keep it consistent as you move forward.
There’s no set size or thickness of drywall that you should use with green glue. It will work with any amount. However, you will find that green glue works a bit better with thicker drywall than with thin.
You’ll want to ensure that you leave at least a 2-inch (5.08 cm) border along the drywall perimeter. Otherwise, you’ll have a terrible time handling the drywall once you apply it.
Finally, remember that green glue won’t work correctly unless it is compressed between two layers. If you don’t have the compression factor, you’ll get very little sound dampening because compressing the green glue allows it to spread evenly over the drywall sheet.
The Application Process
Now let’s go into how you actually apply the green glue to drywall. If you’ve followed my previous instructions, you should already have your drywall laid out for easy handling, and your green glue gun should be prepped and ready to go. This process works best if you have a partner to help you, but it can be done alone without too much struggle.
Ensure that you also have your screws handy, as you’ll be screwing in each piece of drywall once you place it against the wall. Also, ensure you’ve already hung at least one drywall sheet on the wall.
- To begin, spread the green glue all over the drywall sheet. As I mentioned, there’s no specific process you need to follow for this. The main thing is to ensure you’re leaving the border and covering the space adequately.
- Apply the green glue in swirls and loops or in straight lines one after another. You can even mix and match. In any case, once you bind it to the other piece of drywall, it will spread evenly.
- Hang your sheet. Pick up your drywall sheet with the glue and place it against the drywall sheet you’ve already hung. At this point, you need to go ahead and screw it in. The first layer you hang should be attached using 1 ¼ inch (3.18 cm) drywall screws, while the second layer should be attached using 1 ⅝ inch (4.13 cm) or 1 ⅞ inch (4.76 cm) screws.
Screwing is an essential part of this process. While green glue does act as a mild adhesive, it certainly isn’t going to keep the drywall up, especially not with multiple layers. But it should bind it well enough for a short time so that you can get the screws in.
4. The Final Step – Let the Green Glue Dry
The final step in this process is to allow your green glue to dry thoroughly. This should be pretty easy to do, but the important thing is just to not mess with the drywall at all while it’s in the drying process.
The green glue will be set after about an hour but will need upwards of 7-10 days to dry completely and begin showing its sound-dampening effects. You shouldn’t expect the green glue to provide the fullest extent of its sound-dampening effects until a month after application.
If you’ve applied your glue only in the gaps and not directly on drywall sheets, it will dry significantly faster than if you’ve used the green glue is a more extensive application.
Conclusion
Green glue is easy to learn to use, and just about anyone can soundproof their space with it. It’s relatively affordable and has become one of the cheapest and easiest ways to soundproof a space.
Remember when using green glue that you aren’t going for aesthetics. The room isn’t going to be as lovely as it would be with acoustic panels or something similar, but it will have significant sound-dampening abilities.
There you have it, the easy guide to green glue!
References
- https://sweets.construction.com/swts_content_files/151892/375980.pdf