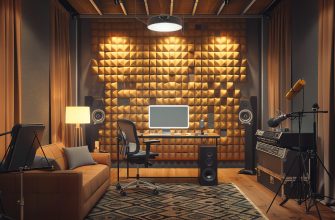
If you have been thinking about building your own recording studio, the excitement might have taken over, making you forget about the importance of ventilation. While not among the most visible systems in buildings, ventilation is essential to ensure that you and your clients can keep playing in the room for several hours in a row. But how can you keep your studio soundproof and ventilated at the same time?
To ventilate a recording studio, you can opt to invest in soundproof vents or, if your studio has windows, substitute them for soundproof windows that can be opened during breaks. You can create a DIY silent vent system or soundproof an existing one using acoustic foam or making a sound maze.
Ventilating your recording studio is crucial and extremely tricky at the same time. Find out the best solutions for your needs below.

- Ventilation and Recording Studios: An Overview
- The Importance of Airflow in a Recording Studio
- HVAC vs. Ventilation Systems
- Ventilation in a Recording Studio: Issues and Obstacles
- Soundproofing and Airflow Needs
- Ventilation and Sounds
- Soundproofing an Existing Vent
- Use Acoustic Foam
- Create a Sound Maze
- Pros of Soundproofing a Vent
- Cons of Soundproofing a Vent
- DIY Solution: Building Your Silent Vent
- Building Your Own Vent: A Guide
- Pros of Building a DIY Ventilation System
- Cons of Building a DIY Ventilation System
- Invest in Soundproof Vents
- How Do Soundproof Vents Work?
- Pros of Soundproof Vents
- Cons of Soundproof Vents
- Ventilating a Recording Studio With Windows
- Investing in Soundproof Windows
- Pros of Soundproof Windows
- Cons of Soundproof Windows
- Using an HVAC System for Ventilation
- Pros of an HVAC System
- Cons of an HVAC System
- Creating a Healthier and More Comfortable Recording Studio
- Conclusion
- Sources
Ventilation and Recording Studios: An Overview
Just like in the case of any other room, ventilation is crucial in recording studios. Indeed, fresh air can help keep the moisture and humidity in the place at a safe level. It also allows anybody in the studio to enjoy playing there for hours at a time. As we are about to see, there are several reasons why you should not forego the installation of a high-quality ventilation system in your recording studio.
However, unlike standard rooms, ventilating a recording studio can be extremely tricky. Indeed, the two most important aspects of a recording studio are the soundproofing system and the room’s acoustics. In both cases, an airtight room aids the quality of sound.
So, how can you ventilate an airtight room without running the risk of compromising the sound? Depending on the type of studio you are running, there are several viable solutions. However, speaking to an expert before attempting to soundproof your studio by yourself might be recommendable.
The Importance of Airflow in a Recording Studio
First off, let’s have a look at why it is so important to have a steady airflow through your recording studio. Just like in the case of most buildings and rooms, ventilation is crucial for several reasons.
Firstly, of course, it allows anybody in the room to receive fresh air from outside. Indeed, stale air can cause several issues, such as:
- High levels of CO2 and chemicals from the wall and surfaces can build up in the indoor air over time. In turn, this can cause long-term health problems to anybody who is in the room or building for several hours a day. These health conditions can range from respiratory diseases such as asthma to SBS (Sick Building Syndrome).
- Stale air is the first cause of headaches and difficulty concentrating, which is something to consider when you are trying to enhance your music or your clients’ performance.
- Another issue to consider is that the lack of ventilation will make it more challenging to regulate the room’s humidity levels. In turn, high humidity levels can represent the root cause of molds and bacteria.
If you have invested (or you are about to) build a recording studio, the last thing you will want for your project is poor indoor air quality or an unhealthy environment.
Additionally, your studio will contain all of your gear and equipment, which is your business’s main asset. In that case, you might not want to have it next to surfaces that are likely to become damp or moist over time!
HVAC vs. Ventilation Systems
If your studio is sealed or airtight, you might be thinking, why not install an HVAC system. It is worth keeping in mind that heating, ventilation, and air conditioning systems do not cover a ventilation system’s same functionalities.
Here are the main differences between the two:
- An HVAC system is designed to heat up or cool down the air already present in the room or building. While this might make the environment much more comfortable than it is now, it will not help you when it comes down to creating a healthier environment.
- A ventilation system is designed to conduct fresh air from outside indoors, allowing fresh oxygen inside while extracting stale air.
Depending on your budget and the climate you live in, you might opt to complete your studio with both systems. However, the ventilation system, while being extremely important, is also the most tricky one to integrate. Find out why below!
Ventilation in a Recording Studio: Issues and Obstacles
Ventilating a studio can be challenging because, as seen above, soundproofing is crucial for you or your clients to record a clean, powerful sound. At the same time, leaving gaps in your soundproofing system might go against the area’s regulations.
Here are the obstacles you are likely to find on your way and what you can do to work around them.
Soundproofing and Airflow Needs
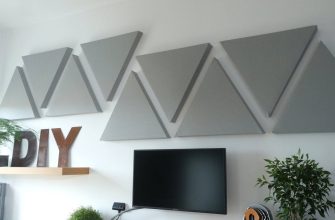
One of the main characteristics of an adequate recording studio is that it is fully soundproof. Some several systems and techniques allow you to achieve this result. Indeed, you might decide to use acoustic panels, acoustic foam, or Rockfoam.
In any case, you will need to check that the studio is thoroughly soundproof by measuring the decibels perceivable from outside it. When done correctly, the soundproofing process also becomes essential in preserving high music and sound standards.
However, when soundproofing your studio, you might need to make it airtight, ensuring that no part of it will transfer any sound inside or outside it. So, implementing a ventilation system in such an environment might seem impossible at first.
Ventilation and Sounds
Ventilation systems are often complete with a passive vent that will extract the stale air from the room, while a van connected to a duct will propel air in. However, these systems can cause several noises and interruptions.
It is crucial to understand in what ways a ventilation system can impact your recording experience. Here are just some to consider:
- The air turbulence within the ducts can cause noise. This noise can be carried into the recording studio, decreasing the sound quality and pureness.
- The noise of the fan which propels air in might also be carried through the ducts.
- If your studio is in a larger building, the ventilation system’s ducts might carry the noise deriving from floors above or from the internal structure.
- The ducts might create sound transmission paths. So, the noise might seem much louder than you wish it to be outside of the live room.
These noises can be airborne or structure-borne, but they will affect the sound you will have within the studio. Here are some possible solutions to ventilate your studio without compromising your music.
Soundproofing an Existing Vent
Soundproofing an existing vent might be a viable solution if you have converted an existing room into a recording studio. Indeed, most rooms in modern houses need to be connected with the building’s ventilation system. This particular is crucial to ensure that fresh air flows through each room.
If you have found the perfect place to design a recording studio – within your home or elsewhere – and it comes with one or more vents, you might consider soundproofing it. One of the easiest ways to do so is to hang a curtain over the vent. While this is not the most effective method to prevent noise from traveling and leaking, it is the cheapest and most straightforward one.
Other, more effective ways to soundproof your vent include the ones below.
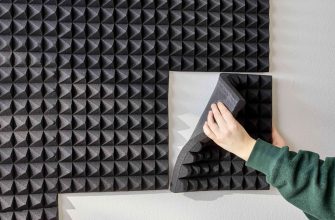
Use Acoustic Foam
Acoustic foam is a unique material that can be extremely helpful when trying to absorb sounds. While it is not a soundproof material in itself, acoustic foam is designed to reduce echo.
Simultaneously, the primary reason for noisy vents is the reverberation of noise and air traveling through metal ducts. In this case, using acoustic foam can represent an inexpensive, reasonably quick, and easy-to-implement method to reduce interference.
To use the acoustic foam:
- Remove the vent cover and measure it.
- Cut out a portion of acoustic foam that fits the cover’s size and glue it to it.
- When doing so, make sure there are no gaps left for the noise to travel through.
The foam will only limit – without stopping – the airflow through the vent cover. At the same time, it can minimize the noise coming from the vent.
To find out more about acoustic foam, read my article about soundproofing your
room for you
Create a Sound Maze
A sound maze is among the most efficient methods to soundproof an existing vent. Undoubtedly, trying to soundproof a studio while ensuring that the environment remains ventilated is a significant challenge. However, a sound maze offers you all the positive aspects you might have been looking for.
A sound maze is exceptionally useful in absorbing the sound as this enters the ventilation system. Indeed, the zig-zag pattern through which the ducts will need to go through helps noise absorption and reduction.
As the sound passes through this pattern, it will hit and bounce off from surfaces lined with sound absorbers (such as acoustic foam). So, it will dissipate during the journey, limiting inbound and outbound noise.
One of this system’s main advantages is that it does not restrict the airflow – something fundamental if you are planning to spend several hours in your live room. A side benefit of this is that the airflow can help you regulate the recording studio’s internal temperature and humidity level.
Learn how to create your DIY sound maze in the section below.
Pros of Soundproofing a Vent
- It is affordable.
- It does not restrict the airflow.
- It can be done at home, without professional help.
- If opting for an acoustic maze, you can still benefit from air’s property to regulate the studio’s internal temperature.
- It does not require you to invest in extensive structural changes.
- It allows you to have a fully soundproof studio.
Cons of Soundproofing a Vent
- It might not be as efficient as blocking the vent.
- It is not a viable solution if you have built a room-in-a-room recording studio and can’t use the original room’s ventilation system.
- You might need to substitute the current vent system with a sound maze. This might require DIY skills and specific equipment.
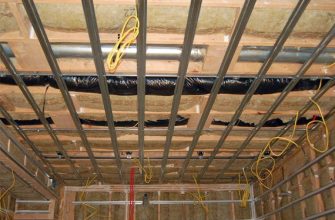
DIY Solution: Building Your Silent Vent
If you have built a room-in-a-room recording studio or don’t benefit from an existing vent, you might need to design a whole ventilation system. This option works best if you are building a recording studio from scratch.
In this case, you might be planning for the overall structure and wall composition. Therefore, you can also allow for a soundproof ventilation system.
If you need more guidance for this crucial step, check out the video below:
When building your own silent vent, you will need to allow for a sound maze that can significantly decrease the studio’s noise towards the outdoors and vice versa.
When picking the materials for it, avoid metal ducts and ductworks that might enhance the echo or sound reverberation. Of course, adding a noise-absorbent liner to the structure can help you reduce the noise even more.
Building Your Own Vent: A Guide
If you wish to find a silent ventilation system that allows you to enjoy the clarity of sound you would have if the whole room was soundproof, you would have to opt for a sound maze. Indeed, this is one of the most efficient ventilation systems for your recording studio.
One of this system’s best characteristics is that it won’t prevent the airflow from flowing through it. With a sound maze, ventilation will not be an issue, but you can count on most noises and sounds being absorbed by the maze.
What you will need to create a sound maze are the following:
- Plywood
- Glue
- Acoustic foam
- A knife
- Measuring tape
- A handsaw (or a similar instrument that will allow you precisely cut wood)
If you are looking at creating a sound maze, you will need a plywood box to fit plywood planks on opposite sides. Once the maze is complete, you can connect it to the home’s ventilation system and a vent on the wall. To do so, you might use ductwork.
The process will vary depending on the type of system you are building and on your ductwork.
The video below will show you more about the steps to build a ventilation system for your home theater or private recording studio.
Pros of Building a DIY Ventilation System
- If you already have a ventilation system that you can refer to, you can just measure the vent’s inside and create the maze by yourself.
- It is suitable for most environments
- If you have built a studio designed like a room in a room, you can use the house’s ventilation system and extend it.
- You can create a maze without the help of a professional
- The materials needed are reasonably affordable
- Building a sound maze allows you to keep the vent functioning – which is ideal if there is the possibility that mold will grow inside the room.
Cons of Building a DIY Ventilation System
- Building a ventilation system might require you to have DIY skills
- Understanding how the materials interact with each other can help you have a better idea of what you should use for better results
If you are building or setting up a video studio, you will need to know how large a recording studio needs to be – find out the answer here!
Invest in Soundproof Vents
Investing in soundproof vents is the best way to substitute the vents you have and aim for optimal results. Soundproof vents are a premium alternative that allows you to keep your studio as it is, and the ventilation system will only need minimal alteration.
However, you should keep in mind that soundproof vents might be particularly expensive, and they might not fit the budget of someone who has just started to work in the industry. Simultaneously, if you are not a DIY expert and have to buy several materials and tools to build a sound maze, then these specialized vents might come at the same price.
How Do Soundproof Vents Work?
Soundproof vents are ideal if you are looking for a quick solution for your recording studio. They are purposely made to be used in rooms with certain special needs, such as recording studios.
Thanks to their mechanism, they are perfect to guarantee that the room has the ventilation needed while being extremely soundproof.
These look like standard vents with ductwork connecting the two extremities. However, they come with an external hood that you can fit on top of the vent to increase its soundproofing properties.
This mechanism can reduce the noise by 45 dB when the internal grille is open. When this is kept closed, you can experience a reduction in noise by 50 dB.
If you are concerned about the look, you should know that it does not differ from a standard vent. Additionally, the hood is available in several colors, which allows you to match it to the room.
Pros of Soundproof Vents
- They are not visible, and they can match the design of your studio
- They won’t require you to design or install a new system as they come as a pre-packaged solution
- While they look and function just like a standard vent, they can reduce the ventilation system’s noise by up to 50 dB
- Soundproof vents might be more expensive than standard models, but they represent a much quicker solution than most others
Cons of Soundproof Vents
- They won’t make the ventilation system completely soundproof
- They might still leave open gaps that you need to close with acoustic foam
- They can be more expensive than other systems
- They might be more difficult to find than regular vents
Ventilating a Recording Studio With Windows
If your recording studio has windows, soundproofing this area can be challenging. Of course, fitting heavy drapes or windows can help you, but you might not be able to achieve the results desired.
However, windows might be an excellent source of natural ventilation if you ensure to let fresh air circulate and flow through at regular intervals. While your studio’s windows can help you get fresh air at no extra cost, it is crucial to invest in a soup roofing system that allows you to cancel out any noise during an artist’s performance.
While heavy drapes might represent an initial solution, you can improve the room’s sound by investing in systems such as soundproof windows.
Investing in Soundproof Windows
The technology behind certain types of soundproof windows makes them ideal for recording studios and live rooms. Since they are manufactured with the need of artists and studios in mind, these windows boast noise reduction glass mounted on a timber frame.
Whether you prefer them to be installed on the inner side of the room or wish it to be outside the room, these windows can lower the noise by 49 to 59 dB. Of course, this level relates to the ones of the surrounding walls.
You can find double or triple glazing soundproof windows in terms of glazing, while the glazing comes in different thicknesses. At the same time, an ultra-modern gasket is fitted between the glass and the frame to help you prevent any structural transference.
Soundproof windows can represent an investment for most individuals, especially if you are moving your first steps in the world of recording. However, you should also consider that the environment and atmosphere you can create in a recording studio can impact the performance’s quality.
Therefore, allowing for these soundproof windows, you might be able to keep a constant flow of natural light and fresh air, which can aid concentration and creativity.
Pros of Soundproof Windows
- Soundproof windows are perfect for those studios who boast windows and openings.
- They allow you to ensure that your studio is soundproof while not cutting out fresh air or natural light.
- They work on any studio independently on location.
- They come in a double or trips glazed model.
- They are made with ultra-modern materials and technologies.
- They can aid productivity and creativity by creating a healthier environment.
Cons of Soundproof Windows
- They can be more expensive than other ventilation systems.
- You will need to remember to open the windows at regular intervals to ensure ventilation and air circulation.
- You will need professional help for installation and maintenance.
Using an HVAC System for Ventilation
Before considering this solution, it is worth understanding that an HVAC system is not always a suitable option to improve the ventilation or air circulation in a room. Indeed, in most cases, air conditioning systems are designed to influence the room temperature without necessarily allowing for fresh air to come through.
In most cases, air conditioners extract air from the room, increasing or decreasing its temperature and inserting it back into the room. While this might make your studio much more comfortable during winter or summer, it is not the best way to ensure fresh oxygen in the place.
Simultaneously, some HVAC systems might also give you the option to take air from outdoors, which is something you might consider if you want that air to be colder or hotter than it is.
In this case, it is paramount to speak to an expert HVAC technician to understand these systems’ pros and cons.
Pros of an HVAC System
- It offers you full control over the quality and temperature of the air inside the room.
- It allows you to make the recording studio more comfortable during the winter or summer months.
- It offers more functionalities compared to a standard ventilation system.
Cons of an HVAC System
- It can be pricier than the solutions seen above
- It requires you to hire an expert HVAC technician to understand the options at your disposal
Creating a Healthier and More Comfortable Recording Studio
When you are designing your recording studio, there are several aspects that you might have taken into consideration. Undoubtedly, convenience, affordability, and availability are among the most important factors you considered.
However, now that your studio is almost complete, don’t forget that the atmosphere and surrounding environment can significantly impact your performance when playing in the studio. Of course, you will want to feel safe and at ease, but ensuring that you have all the comforts to play for hours is also crucial.
Don’t forget that, in the same way that the surrounding environment might inspire your music, the performance of the artists you invite in the studio, as well as one of your clients, can change substantially.
Ultimately, ensuring that enough fresh air and natural light are reaching through at all times is crucial. And while ventilation is undoubtedly an essential aspect, you also need to keep in mind that the room temperature and colors picked can have a substantial influence.
Conclusion
Deciding to soundproof your recording studio can represent a considerable challenge. However, finding and implementing the right ventilation system is crucial. Indeed, this can impact sound quality, airflow, and your artists’ ability to play for several hours in a row.
Depending on your studio’s characteristics, you might decide to implement soundproof windows or specifically designed silent vents. If you wish to ventilate a home recording studio, you can create a DIY vent system or soundproof an existing one by adding acoustic foam or designing a sound maze between the internal and external vent.
Sources
- University of Rochester: Indoor Air Can Cause Health Problems
- NCBI: The sick building syndrome
- Adventures in Audio: Why a soundproof recording studio needs ventilation
- Technical Foam Services: How Does Soundproofing Foam Work?
- AcoustiBlok: 30 Types of Soundproofing Materials Explained
- The New York Times: Colors may affect performance, study suggests
- Greater Good Magazine: How Nature Can Make You Kinder, Happier, and More Creative
- The Soundproof Windows: Studio Line Windows