For years you’ve had no problems with your acoustic foam, but suddenly you find yourself struggling to keep it in place. It sometimes even happens with a new installation, and there is nothing more distracting than being attacked by foam halfway through a take. Luckily, there are some solutions you can try to remedy the issue.
When your acoustic foam keeps falling off, make sure to choose the right method to re-stick it on as securely as possible. Alternatively, you can always enlist the help of a professional. This is also a great time to consider whether you need acoustic foam in the first place.
The whole concept behind sticking something to a wall can be broken down scientifically. You have to coax your foam to defy gravity and stay on a wall or ceiling, but it’s not working out quite as you had hoped. The application methods for acoustic foam are so varied that it’s almost impossible to provide a one-size-fits-all solution; however, by keeping the below tips in mind, you’ll have a far better grasp of the process.

- What To Consider When Installing Acoustic Foam
- How To Choose a Method for Sticking Acoustic Foam
- Check the Manufacturer’s Recommendations
- Look at Your Foam
- Look at Your Substrate
- Clean Surfaces
- Replacing Old Foam
- Double-Sided Tape – Double-Edged Sword
- Try Hanging Strips
- Using Pins To Apply Foam
- Spray Adhesive
- Change Your Sticking Strategy
- Decorative Soundproofing Panels vs. Traditional Foam Soundproofing
- Consider Getting Professional Help
- Decide if You Need Acoustic Foam in the First Place
- Final Thoughts
What To Consider When Installing Acoustic Foam
Selecting the correct method of sticking your acoustic foam all depends on a few factors:
- Your Foam – Whatever you use, it has to grip your foam somehow.
- Your Substrate – This is whatever surface you are sticking the acoustic foam to.
- Time – No need for a permanent installation when you’re renting.
Below I will discuss these considerations and many others for ensuring you get your foam stuck to your wall for good.
How To Choose a Method for Sticking Acoustic Foam
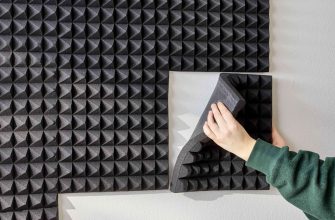
Whether you installed the foam![]()
![]() yourself or not, sticking or re-sticking acoustic foam isn’t always a simple task. An old panel might fall due to aging adhesive, and if that is the case, you may well experience more issues. New installations may experience this due to inferior adhesives, inappropriate installation methods, or poor preparation.
yourself or not, sticking or re-sticking acoustic foam isn’t always a simple task. An old panel might fall due to aging adhesive, and if that is the case, you may well experience more issues. New installations may experience this due to inferior adhesives, inappropriate installation methods, or poor preparation.
Check the Manufacturer’s Recommendations
If you know which company manufactured the foam in question, you can consult their website, and you might find the information you need. The manufacturer might even offer a solution for applying their product.
Following the manufacturer’s recommendations on applying your foam is the best way to ensure it stays where you want it to. They might recommend specific products and different methods for applying them to different surfaces, and doing anything wrong might cause an installation to fail.
If your requirements are outside of the scope of the manufacturer’s recommendations, you could always reach out to them. They may be able to offer you some advice or an alternative solution.
Look at Your Foam
Take a minute to analyze your foam. It should be clean and dry, with minimal damage and no strong odors. If there is anything to the contrary, look closer.
The condition of your foam is important because it will tell you if it can even be re-stuck in the first place. You may have to get new or different foam.
Wet foam indicates the presence of moisture that can cause an adhesive to fail. Waterlogged foam is significantly heavier than dry foam, and a solution that holds it up while dry can potentially fail.
Dirty foam also isn’t ideal for sticking to your walls. Adhesives do not like dust and, as such, will also fail in the presence of enough dust. It might not be economical to clean dirty foam, but there is no harm in trying.
Old glue and tape can be a real pain to clean off of foam. They might require significant mechanical force or chemical solutions to break the old, time-hardened bond. Care must also be taken not to damage the substrate material since repairs can be costly, but it might be worth your while to remove troublesome foam to investigate any suspicions carefully.
Look at Your Substrate
When I talk about a substrate, I am referring to the surface you are trying to stick your acoustic foam to. Take note of its condition – peeling paint is not a great candidate for adhesives, and the wall should be cleaned and prepared before sticking anything to it.
A good surface for adhesive tape will be clean, smooth, and hard. Tiles, concrete, painted plaster, drywall, and wood are all good candidates for adhesive tapes, but they will each respond better or worse if you ever try to remove an adhesive.
Dirty, rough, and porous surfaces are not ideal for adhesive tapes. Drywall should ideally be painted before applying adhesive. A few layers of paint might save you from a costly repair – it’s usually easier and cheaper to clean and repaint a surface than to replace it.
Clean Surfaces
You might have had a great idea about converting that unused garage into a studio, but adhesives don’t do too well with dirt – they stick to that instead of the surface and fall off. Even if a wall appears clean, it may have a hidden layer of oil or grime interfering with the adhesive.
Be sure to thoroughly prepare a surface before you try to stick anything to it. Hanging anything on an inadequately prepared surface is a Sisyphean endeavor. Don’t do that to yourself – not much is worse than doing a job twice.
Your foam’s sticking surface is also essential. Old foam can absorb all kinds of dust and dirt over time. Yuck. You can clean it if you want to, but you might be better off replacing it if its sticking surface has been damaged somehow.
Replacing Old Foam
I have alluded to this already, but it must be reiterated that extra care must be taken when replacing old foam. This is usually much more difficult than installing new foam – costlier too.
If you have decided to go the route of replacing your foam with a new one, take care to consult a buyer’s guide if you have never installed acoustic foam and make sure you are getting a good product and not a cheap imitation.
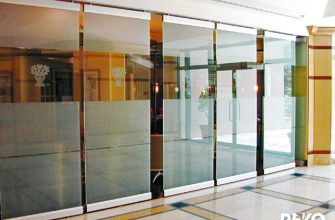
Completely overhauling your foam can give you even better soundproofing![]()
![]() with more modern materials. You can also go for a different aesthetic or find a better solution to your freefalling foam.
with more modern materials. You can also go for a different aesthetic or find a better solution to your freefalling foam.
Double-Sided Tape – Double-Edged Sword
Coming in convenient rolls, double-sided tape is available as an excellent solution for quickly applying soundproofing. There are purpose-made carpet tapes that are great for sticking down your stuff but be warned – some use exceedingly strong adhesives that can damage your wall when you try to remove them.
Double-sided tape is available in many forms and is designed for different purposes. Make sure you use a tape that is designed to stick to the surface you want to apply soundproofing to. Reasonable force must also be applied to ensure a firm stick.
You have a lot of options when choosing tape at different price points. Often with these kinds of things, less is more. You can usually apply more tape quite easily, just don’t apply more than you need to – use a little bit at a time to see how much you need for a reliable stick. Remember that certain kinds of foam can also gather dust over time, increasing their weight – this usually won’t cause the foam to fall but can contribute even if only slightly.
Try Hanging Strips
You get some professional quality panels that are also very nice to look at. A simple colored panel or two can really bring the look of your studio together while providing sufficient control over troublesome primary reflections and resultant flutter.
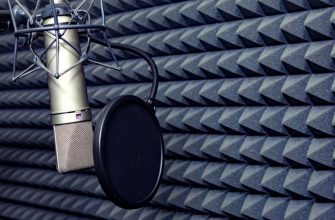
Hanging strips are purpose-made as an alternative to nails and other destructive means of hanging pictures and frames. They can also serve to hang acoustic panels![]()
![]() , whether they are homemade or store-bought.
, whether they are homemade or store-bought.
Rather than skimping on cheap adhesives and ruining the wall, and your reputation as a tenant, check out these 3M Command Large and Medium Picture Hanging Strips (available on Amazon) that are designed for impressive loads.
- VARIETY PACK OF PICTURE STRIPS: One package of the Command Picture Hanging Strips Variety Pack…
- WORKS ON A VARIETY OF SMOOTH SURFACES: Wall hanging strips work on a variety of smooth surfaces,…
- SURFACE PREP: Clean the desired surface with rubbing alcohol to remove grime and dust to allow the…
Last update on 2025-07-19 / Affiliate links / Images from Amazon Product Advertising API
Using Pins To Apply Foam
Pins are a great option if you want a solution that causes minimal damage to the surface. You can get away with pinholes that are barely noticeable sometimes. Pins also work like a charm on cladding and brickwork, but you will have to assess whether the damage will be problematic or not.
Pins also have the benefit of potentially making your foam more reusable, but you may want to consult with any concerned landlords and reassure them that some minor touch-ups will resolve the pinholes – so long as you can match the paint. You’ll be in for a repaint otherwise and might need to patch and fill holes.
Spray Adhesive
Loctite offers a convenient aerosol adhesive that you simply spray on the back of your acoustic foam and then apply to a clean surface. This method is quick, easy, and costs more or less the same as a few rolls of tape for a can.
The wet application of spray adhesives will cover the surface better than tape, resulting in a powerful sticking force. However, as a result, it can also be troublesome to remove, especially if used in excess.
You might be tempted to coat the entire panel with adhesive, but consider how permanent the installation will likely be. Just like with tape, you will want to limit any damage in the event of removal. YIf you’re set on trying this solution, I recommend Loctite Spray Adhesive General Performance from Amazon. It’s effective, made of high-quality ingredients, and pretty affordable.
- General Performance: Spray adhesive glue provides superior bonds on a variety of materials
- Repositionable: Permanent or repositionable bonds with no reworking, bleed through, wrinkling, or…
- Versatile: Ideal for household and automotive repair projects and crafts
Last update on 2025-07-19 / Affiliate links / Images from Amazon Product Advertising API
Change Your Sticking Strategy
You may find that the method you have chosen is not working for you for whatever reason. Don’t give up – there might be another way to solve your soundproofing sorrows.
You can reapply a fallen panel that was previously taped on with pins rather than trying to re-tape it. Similarly, you can use a small amount of tape to supplement a faulty pin without risking too much damage to the surface.
Another popular solution is to mount your foam on a board. This way, you can move it around and even hang it on a wall while causing minimal damage to the structure. This is a cheaper alternative to commercially available wall hangers but might suit you best if you are using a particularly high-performance foam chosen to eliminate a specific noise, like a noisy 3D printer that whines at a certain frequency.
Decorative Soundproofing Panels vs. Traditional Foam Soundproofing
Modern musicians and creators are fortunate in that this problem has been around for as long as people have been trying to improve acoustics. While purpose-made foams were once prohibitively expensive and ugly, in the realm of professionals and audiophiles, they are now available to consumers in convenient and easily installable packages.
Consider Getting Professional Help
Maybe you’re facing a problem you aren’t prepared for with your installation or are not equipped to resolve the situation. It’s time to get some help. There is no shame in this – you will breathe a sigh of relief when you see the pro swoop in and resolve a problem you have been struggling with for ages.
Calling professionals is only recommended in cases where you have failed to resolve the problem yourself or are not equipped to do so.
There may be other problems, like moisture causing your foam to fall or an aging adhesive that may necessitate more extensive repairs. Unfortunately, persistently falling foam can signify a deeper problem, and you may want to eliminate it before it gets out of hand.
Decide if You Need Acoustic Foam in the First Place
If you’ve just got one annoying panel that you just can’t get to stick again, no matter what you try, you may be better off forgetting about it.
The effectiveness of acoustic foam in relation to the area it covers is a bell curve function. At a point, adding more panels helps less and less as you cover more of a surface area. A single panel might not be making that much difference sonically.
Think about it – you could quietly use that piece of foam as packaging material, or the cat might enjoy sleeping on it.
Mind you, there are still those professionals and audiophiles who will settle for nothing less than perfection, driving further innovation and creating ever more sophisticated solutions that will continue to develop with innovations in materials and manufacturing processes.
You might struggle to re-stick old foam and run into other problems that cause your acoustic foam to keep falling. The most important considerations are a clean surface, the correct sticking method, and good foam.
Final Thoughts
Even though acoustic foam falling off the walls is a confusing, and sometimes challenging-to-fix issue, there are some workarounds that can help you address the problem without having to spend thousands of dollars on expensive solutions. By following the above tips, you’ll be able to continue recording high-quality sounds in no time.