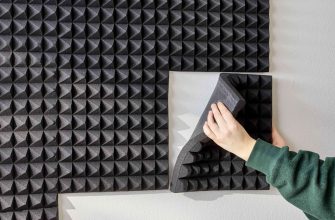
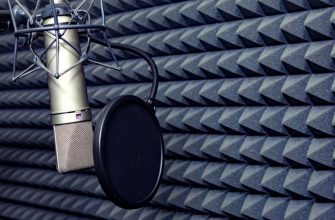
Acoustic foam is an effective and affordable way to control noise in any room, especially if that room has hard walls and little natural sound absorption. Acoustic foam panels help reduce reverberation and echo, which improves the clarity of your recordings. The acoustic foam also helps prevent sound from bouncing around the room and annoying your neighbors or the person living beneath you.
You can hang acoustic foam without glue around your recording room with mechanical fasteners, self-adhesive pins, Z clips, push pins, and command hooks. You may use double-sided tape or command strips if you want to hang acoustic foam without permanently damaging your walls.
Depending on the space, the amount of noise you’re trying to reduce, and your available budget, there are several ways you can hang acoustic foam panels without glue. In this article, I’ll cover 8 creative and cost-effective ways to hang acoustic foam without glue.

1. Self-Adhesive Pins
Acoustic foam can be mounted with self-adhesive pins on walls or ceilings to reduce echo and improve sound quality in your home. These tiny metal or plastic clips feature an adhesive backing that enables them to stick to metal, wooden, leather, or fabric surfaces after being pressed hard against them.
To use self-adhesive pins:
- First, clean the wall where the acoustic foam will be mounted with isopropyl alcohol.
- Peel off the release liner of the adhesive backing and press the pin hard against the surface you want it to stick to.
- Push the adhesive side of each pin against the wall or surface and hold it in place for at least 10-30 seconds. The strength of the bond between the material and the adhesive may be improved by pressing hard.
- Push your acoustic foam into the pins.
- Use the metal caps provided in the package to cover the sharp tips.
As you can see, self-adhesive pins are an inexpensive and simple way to mount acoustic foam![]()
![]() panels on walls. You’ll need a few supplies and about an hour to complete this project, depending on how much wall you want to cover.
panels on walls. You’ll need a few supplies and about an hour to complete this project, depending on how much wall you want to cover.
Mounting acoustic foam with self-adhesive pins makes the foam much easier to install and removes the need for nails or other cumbersome fastening methods that may damage the installation site. When it’s time to move your studio to a new location, gently pull the pins away from the wall.
2. Screw Fasteners
Screw fasteners, or simply “screws,” are a type of mechanical fastener that uses the principle of friction and a thread locking mechanism to secure your acoustic foam in place.
Screw-in acoustic foam panels are a quick and easy way to reduce noise in your home or office. They are simple to install and come with everything you need to get the job done. Just make sure you have the right tools, like screws, a screwdriver, and a power drill.
- You’ll need to make pilot holes in the wall. If it helps, ensure that these pilot holes are lined up with the studs in your walls.
- When installing acoustic foam with screw-in panels, only ensure that the screw compresses lightly on the foam material.
- Be sure to check on the material’s thickness; acoustic foam comes in a range of thicknesses, normally ranging from 1 – 4” thick foam. The thicker the material, the longer the screw required.
Screws are a quick, long-lasting solution to mount your acoustic foam without glue![]()
![]() . On the downside, they are an intrusive type of fastener. That’s because they will leave small holes in your walls in case you want to move your acoustic panels to a different location.
. On the downside, they are an intrusive type of fastener. That’s because they will leave small holes in your walls in case you want to move your acoustic panels to a different location.
3. Pins (Push Pins and T-Pins)
Speaking of intrusive fasteners, push pins and T-pins are a less intrusive option for hanging acoustic foam without glue. Pins are an inexpensive and easy way to display acoustic foam on the walls of your recording room.
Normally, push pins are used for hanging lightweight art, frames, and other decorations on a wall. They are easy to install, inexpensive, and, best of all, they’re reusable. You can easily remove push pins from the wall without causing any significant damage, and you can use them again for other projects besides your DIY acoustic foam installation.
Unfortunately, the end result may not come out professional. What’s more, your acoustic foam may be a little bit too thick to secure, with push pins being too short for the job. If that’s the case, what you need is a longer T-pin that works in a similar manner.
T-Pins are also easy to install. You need to mark your spots on the drywall and pin down the acoustic foam into the surface. Unlike push pins, T-pins are often longer, ranging from 1” to 2” in length or longer. However, these pins may not be so easy to push into a concrete wall.
If you’re using push pins to hang acoustic foam on a non-wood surface, be careful not to put too much weight on them. This can cause damage to the surface, and–even worse–your acoustic treatment may not stick around long enough.
4. Z Clips
Z Clips are also an intrusive installation solution for your acoustic foam. However, they’re easy to install with simple tools, including a few screws and a power drill. Z clips can be purchased at most hardware stores or online.
To hang your acoustic foam with Z clips:
- Take the wall measurements with a long, straight metal ruler and mark the installation points.
- Use a metal level to make sure that your marked points are at the same level.
- Next, use a drill to make pilot holes in the wall where the Z clips will be installed.
- Cut down the acoustic foam to size. Sometimes, the foam is usually sold in large sheets, so you’ll need to cut it to fit.
- Install the first set of Z clips on your marked installation points and fasten them onto the wall by driving screws into the pilot holes.
- Mount another set of Z clips on the foam.
- Hang the foam into position and ensure that the clips slide into each other
In case the foam material isn’t strong enough to support the clips alone, don’t fret. Simply mount the foam onto a wooden panel and then mount your Z clips onto the wooden surface. This should give it enough strength to hold the clips into position.
5. Command Hooks
Unfortunately, all the methods listed up to now are guaranteed to leave behind a few marks on your home. They’re not suitable for short-term stays, e.g., when you’re renting or intend to move to a new location soon.
Command hooks are little sticky hooks you can stick on the wall to hang things up with. These hooks are often used as coat hangers or hat racks. They’re usually made of metal or plastic and coated with adhesive on one side, which easily sticks to pretty much any wall surface and leaves no visible marks when removed.
To install acoustic foam with command hooks:
- You’ll need first to decide where you want to hang the acoustic foam. You can choose any spot, but it’s best to choose a spot at ear level.
- Next, measure the length of your acoustic foam and cut it down to size with an electric carving knife if needed.
- Clean the surface with isopropyl alcohol.
- Remove the release liner from the back of the hook and stick it onto the surface.
- Push your acoustic foam into the hook until you can feel the base of the hook.
Command hooks are easy to work with, although sometimes, the bond between the adhesive side becomes too strong and comes off with some paint when yanked on too hard. If that is the case, try warming up the hook with a hairdryer and pulling it out gently. Removing command hooks the right way ensures that they can be used again.
6. Command Strips
Command strips are a little different from command hooks. Instead of hooks, command strips rely on adhesive surfaces to stick onto the wall. Command strips come with two strips of hooks and hoops and an adhesive backing on each strip.
Working with command strips only takes a few minutes. Plus, there’s no drilling or nailing involved, either. You just need to make sure that the surface you’re hanging it on is clean and dry. Then you can follow the steps below to hang your acoustic foam with command strips:
- Clean off the surface with isopropyl alcohol.
- Unwrap the strips from their packaging.
- Bind the loop side from one strip to the hook side of the other strip. This provides two adhesive sides; one will stick to the wall and the other to the foam.
- Stick the adhesive sides of the strips to the foam and press hard on the walls (for about 30 seconds).
Remember, command strips are not to be used on wallpaper. They should be used on solid surfaces. It’s important to use command strips that are made for hanging heavy items, even though your acoustic foam weighs little.
7. Double-Sided Tape
Double-sided tape is another great solution for acoustic treatment if you don’t want to make holes in your walls or ceiling or don’t have studs to screw into. The tape comes with two adhesive sides; one for the wall and the other for the foam. Double-sided tape is applied directly to the acoustic foam, which is then attached to the wall.
Follow these simple steps:
- Spread one adhesive side onto the foam’s back side.
- Peel off the paper lining to expose the other adhesive side.
- Press the foam hard onto the wall for 10-15 seconds.
The double-sided tape supports as little as 5 pounds (2.27 kilograms) to 90 or more pounds (40.82 kilograms and above), depending on the brand. Some tape brands are a little weaker. To make sure your acoustic foam stays put, apply several strips of double-sided tape.
Know what’s even better? Double-sided nano tape. Nano tape has been known to support heavy objects weighing more than 40 pounds (18.14 kilograms). What’s more, you only need a small strip of the nano-tape to hold a large piece of foam in place. Nano tape adheres to almost every surface.
On the downside, it has an incredibly powerful stick, so yanking out your acoustic foam when moving won’t be easy.

8. Hang on Cardboard
Mounting your acoustic foam on cardboard with adhesive tape provides more versatile installation options. When you mount the foam on the cardboard, you can easily carry it from one place to another or move it to a new position with ease. Hanging your acoustic foam on a piece of cardboard is best for covering large areas.
You’ll need an electric drill, scissors, measuring tape, and a screwdriver.
- Use the measuring tape to take the cardboard and foam panel measurements.
- Cut the acoustic foam to size. You can use scissors or an electric saw, depending on the type of foam.
- Get your double-sided tape and stick it onto the back of the foam panels.
- Stick the other adhesive side of the foam panels onto the cardboard and hold it for 10-15 seconds.
- Install the acoustic panels
 by screwing them into the walls. You can also hang the panels with clamps. You may also use nano tape, command strips and hooks, T-pins, or other methods highlighted in this article.
If you intend to relocate to a new studio, all you have to do is take out the cardboard plus foam panel and move it to the new location. Acoustic foam comes in different thicknesses with different sound absorption capabilities. The thinner versions are suitable for mounting directly onto drywall, while thicker options will require additional support, such as plywood or cardboard backing boards.
It is important to point out that acoustic foam installation will not make the room soundproof. Many people often mix up soundproofing for sound deadening. Soundproofing prevents sound from entering or exiting the room, while sound deadening eliminates unwanted reverb from your recording.
Conclusion
You can’t get great sound from your home recording studio until you address the acoustics of your space. Acoustic foam is an affordable, effective way to reduce excess noise and control the reverberation time of your room. The good news is that hanging it doesn’t have to be a difficult or frustrating task without glue.