Portrait photography demands skills more than knowing how to use your camera. You need to understand how to work with people—putting them at ease and gaining their trust, so you get them looking natural, comfortable, and most authentic. It would help if you also captured their character, but how would you do that?
You should focus on your subject’s eyes to capture a characterful, engaging portrait in portrait photography. If you’re shooting a solo portrait, set your focus on the iris of the eye that’s nearest your lens. Set AF-S mode to lock onto your subject, and snap one shot at a time.
In this guide, we’ll cover where to set your focus for portrait shots. We will look at how to create rapport with your clients and teach you about settings you must use to ensure engaging well-lit portraits.

How to Set Up Your Camera for Outstanding Portraits
Let’s look at how to set up your camera for portrait photography.
Use an Appropriate Lens for Portrait Photography
First, you’ll want to use a lens that’s appropriate for portrait photography. You want a lens with a focal length that falls between 50mm-100mm. For many portrait photographers, the go-to focal length is 85mm with a small aperture, or f-stop, of around F2 for solo model portraits. For group portrait shots, close down your aperture to around F5.6-8.
If you drop your F-stop below F2, your depth of field becomes shallower and means you have less of a margin for getting your focus accurate. With F2, you gain a slightly deeper depth of field, which means your focusing should be more straightforward. That’s not to say don’t drop below F2 since the greater your aperture, the creamier your bokeh (soft background blur).
Bokeh makes your model stand out, as it blurs out background detail. Conversely, some portrait photographers want background detail to add context to their model. If you wish to show your subject in their environment, go for a smaller aperture (higher F-stop) for background detail that will feature in your portrait.
Check out how the Nikon 85mm compares with the 70-200mm for portraits here!![]()
![]()
Set Your Focus and Drive Mode
Set your focus options on your camera to focus on a single focus point rather than multiple AF points. Select AF-S to do so. We’re assuming that you’re shooting a static subject, so switch your camera drive mode to single-shot.
Once you have the focus point showing in your viewfinder, set it on your model’s eye. If their face is angled, so one eye is closer to you than the other, focus on the closest eye.
When you have set the focus, any movement by yourself or the model after that will mean you need to re-adjust focus. Before you shoot, zoom in and check where the focus falls. The eye or eyelashes should be sharp. Alternatively, once you’ve taken a shot, be sure to check the focus. There’s nothing worse than waiting until you edit to discover the focus is off.
Make it a habit to check your images once you’ve shot them. While you check focus, ensure you have the right balance of shutter speed, ISO, and aperture, too. Since you’re checking your shots, why not make a point of sharing them with your model to build rapport and trust? More on working with your model later.
Set Your ISO
ISO is a measure of sensitivity to a light source, and it refers to the days when most photographs were on film. With too great an ISO setting in a standard daytime setting, your shot will be overexposed. To avoid visual noise appearing on your image, keep to a low ISO that falls between 100 to 400.
If you are shooting in low-light situations, raise your ISO. Alternatively, you can compensate and open up your aperture to let in more light. Remember, this will cause your depth of field to shorten. Photography’s a dance between three key components: ISO, aperture, and shutter speed.

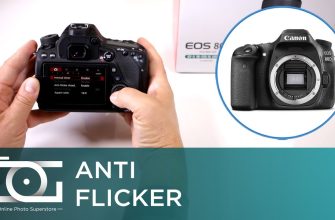
Check out to see if the Canon 80D is good for portrait photography here!![]()
![]()
Regarding the shutter speed, assuming your subject is relatively static, look for a speed around 1/15th up to 1/8th of a second. If your subject is moving a lot, raise the shutter speed so that you can ‘freeze’ the subject with no blur.
Once you have your camera settings right, it’s time to consider the environment where you’re shooting.
What to Consider When Shooting Portrait Photography
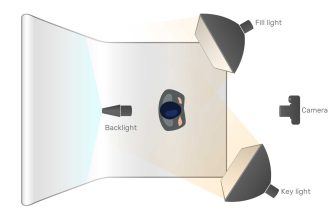
Are you the type of reportage portrait photographer who gets a buzz from shooting portraits with natural light, or are you a studio photographer who prefers an additional light source to balance out unflattering shadows? No matter your photographic style, it pays to consider how you use light to make your model burst from the image. The right lighting lets you do this.
The Light in Your Model’s Eyes
If you are shooting a portrait in a studio, set up your lights so that when they’re triggered, they pop a burst of light on your model’s eyes. A reflection of light in each eye adds extra dynamism to your subject. Whether you’re using a Speedlight or studio photography kit, literally catching the light in your model’s eyes will raise your image’s quality.
At the same time that we’re talking about light in your model’s eyes, if you’re shooting on location and that location happens to be getting full midday sun, suggest moving your subject into the shade. This will reduce squinting, which never makes for a flattering image, and it will help the color consistency in your photo. Otherwise, sunlight tends to create high contrast and severe shadows.
The Background
How much background you choose to include in your portrait has a lot to do with your preferred photographic style and the focal length you use. Shooting with an 85mm (3.35 in) will produce a tighter image that focuses on your model’s face, head, and shoulders, but sometimes, going wider brings in the detail that adds context and character to your portrait.
Be confident in suggesting background options for your model. Sometimes the environment you shoot in will bring out qualities in your model that you didn’t notice. Varying settings also introduce new lighting opportunities.
Sometimes you’ll get a model who is uncomfortable having their portrait taken. Sampling different backgrounds and focal lengths give you both time to get creative and comfortable as you work together to locate the setting for a picture that encapsulates your subject.
Killer portrait photography comes with knowing how to work with models. Next up, we look at how to work with your model.
Working With Your Model
The best portraits capture a person at their most authentic, which means you need to create a rapport with your model. Get them talking, get them laughing, and show them the photographs you take. By sharing the pictures, you include your model in the process and gain trust. The more they trust and feel part of the process, the more at ease they feel and their comfort reads on camera.
One last note about working with your models is getting them to look at you. You want to capture them looking towards the lens, so place yourself behind the camera. At times, continue the conversation while you’re looking through the viewfinder. This creates eye contact between the model and camera lens, which means you have the chance to shoot engaging shots.
Check out to see if the Sony a6000 is good for portrait photography here![]()
![]()
Final Thoughts
It takes skill to balance photographic skills with the skills you need to bring out your models’ best. Follow the simple rules we’ve laid out, and be sure to focus on your model’s eyes to create sharp, characterful, well-lit portrait photographs your clients (and you) will love.
Sources
- Photography Pro: 8 Portrait Photography Tips Every Photographer Should Know
- Digital Photo Mentor: 10 Camera Settings and Equipment Tips for Portrait Photography