Mastering is the final step in the music production process and is vital for making your track sound finished. It has a reputation as a bit of a dark art, but the process is more straightforward than you might expect.
Can you master a song using only Logic Pro plugins? Yep, it already has all the tools you need to get a great master.
To master a track in Logic Pro, you’ll need to follow these 8 steps:
- Mastering preparation
- EQ
- Compression
- Multi-band compression
- Saturation
- Limiting
- Metering
- Final checks & exporting
In this article, I’ll be going through the exact steps you’ll need to master any track in Logic Pro from start to finish using only stock plugins. Let’s go!
Step 1: Is Your Track Ready for Mastering? How to Prepare
Once you’ve decided your track is ready for mastering, you cannot go back, so make sure you’re completely happy with the mix. Not sure if it’s finished? Here is a short workflow you can use to check for final tweaks.
- Take a break of at least a day after you’ve finished mixing. This will give time for your ears to reset.
- Pull up your reference tracks and warm up by listening to them and immersing yourself in the sound.
- Sit down with a pen and paper and turn your computer screen off so you cannot see your mix. Press play and concentrate hard, scribbling down anything which sounds off.
- After your first listen-through, look at your notes and fix anything you’ve written down.
- Take a short break and repeat steps 2-4 once or twice. You might like to use different speakers or headphones this time. Try not to repeat it more than twice – getting stuck in an endless cycle of tweaking is no fun.
Before exporting the mix, you must also make some quick technical checks. First, check that your stereo out channel is not reaching above -3dB. This ensures you have enough headroom for mastering.

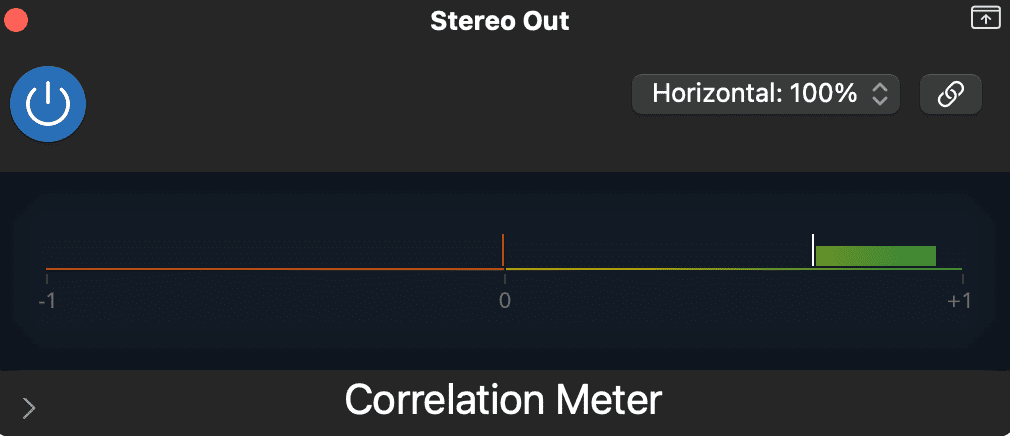
You also need to check for phasing issues, which you can do with the Correlation Meter plugin (under ‘Metering’). Make sure that the meter is consistently staying above 0. If not, it means the waveforms of two of your tracks are cancelling each other out.
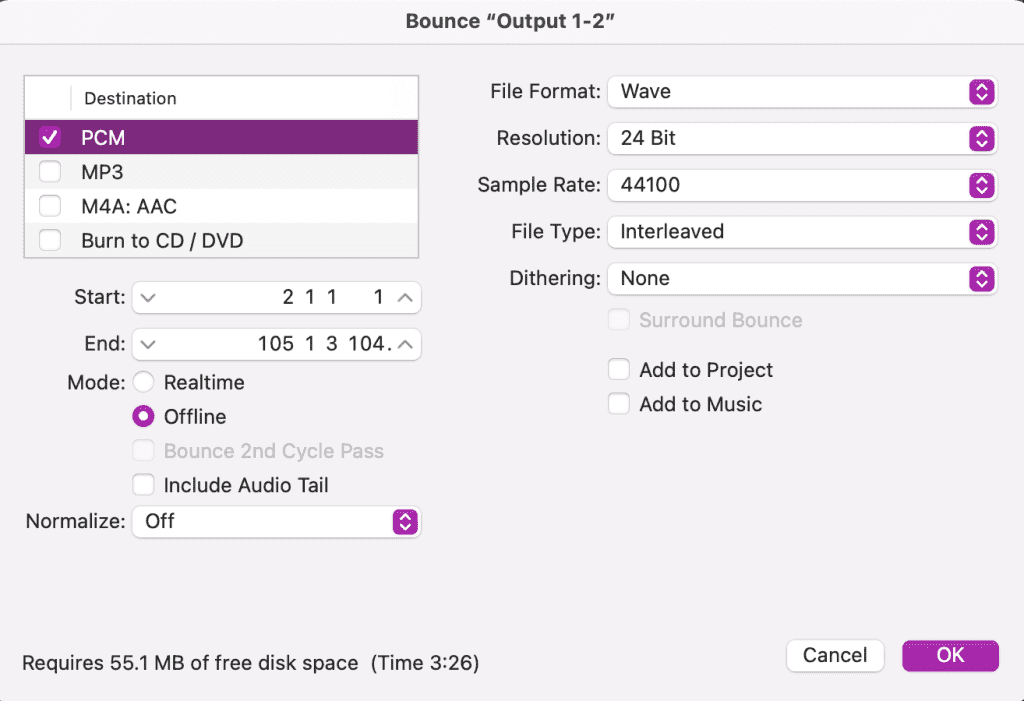
The mix is now finished! Select all your tracks and hit Command+B to bounce it. You’ll need to tick ‘PCM’, which will give you a WAV file. Ensure the resolution and sample rate are the same as in your project.
Now, take a break of a day or two to refresh.
Open a new Logic Pro project and drag your audio file in. You’ll also need to drag in audio files of 2-3 reference tracks, preferably from top-rated artists in your genre and released within the last five years.
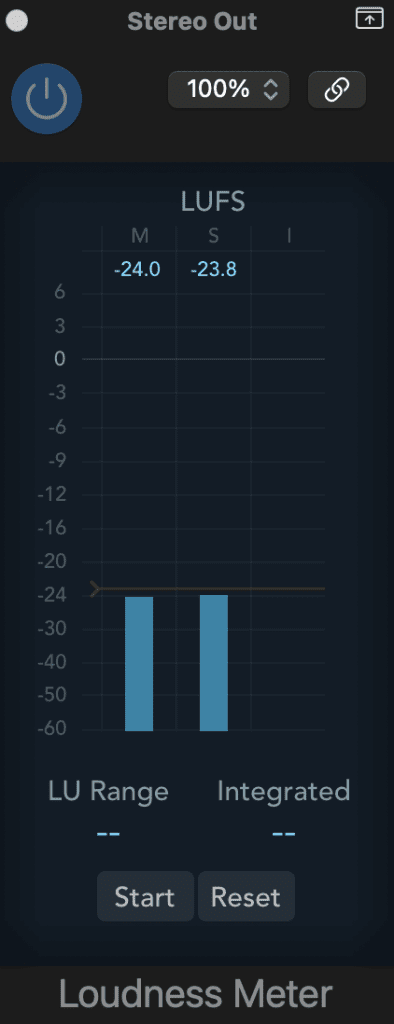
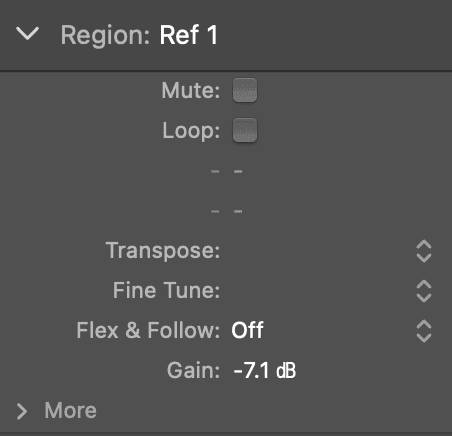
To compare your track with the references, they must be roughly the same loudness. Add the Loudness Meter plugin (under ‘Metering’) on your stereo out channel and play the loudest part of your track. Take a mental note of the number under’ S’. Now, adjust the gain (on the left-hand side under ‘Region’) for both of your references until the number is roughly the same.
Check out some of my other articles:
- Is Logic Pro Good For Making Beats? Yes, 3 Reasons Why
- How Long Does it Take to Learn Logic Pro?
- How to Make Vocal Chops in Logic Pro
- Is Logic Pro Good for Classical Music? Yes, 5 Reasons Why
Step 2: Mastering EQ – Shaping Tone
The first processing step in mastering is EQ. This shapes the frequency balance, creates a pleasant tone, and is vital for making sure your mix sounds good on different speakers.
For this task, I’d recommend two plugins. The first is the Vintage Tube EQ from Logic’s Vintage EQ collection. The second is Match EQ.
[Screenshot 6 + 7: Tube EQ + Match EQ]
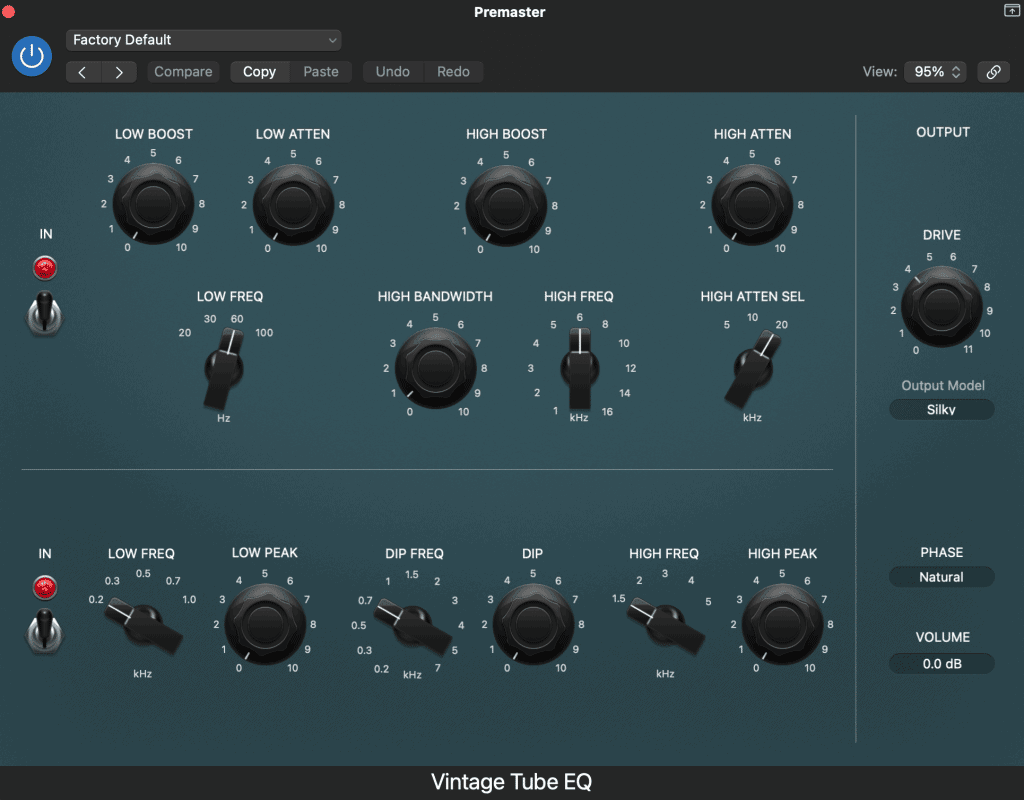
The tube EQ is inspired by two analog EQs – the Pultec EQP-1A at the top and the MEQ-5 underneath. These both add some excellent analog mojo, even without adjustments, meaning it sounds more ‘musical’ than a digital EQ. Listen to the references and your track, and adjust accordingly. Too much mud? Use the dip dial to remove somewhere between 0.2 and 0.5 kHz. Needs more air? Use the high boost at 10kHz or above.
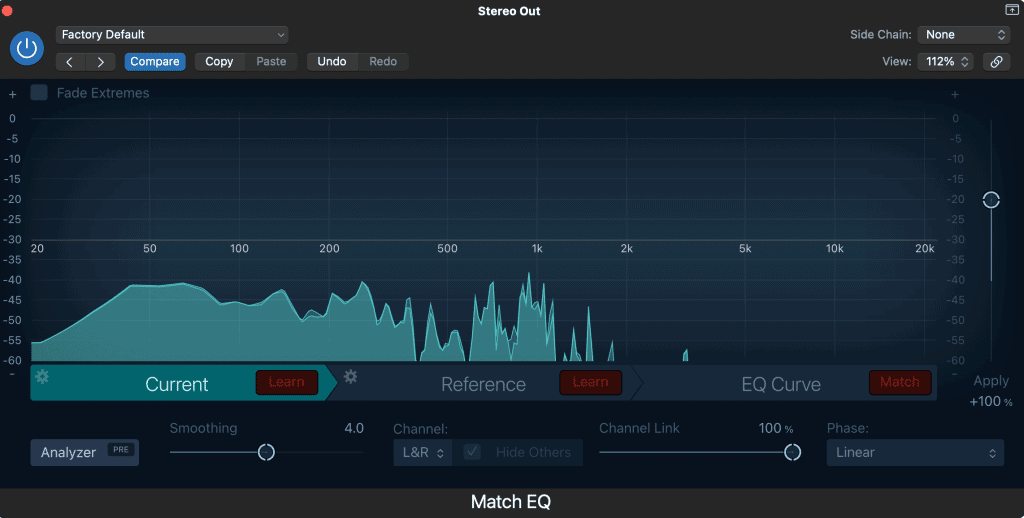
When mastering, we want to use wide and subtle adjustments of 1 or 2dB. Any big problems should have been fixed in the mix.
If you’re completely lost and not sure what to listen out for, Logic Pro has a secret trick up its sleeve – the Match EQ.
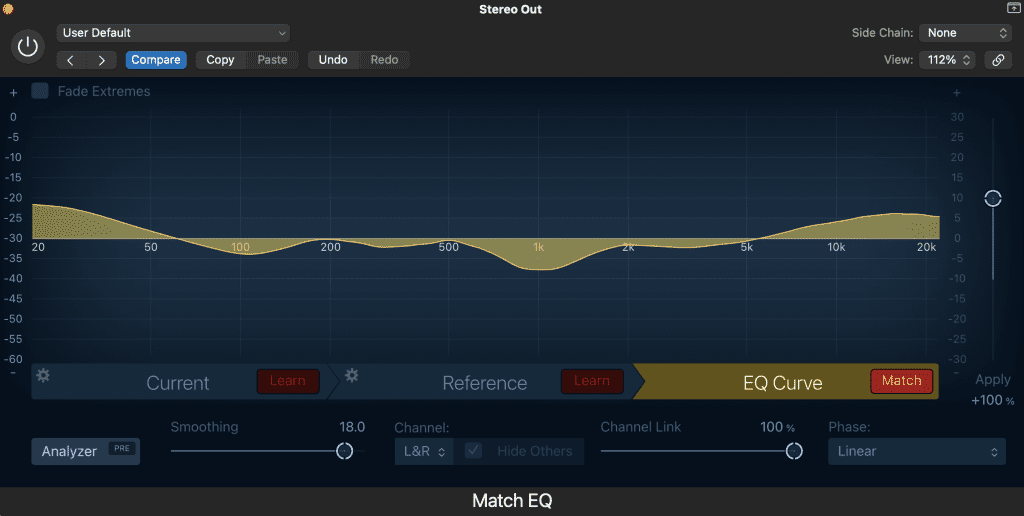
You can either drag your current and reference tracks into the plugin or press ‘learn’ and play them to record the frequency data. Hit ‘Match’, and Logic will show you a graph of suggested EQ adjustments to match your reference better. Turn ‘smoothing’ up if it looks too erratic. It’s better to use this plugin to inform your EQ decisions rather than using it directly, as it can otherwise make your track sound pretty strange.
In this example, we can see that my reference has a bit less energy in the mids, around 1kHz, and more energy in the top end (15kHz) and sub-bass (20Hz).
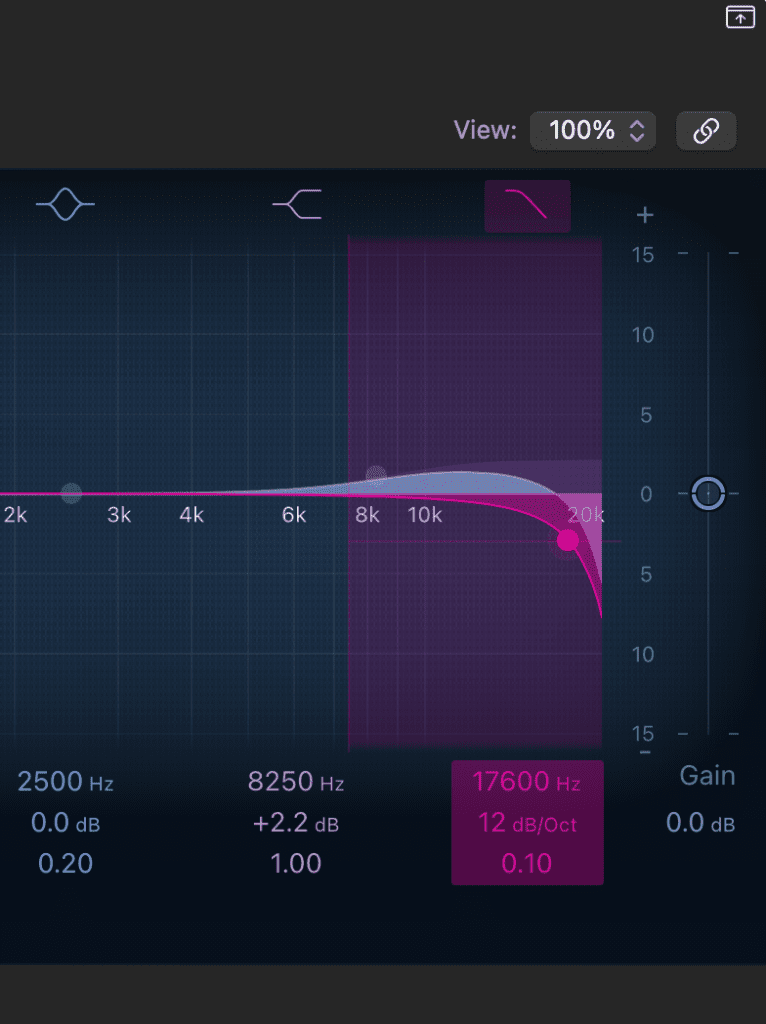
Pro Tip: If you’ve used a high or low shelf boost, it’s a good idea to combine it with a high/low pass filter to roll off and shape the extreme ends of the frequency spectrum, rather than creating excess brittleness or boomy-ness. This is easy to do in the Channel EQ.
Step 3: Mastering Compression – Controlling Dynamics
Compression has two goals in mastering: to ‘glue’ everything together and to control large peaks. It works by turning the volume of your track down a bit whenever it reaches over a certain threshold, so it has a more consistent volume overall.
Logic Pro has a fantastic selection of stock compressors. For mastering, I’d recommend using the Platinum Digital and the Vintage VCA.
Taming large peaks
The Platinum is a plain compressor that is not modelled on any analog gear and is very clean-sounding. It’s an ideal choice for taming out-of-control peaks.
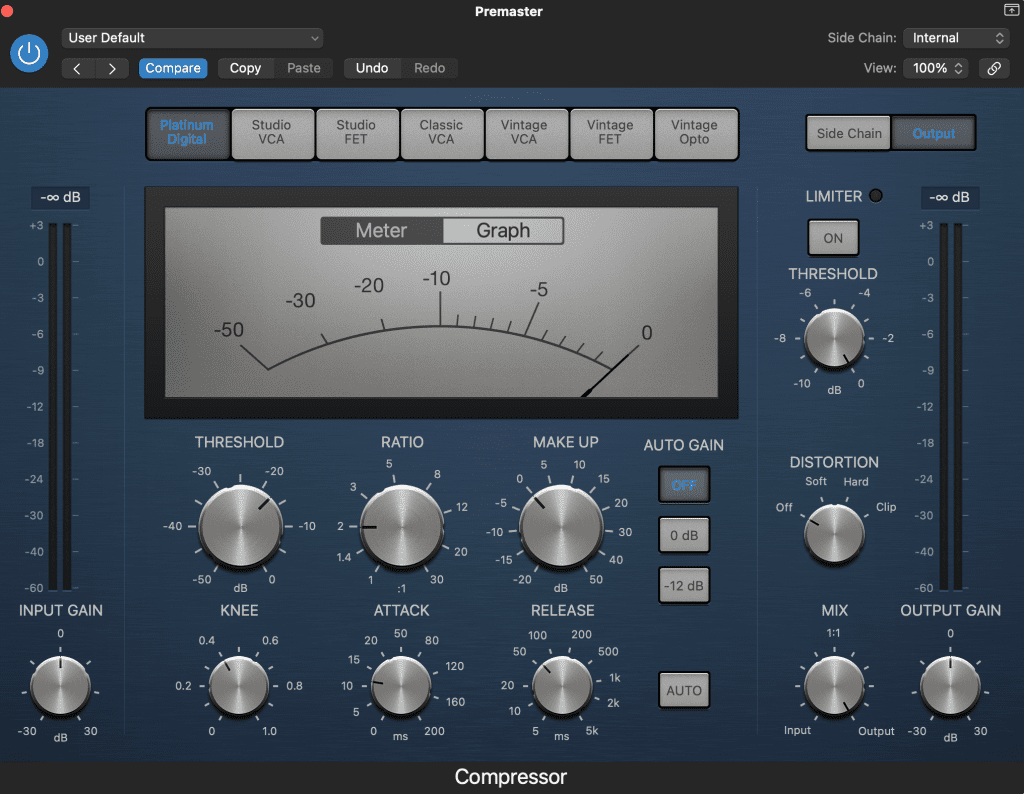
First, turn off the auto release and gain to set up your compressor. Set the knee somewhere in the middle to start. This controls how obvious your compression will be (with 0 being the most obvious). Turn the attack and release all the way down, and set your ratio at around 2:1.
To start compressing, adjust the threshold until you get quick little spikes on the meter every now and then. This means you are catching just the peaks and leaving the rest of the signal untouched.
Next, start to increase your attack time. We want it to be fast enough to catch the peaks but not so fast that it messes with bass frequencies. Somewhere above 10ms is a safe bet.
We also need to set the release time. The compressor needs to release quickly to catch just the peaks, but not so fast that it creates pumping. This could be anywhere around 30 to 100ms. Try paying attention to your kick and snare (or other percussions) as they have the punchiest sound and will impact peaks the most.
This type of compression is helpful in some cases, but in others can make the mix sound over-compressed. Don’t be afraid to switch it off later if it isn’t serving the track.
Glueing a mix
The Vintage VCA is Logic’s version of the SSL G Bus Compressor, best known for its beautiful saturation and ability to magically glue things together.
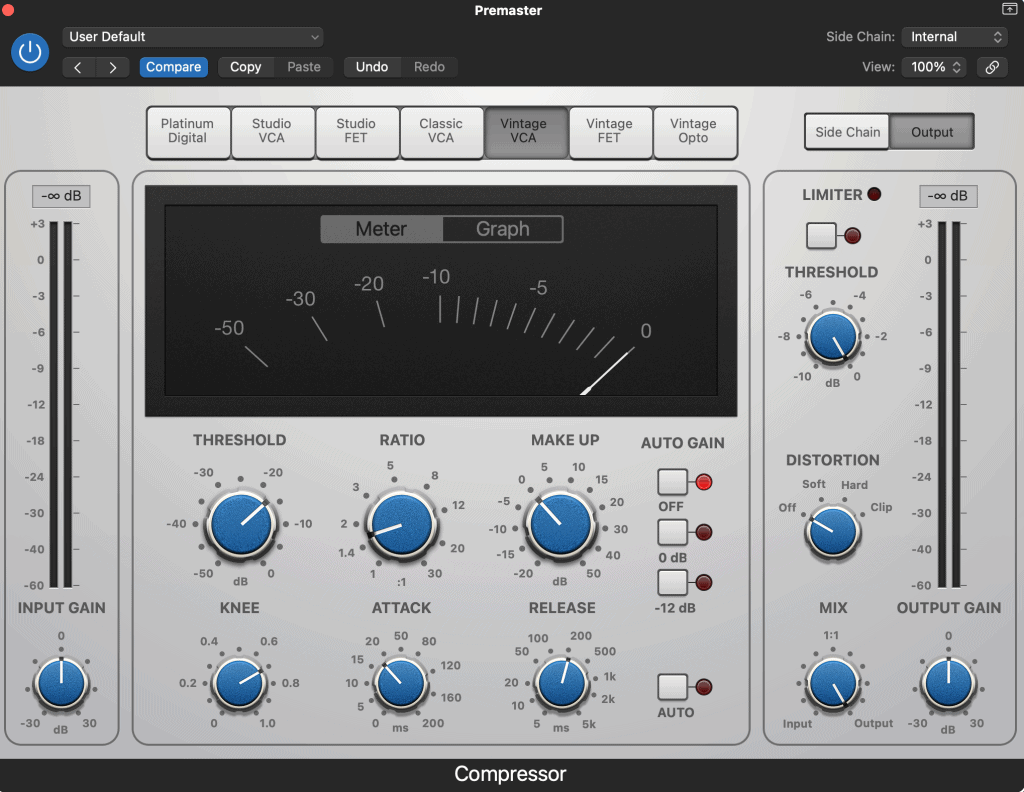
To set it up, follow the same steps as before. This time, you might like to go for a higher knee. For glueing, we want the compression to affect most of the signal, so the threshold needs to be slightly lower. Adjust until you are getting around a subtle 1dB of reduction.
Next, the attack should be short to medium to let some punchiness through, while the release should be long – somewhere above 100ms is a safe bet. The release will need to be timed to your song’s BPM to sound natural.
You can use this online calculator to find appropriate millisecond times for your release: https://anotherproducer.com/online-tools-for-musicians/delay-reverb-time-calculator/.
With this type of compression, you might have lost some loudness, so be sure to use your loudness meter to check, and adjust the make-up gain to make up for any loss.
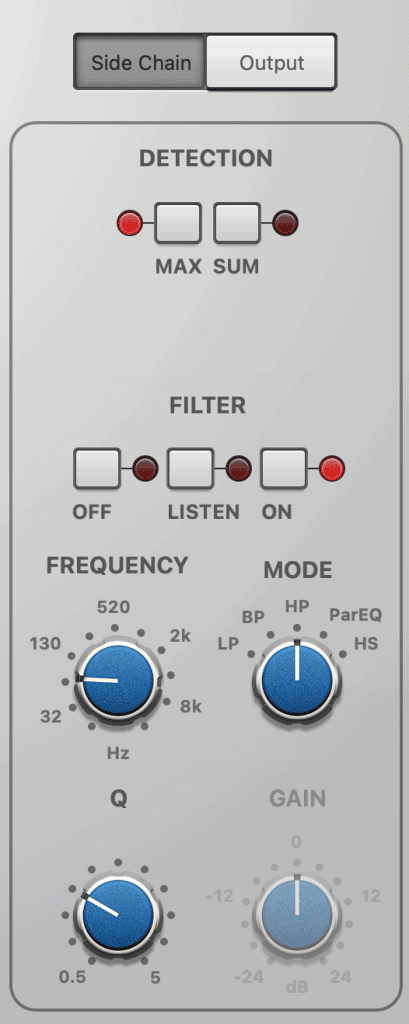
Pro Tip: compressor’s ‘ears’ don’t work the same as ours. We hear bass frequencies as quieter than higher frequencies, but the compressor doesn’t. To stop the compressor from overreacting to your bass, use the side chain in HP (high pass) mode, and adjust the frequency dial until the compressor is no longer reacting to your kick or other low-end instruments more than the rest of the mix. The sweet spot is usually around 60-100Hz.
Step 4: Mastering Multi-band Compression – Controlling Tone
Multi-band compression is a bit like an EQ which only activates when specific frequencies get too loud. It’s not always necessary when mastering, but it can be an incredibly useful tool.
Logic Pro’s multi-band compressor is called Multipressor, and… it’s not much of a looker. Do not worry – though it looks complicated, setting it up is mostly the same as a normal compressor.
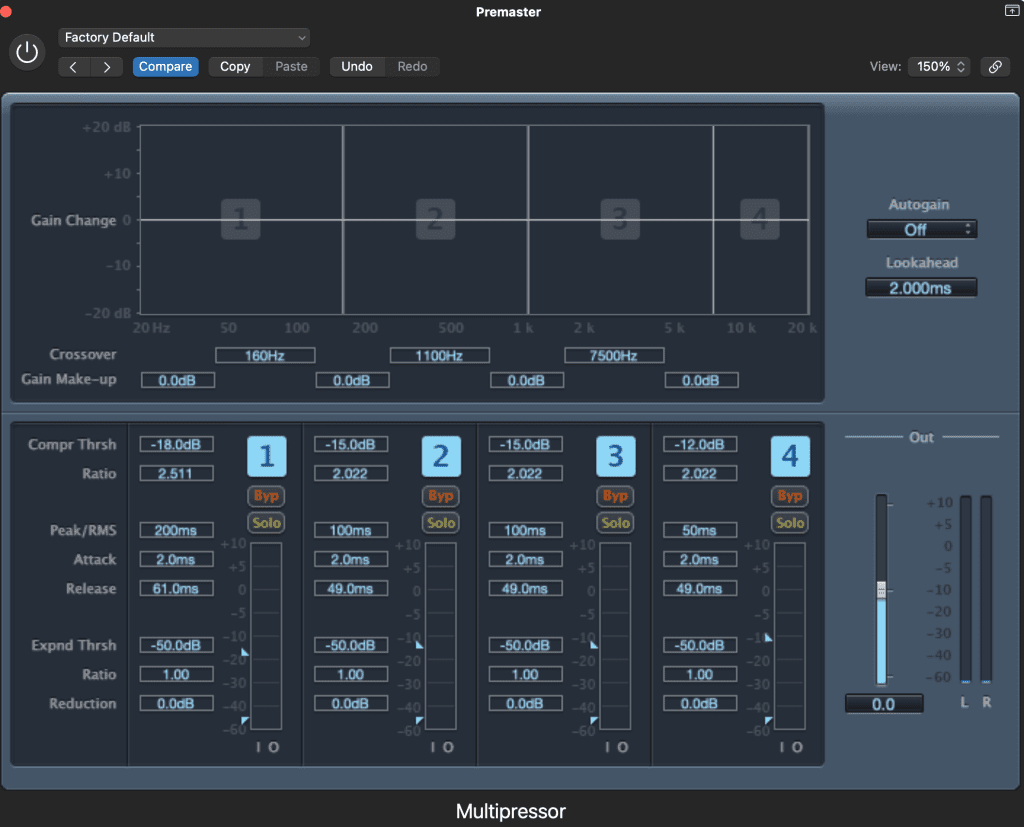
Let’s say we want to compress just the low end to make it more consistent. This is section ‘1’. You can change the crossover frequency depending on what is needed to affect a smaller or more comprehensive frequency range.
We still have ratio, attack and release, but we also have peak/RMS. This controls how long the compressor stays on between attack and release. For bass frequencies, it’s best to set peak/RMS higher (around 100-200ms) and attack short to medium. The release must last the full length of each bass note until the beginning of the next note. If the bass has lost some loudness, you can use the gain change line to turn it up again.
The bypass and solo buttons are incredibly useful for listening to the four bands individually.
There is also an expander at the bottom, with a threshold, ratio and reduction level. An expander is the opposite of a compressor – it turns the volume up when the signal drops below a certain threshold. It’s not something you might use often, but feel free to play around with it if you like.
Pro Tip: unlike EQ and compression, multi-band compression is unnecessary in every master. Only use it if you think it’s needed, and don’t be afraid to turn it off later if it isn’t helpful.
Step 5: Mastering Saturation – Adding the Sweetness
Saturation is a unique blend of subtle distortion and compression, as you would find in any analog gear. It adds harmonics which give your mix an extra vibe and liveliness, as well as helping to glue everything together. It’s not necessary to master, but definitely a step you’ll want to consider.
In Logic, there aren’t any plugins specifically for saturation. Instead, they are built into plugins you’re already using. There are four different ways to add saturation in Logic Pro:
– The Vintage EQs
– The compressors
– The tape delay
– Phat FX soft saturation
Turn the drive dial up or down to add saturation in any of the vintage EQs. Be aware that turning the drive up will make your track louder, so if you are returning to your EQ at the top of the plugin chain, you must adjust the output volume to match the same loudness level on your loudness meter. Alternatively, you could add a second instance of the vintage EQ plugin as a stand-alone saturation tool (without any EQ adjustments).
Turn the distortion dial to ‘soft’ to add saturation to your compressor. Again, you can either add this as a stand-alone and turn the ratio to 1:1 (no compression) or return to the compressor you used previously and adjust output gain afterwards.
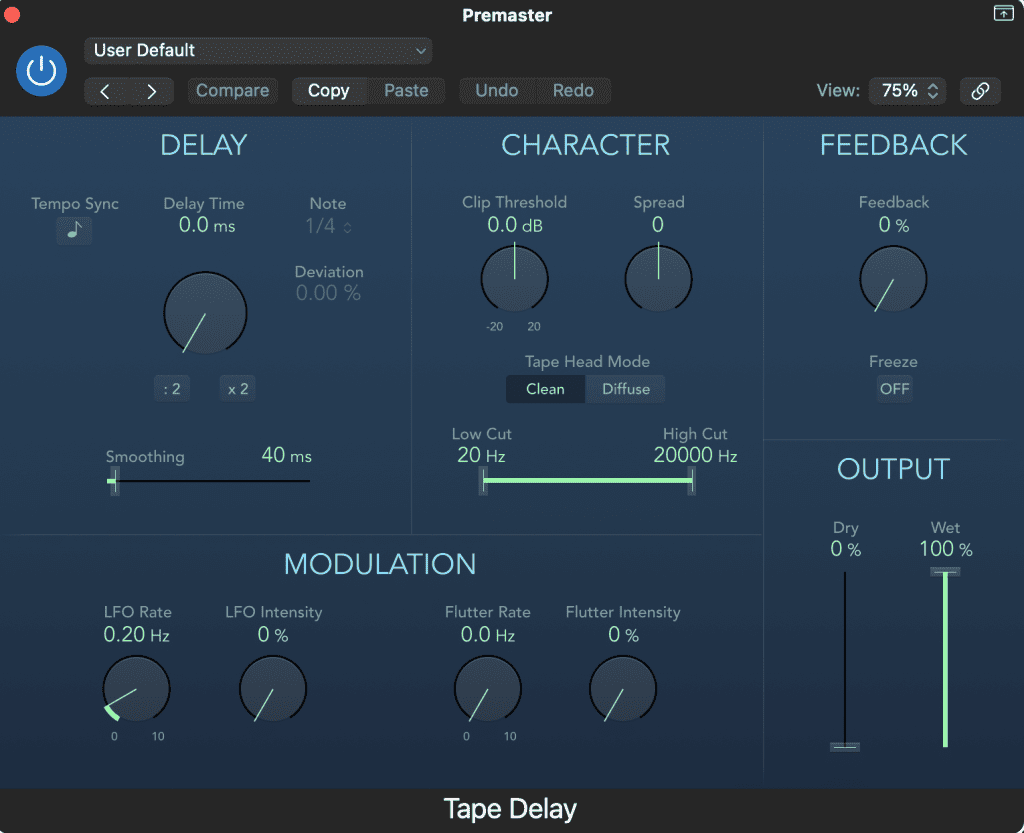
Tape saturation is a favorite for many producers, thanks to its beautiful warmth and vibe. Logic has a secret weapon with this built-in: the tape delay. To use its saturation in your mastering chain without the delay effect:
– Turn feedback to 0%
– Turn off Tempo Sync
– Set delay time to 0.0ms
– Set the output to 100% wet and 0% dry
Turning the clip threshold into the negative values will push the tape saturation further, while positive values will make it more subtle.
Finally, there is the impressively multi-purpose Phat FX plugin (find it under ‘Multi Effects’). Turn off all the other modules and set one of the distortion dials to ‘Soft Saturation’. I’d recommend turning the other two dials down to 0%, as three distortion modes can be a bit much for mastering. From here, you can add as much soft saturation as you like.
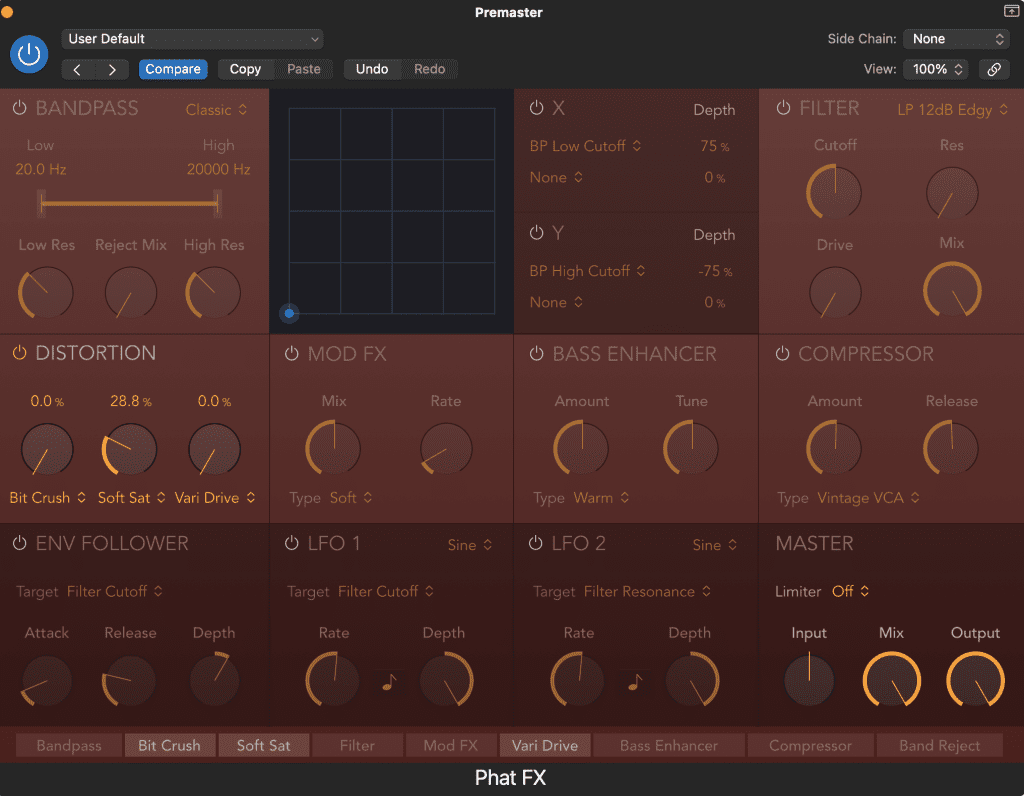
Pro Tip: it’s easy to overdo it with saturation and end up with a master, which sounds too distorted. Once you’ve found your saturation sweet spot, try backing off to be safe. You can also dial back the ‘mix’ knob in Compressor or Phat FX to blend it with the unsaturated sound.
Step 6: Mastering Limiter – Make it Loud.
This is the final processing step for your master! The limiter works like a compressor, but rather than turning the volume down slightly after it crosses a certain threshold, it just chops it off. This squashes your track, so it appears louder overall, and there won’t be any stray peaks.
For this step, I’d recommend Logic Pro’s Adaptive Limiter. Compared to the regular limiter, it has an automatic release time which adapts to the music.
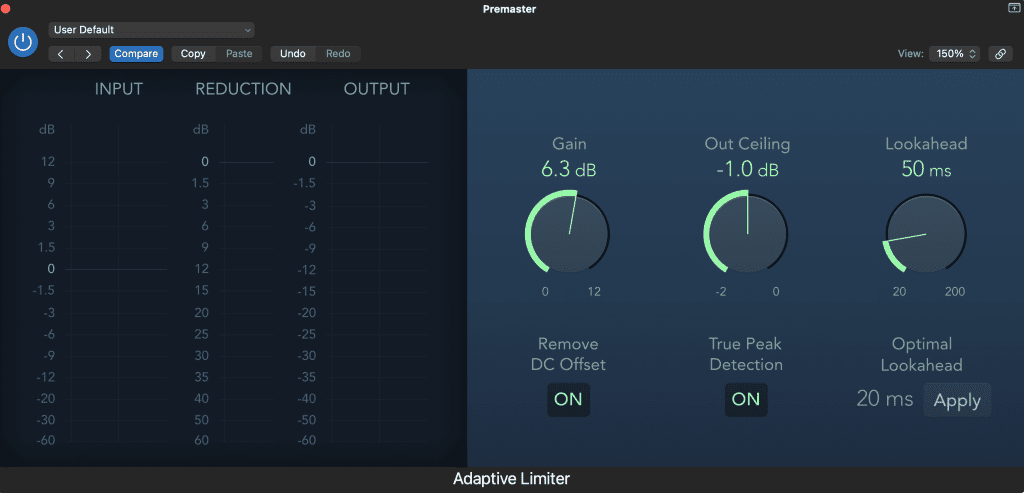
If you’re mastering for digital audio (e.g. to put on Spotify, Apple Music or YouTube), you’ll need to set your output ceiling to -1.0dB. If you’re working with a particularly ‘loud’ genre like EDM, set it to -2.0dB. If you’re mastering for a CD, set the output ceiling to -0.2dB. We’ll go over the reasons behind this in the next step.
Next, turn your gain up until you start getting some gain reduction. 1-2dBs of reduction is healthy for most genres, but you might like to push it to 5dBs if the style calls for it. Make sure you’re checking the loudest part of your track.
Now you have a choice to make. You can turn on True Peak Detection, which provides super-accurate limiting and saves hassle. If you don’t like the sound of the true peak limiting and decide to turn it off, you’ll need to pay careful attention to your levels with some meters (more on that in the next step).
Pro Tip: as with compressors, you can use more than one limiter. For example, you might like to use one limiter with True Peak Detection off to shape the sound and a second with True Peak Detection on to catch any stray peaks.
Step 7: Metering – Getting the Right Levels
Mastering is more about the musicality than the numbers, but there are still some things we need to check to make sure your track will sound its best once released.
For metering, you can use Logic Pro’s MultiMeter (find it under ‘Metering’). Under ‘Level’, select ‘True Peak’, which will change the display in the top right.
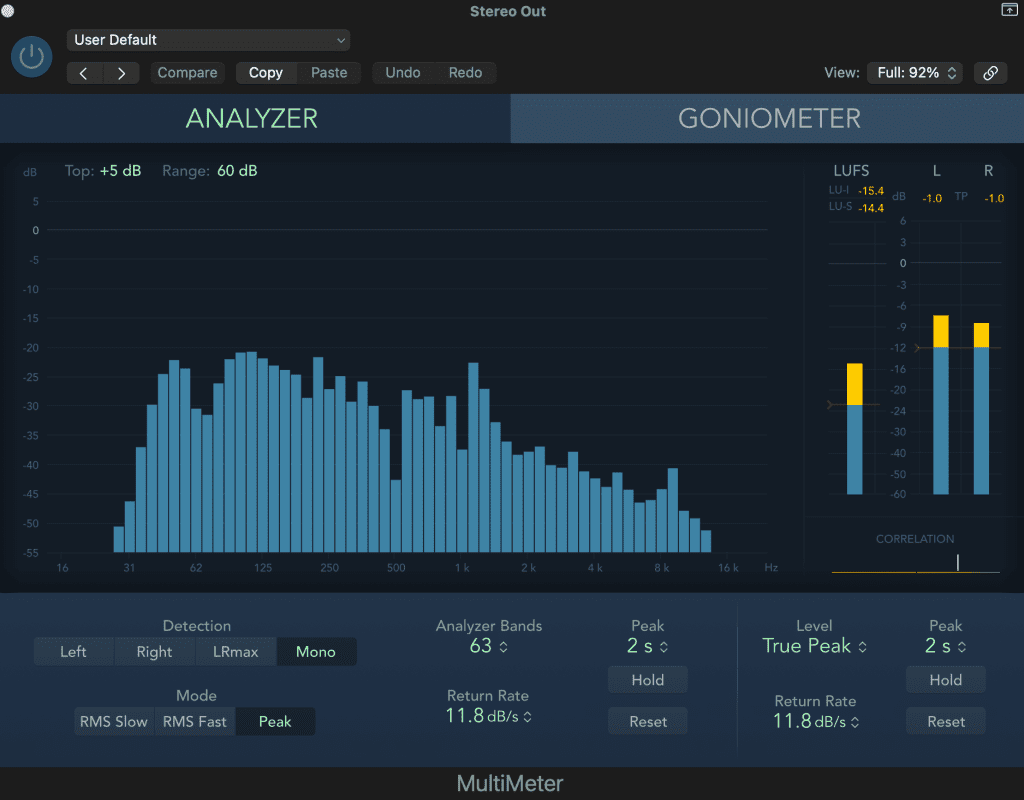
A true peak detector can detect inter-sample peaks. These are peaks in the audio that the computer can’t otherwise see – they only appear in real-world audio where the music is played out of a speaker. These inter-sample peaks can cause unpleasant distortion, so checking for them is essential.
If you turned on True Peak Detection on your limiter, there’s no need to worry about checking it with MultiMeter. If you didn’t, you’d need to jiggle the gain and output ceiling on your limiter until there are no true peaks above your output ceiling.
To recap, digital platforms recommend true peaks to be no more than -1.0dB or -2.0dB for louder genres. This prevents your track from distorting when converted to lower quality for streaming online. When writing to a CD, the file remains the same quality, so it’s perfectly fine to leave it at -0.2dB.
Next, let’s talk about loudness. You may have heard that streaming services normalize everything to -14 LUFS. This is not a target for you to hit.
LUFS is a scale of loudness perceived by the human ear, so it helps compare the relative loudness of different tracks.
There is no one LUFS reading you should be aiming for. Softer genres like jazz tend to sit around -14 to -16 LUFS. Most pop music sits no louder than -9 LUFS. Some hard-hitting genres will push to -6 LUFS. So long as your track sounds good, the streaming services will do the rest of the hard work regarding loudness.
Pro Tip: you can check how much your track will be turned down on different streaming platforms with this handy website: https://www.loudnesspenalty.com/
Step 8: Final Checks & Exporting
It’s finally time to export the track!
You might want to check your master on different speakers and headphones to ensure you’re happy with it. Remember to compare to your reference tracks.
When ready, select your track and hit Command + B to bounce it. For streaming, you’ll need a WAV file with the same bit depth and sample rate as your project. Most distributors will now allow you to submit high-quality files such as 24-bit and 48kHz or higher. For CD, you’ll need a 16-bit file at a sample rate of 44.1kHz. If you’re down-sampling from a higher bit depth to a lower one, you must turn on dithering to prevent distortion.
It’s Release Time
Now you’ve reached the end of this guide, you’ll have a track ready to be released without even leaving Logic Pro. There’s a lot of information to take in, but it becomes a seamless process once integrated into your workflow.
Your first master might take you an hour or more. Once you become more comfortable, the process should take no more than 15-20 minutes (yes, really!). Mastering is about trusting your ears and being decisive on precisely what a track needs to finish. This doesn’t always mean tonnes of plugins and tonnes of time; sometimes less is more.
Happy mastering!
References
Formation Audio (2015). Pass Filters in the Mastering Process. Available at: https://mastering.ninja/articles/2015/7/13/pass-filters-in-the-mastering-process
Justin Perkins (2021) The Mastering Guide to Audio Formats and Delivery Mediums. Pro Audio Files. Available at: https://theproaudiofiles.com/audio-mastering-format-and-delivery-guide-2014/
https://www.loudnesspenalty.com/
Recent Posts
QuickTime is a vital app for many Mac users, and if you’ve recently bought a new microphone, you might wonder how to use it optimally. QuickTime cannot record audio content if it doesn’t have...
Every microphone leaves a unique signature on the quality of its output. If you’re a podcaster trying to melt your way into your audience’s hearts, a muddy, distorted recording won’t cut it....
