- Get A Good Quality Recording
- 11 Tips on How to Get a Good Quality Record :
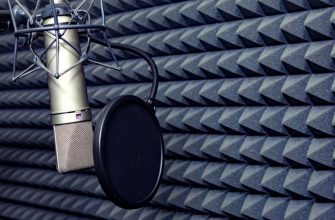
- 1. Get the right Mic for Your Vocal or Gear –
- 2. Add a pair of Headphones to your Gears for monitoring –
- 3. Get a pair of Monitors –
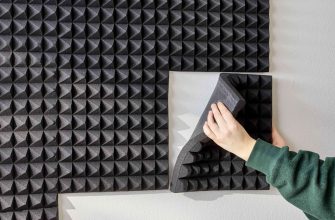
- 4. Soundproof Your Home Studio –
- 5. Deaden the echo in your Studio or Room –
- 6. Acoustic Treatment –
- 7. Distancing –
- 8. Exploit the Software –
- 9. Get Accustomed to Your Gears –
- 10. Fail at first, Succeed latter –
- 11. Just Get Started –
Get A Good Quality Recording
I know we all have been reading these articles on “How to get A good quality Recording?” from different sources but fail to take action. You need to take action and follow all the mentioned tips on a whole to make your records sound better.
You need to try out the different tips that you come across and test them out. My suggestion on this is to do all the steps and remove the ones that are not working for you.
We can always get a Good quality Recording by improving some important factors in our studio or maybe with our gears. Some of the tips that I am going to share will be the ones that you have come across in every articles.
While some of the ones are the things that you hardly come across to another posts or articles. And If you have come across it then you can have a quick read on what I have to say.
Small things are the ones that we always tend to leave out and they are also the ones that can give us a difference in every aspect. So, we need to consider them too.
11 Tips on How to Get a Good Quality Record :
1. Get the right Mic for Your Vocal or Gear –
This is a very crucial part to have a great quality track form the start. You Microphone plays a very important role on the sound and quality you get at your record.
There are different types of Microphones for various types of projects. And as you might know it, they respond very differently from each other as they are meant to record different types of sound signatures.
For Instance, If you are going to record a Vocal then you should opt for a Large diaphragm Condenser mic – meant for recording crisp and clear vocals. On the other hand for recording a drum, you should opt for Dynamic Cardioid Mics as they are naturally loud, punchy and bassy.
Again, for an electric guitar we should opt for a mic that can handle high Sound Pressure Level (SPL) as they may be even more as compared to that of a drum kit – something like a Hyper Cardioid Dynamic Mic. And Yes there are also mics for recording Acoustic Guitars.
Some General types of Microphones ![]()
![]() are –
are –
- Condenser Microphones
- Dynamic Microphones
- Ribbon Microphones
The list can go on if we go further down and deeper. Do you get an idea now on what I am trying to convey here. There are different for a reason – and you should choose something that is the best suited for you and your studio gears.
I suggest you go with a unidirectional Microphones for recording vocals and other gears as it will only pick up the desired sound.
Check Out our Recommended Microphones list.![]()
![]()
2. Add a pair of Headphones to your Gears for monitoring –
If you have a pair of headphones then it’s perfect and you don’t need to get anything new for this. If you don’t have it then get yourself a pair of it. You will be needing it quite a lot in monitoring your track.
Headphones are very essential in monitoring your track or while recording. You can even use it without a pair of monitors – manage your studio with a pair of headphones only.
It will allow you to monitor even the slightest change in sound signatures and hence enable you to cut out any unwanted noise in the background.
These unwanted noise are very tricky to sort out if you are checking the record on simple plain audio outputs or monitors.
You can test this out at your own by hearing a record on a simple speaker and try to tweak all the unwanted noise in the background. Of course, you will be able to cut out the obvious and loud ones but not the weak ones.
These small weak ones will prevent you from achieving that pro quality sound track and you need to fix these with the help of a pair of headphones.
Here is our Favourite Headphones![]()
![]() .
.
There are different types of headphones and you better have a good look on the different types before you get a pair of it. You can check this article![]()
![]() – there is a portion where different types of headphones and their uses are described.
– there is a portion where different types of headphones and their uses are described.
3. Get a pair of Monitors –
Get it if you have the budget, if not then you can still manage without it.
A pair of Monitors are needed so as to simulate the real life music experience with all the ambience of a particular situation or a room. It will give you a real life experience on how your music or record will sound like on other systems.
Such real life scenarios are really hard to simulate on a pair of headphones, and a record that sounds good on a pair of headphones may not be that good on other audio systems. This is because there are various factors that come into play when heard from other sources.
Some of the factors are ambience of a room, reverberations, interference of reflected sounds, distances of the speakers, etc. while on headphones the music is pumped right into our ears.
We can get around this with only a pair of headphones and simulating these factors, but it won’t be that easy and effective as compared to that of a pair of monitors.
4. Soundproof Your Home Studio –
Here is also one of the most important thing that you should consider doing or getting it done before anything else. You really need this piece of the puzzle if you want a better quality record.
There are various processes or steps that you could do to soundproof your studio in an easy manner. Moreover, you could hire an Expert and make him do it for you.
If you want to spend less and do it yourself then Check my article on SoundProofing in an easy way![]()
![]() .
.
It is the process in which unwanted noise or sound are blocked, which are coming from the outside environment. Plus it will prevent the music from your studio from leaving and disturbing others too. Keep that in mind buddy, you need to turn that volume down too without sacrificing the volume level inside your studio.
Now, let me make this clear – it’s not “Acoustic Treatment“. Soundproofing and Acoustic Treatment are very different from each other, in fact they are totally different. Many others get confused between these two.
In short – Soundproofing is the process of blocking unwanted noise while Acoustic treatment is the process of making a room reach a desired sound characteristics by tuning the room.
5. Deaden the echo in your Studio or Room –
It can be quite annoying sometimes, we all know about this echo thing and you need to do something about it too. You can check the level of echo yourself, don’t need anything fancy to do this.
Just shout at your room or say something inside your studio directing your voice at a wall in front of you but do it from a distance – maybe from the door.
If you don’t do it from a distance you may not observe the echo effect as echos are produced by the reflections of sound waves from a wall (a smooth polished surface) that is at distance from the source.
As for reducing echo in your room/studio, you need to reduce the amount of polished surface or bare walls as much as possible not to reflect the sound waves.
Let’s think about something easy and cheap – something that is soft but thick or anything that will help us absorb some of the sound waves and prevent it from reflecting back again.
It can be a thick curtain that you could hang it in front of your walls or you can get professional too, but you will need some bucks to get professional on this.
6. Acoustic Treatment –
You can do this or not as you can still manage without it. Some people say it is very much needed while the others say that it’s not that much of a problem.
In my opinion – depends on the situation: if you have a pair of monitors and all the required steps are not done including the Acoustic treatment part![]()
![]() then, it might even worsen the situation.
then, it might even worsen the situation.
On the other hand if you use only a pair headphones to record or monitor your mix at your home then you can still manage without it too.
There are also other ways to get around it without going through the process. And doing it require some technical stuffs too. So, decide it for yourself.
7. Distancing –
You may have heard or not about this but the distance you keep with your mics when recording plays an important role in producing a great track. Test this out for yourself with your mics.
Try recording something in three conditions –
- Very close to the mic.
- Not too close, not too far – keep it in the middle.
- A little bit far way from the mic.
In these different cases you will observe how much the quality of the record is affected with variations in their distances. It will be different for different mics and you need to configure it to work the best with your voice.
Of course, their will be a desired distance for every gear you use too. So, you better find that sweet spot for each one of your gears if you have anything extra other than your vocals.
It is just a hit and trial method before you find that sweet spot that you are looking for. Don’t give up even if you fail at your first 3 or 4 trails. You can find that sweet spot if you give in the time needed.
8. Exploit the Software –
You can use software too to improve the quality of your record. Let’s say you don’t have expensive software where you could do all those crazy things – don’t you worry as we could use simple software like Audacity to do the job for us.
It’s easy to use and you could do as almost everything – not everything but you can manage with it. You can watch other Youtube videos on it and learn how to manipulate or use it to improve the quality for your music or record.
Yes, you can use other professional software to do it – if you have and could do it with a professional one, it’s even better. Just don’t use too much of it as it will kill the natural characteristic of your voice or music.
9. Get Accustomed to Your Gears –
You should get accustomed to your gears as time goes and you don’t need to change every now and then. As you spend more time with your gears, you will come to know the ins and outs of your gears and how they work in different conditions.
Right after you master your gears if you change it to a new one, then you have to start all over again.
I am not preventing you from upgrading your gears, what i want you to know is that don’t change your gears often. You can upgrade it when you need it.
The same goes for your Room or Studio. You need to lean about your studio too. How it sounds at a particular area of the room which the best suitable for you to record.
10. Fail at first, Succeed latter –
You will not get the desired level of quality track that you are aiming for when you do all these steps (for the first time) but you need to search for that sweet spot as I have mentioned above. Just Take it slow – One step at a time and try to accomplish all the required steps.
11. Just Get Started –
This is the one that many a people fail to do and end up to the initial state. Well, you gotta take actions on the tips that you have read here.
Getting Started is getting ahead and you will learn all the DOs and DON’ts pretty fast as you go through the processes. So, think about what you need to do and take action on it step by step. While doing so you will come to know of the things that will work and what won’t work.
And that my friend is the best part on getting started. All the things will come into place and you will know how your gears or studio setup works the best for you. Therefore, you will know exactly how to produce a great quality track or record even if you have a low quality gears on your studio.
Now, Go smash these steps and hope you will get a great Quality Recording.