Planning to build a home recording studio? You must be going through all the guides, tips, or techniques that you can find online or offline. (I did the same thing)
After researching other sources and some of my experience, I have come up with this post and will try to be as complete as possible.
By the end of the post, you should know how to build it and even have the idea of building a professional music studio.
Before we dive into the details, you must know that building a studio room is a big and easy task at the same time.
If you don’t know the basics, then it will be a complete mess, and you will have to do it all over again.
Those who are starting tend to leave out some important things while setting up. It may be due to ignorance, lack of money, negligence, or others.
But down the road, they regret it. I am a VICTIM of the same … I had to rebuild my room cause I messed it up completely.
So, I will be covering all the things needed in building a recording room – flooring, soundproofing, acoustic treatment, room selection, gears needed, positioning, other additional gears, etc.
Approaching it in a planned manner will give you the best results. Every process has its own steps that you should follow, and the same applies here too.
An Example
For instance, let’s say you are building a house. Think about the steps needed in building the house.
First of all, you have to think about the space or where you will build it. After that, you have come up with the number of rooms and the design of the house.
The second thing you need to decide is the material you will use to build it. Lastly, you are going to decorate the room and come up with the base idea for it.
The important thing is that the amount of money you want to put in will also affect the house you are building.
We need to look at other factors – like the number of family members, space for the family members, amount of space for the kitchen, living room, etc.
And this will be different for all the families out there – as they have their own preference.
You need to understand some things before you start building the house and do it according to your needs.
Like this, we will make it simple and easy to build the recording room while making you understand the basic things needed.
Check out how much it would cost to build a home recording studio here!
The main steps on how to build it –
- Choosing the best place
- Flooring
- Isolations / sound proofing
- Acoustic Treatment
- Essential Studio equipments
- Additional Gears
- Some Free software
- Some Tips
How to build a home recording studio?
1. Room Selection
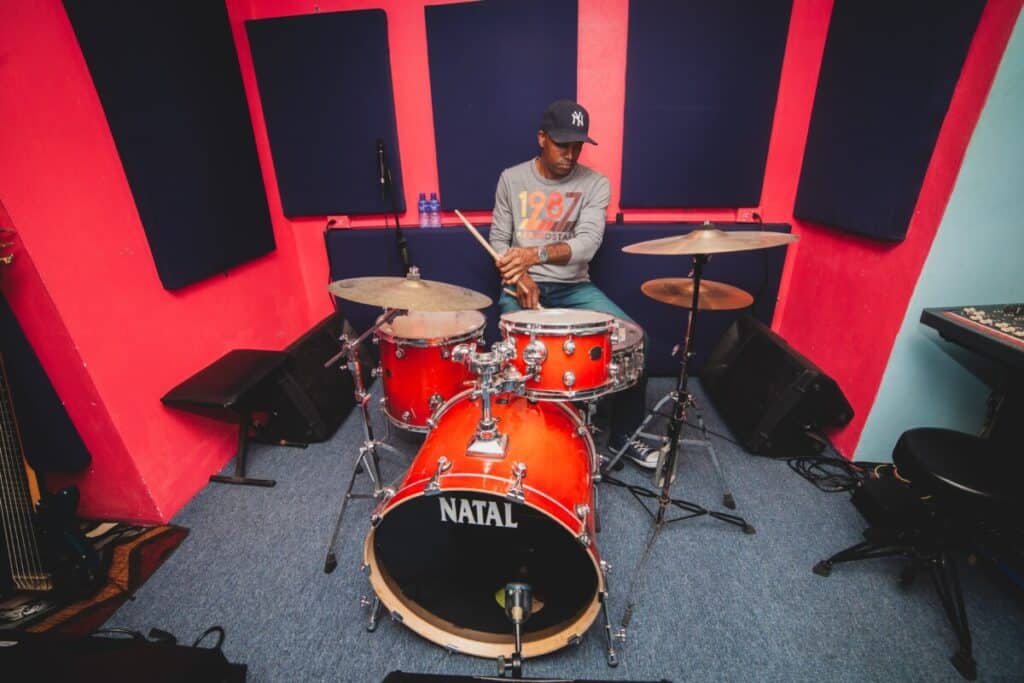
The first thing we need is a room where your gears will be set up. Keep in mind that the room’s nature also plays an important role when you are setting up a recording studio.
You will probably have two or three rooms that you can select from, and you should go for the room with the maximum space among them.
- More space, the better it is. It is because more space will help in the process of acoustic treatment later.
- Having more space inside the room will provide the needed space for natural reflections to occur, making the recordings sound natural.
- It will also help when you are making the stereo image identical inside the room, therefore helping in the positioning of the gears.
Identical stereo image – It is the phenomenon when the reflections inside the room are symmetric in nature.
On the other hand, almost all of the rooms inside a house are not meant to sound great while recording. (as they are not built for it)
So, an ideal type of room or a room close to this will be hard to find .. and we need to manage with what we have.
You must avoid building a home studio in a small and square room.
This will completely ruin everything with the annoying reverberations between the walls and other factors that will be hard for you to manage later.
For more information, check out who is responsible for soundproofing between flats.
2. Flooring
After you have chosen the room, the next big thing is the type of floor you want to install.
There are different types of flooring for a studio that you can go with. It can be hardwood flooring, laminate flooring, cork flooring, concrete flooring, etc.
Every one of them has its own merits and demerits. And you should choose the one that will suit you the best for your situation.
1.Hardwood flooring –
It is the type of flooring that you will see in most of the pro studios. And they are also mainly used for recording rooms.
They sound more natural as compared to others and give that original kind of ambiance to the reflections.
If you have hardwood floors already installed inside the room, you don’t need to replace them. You can go to the next step of the process.
Hardwood floors are durable and will last for a long time. This will help in keeping up with the traffic inside the studio.
But it is expensive, and you need an experienced person to install it properly. If you have the budget then, I suggest you go with this.
2.Laminate Flooring –
This type of flooring is prevalent nowadays due to its various advantages as compared to others.
It can be used almost anywhere, and you can expect something more than the price you are paying for.
The best part about it is the ease of installation. It is quick and simple to install over any flooring. And you don’t need to be a flooring expert.
You need to install a sub-floor before it. After that, you can put it over the sub-floor without the use of glues or nails.
But, laminate floors won’t give natural reflections to the level of the hardwood floors.
On the other hand, you will be getting a good deal for the price range. I mean.. it is durable, easy to maintain, cheap, water-resistant, and you can choose from a wide range of styles and colors.
You can opt for this if you are on a tide budget but, don’t expect it to give you the best results.
3.Cork Flooring –
This is also one of the floors that are becoming popular nowadays. It is now competing with natural materials.
It has good sound deadening property, and so I have seen studios using this type of flooring. Due to this property, they are mainly used in control rooms.
You can also use this as a decoupling material between two layers (as a sub-floor) due to the sound deadening quality.
The sound waves’ reflections will be quite lower as it mainly absorbs them and gives off a warm nature.
Note that it is not that durable as compared to others and expensive too. It should be in the same price range as hardwood floors.
So be sure to choose something that will be good for you and your budget.
If you want to know the different prices of various flooring, an article explains it.
3. How to Sound Proof your Recording Studio?
It is the process of blocking the unwanted sounds from the outside environment and also the sound from inside the studio from leaving.
This is the first thing that you should do before you start acoustic treatment. Many people leave this behind or do only this while building a recording studio.
You shouldn’t make the same mistake. For a recording studio, both soundproofing and acoustic treatment are needed.
Both of them are equally necessary too. And it would help if you didn’t mix up soundproofing with acoustic treatment.
I have mentioned in other posts that these two are completely different processes and complement one another.
The following are the simple steps involved in soundproofing your room –
Step 1
Filling up all the holes and cracks that are at the walls of the room or studio. Search every nook and corner of your room so that you don’t miss any of it.
This might look like something that you could neglect, but I can assure you that it can have the potential of ruining your recording easily.
Moreover, it is not a difficult thing to do. You can use something like a NoiseProofing sealant to fill up the gaps, and the cracks easily
Step 2
The second step is to soundproof the door of your room or studio. Soundproofing the door is an easy thing to do as compared to other steps.
You can just put an Adhesive Weatherstrip below the door to close up the gap between the door and the floor.
This will do the job if you have a good solid core door. But if you don’t have a solid core door, you won’t be able to block the sound completely.
Hard and thick materials are naturally good for blocking sound waves.
If you have money to invest in a solid core door then, go for it. It will be a great investment for your studio.
Another way that you could do this without spending much is to use a Sound Proofing Blanket instead of a
solid core door
- Panels have bound hems, double nickel plated brass grommets 12" O.C. along top and 18" O.C. along...
- Double faced material in nominal 2" thickness, for use as an absorber, or combination...
- Measures 4' width by 8' height by 2" thickness
Last update on 2025-05-30 / Affiliate links / Images from Amazon Product Advertising API
It would help if you hung it in front of the door when you are recording or doing something related inside the studio.
That is what I did when I first started, and it is very effective too. Affordable and easy to maintain are one of the main points to it.
Don’t forget to buy a blanket that will cover the whole door, so make sure you get a blanket with the right dimensions.
Step 3
Next up are the windows; you can completely remove the windows if removing them won’t be a problem for you.
If you need light or don’t want to remove the windows, you need to soundproof them.
What you could do is remove the normal glasses and replace them with soundproof fiber glasses. Make sure you don’t leave any gaps on the edges when installing it.
Another alternative is to use the same technique mentioned above, hanging a soundproof blanket over it. (but the sunlight will be blocked)
Step 4
Small but something you need to take care of is the ventilators. It would help if you kept the ventilators as well as soundproof them too.
You need air to breathe, and therefore you can’t remove them all from your room. So, we need to keep it open and deaden the sound waves coming through or leaving it simultaneously.
For this, a technique called the Sound Maze technique is commonly used to deaden sound waves.
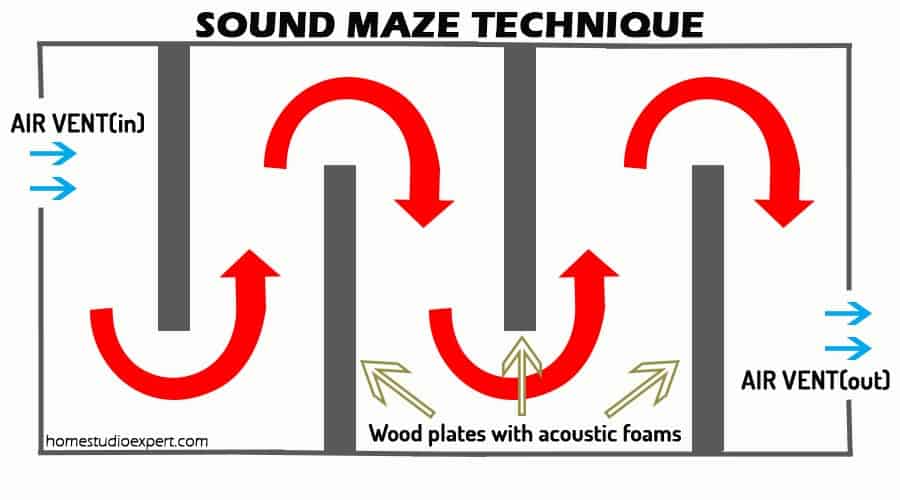
It is the technique in which the sound waves are made to pass through a series of zigzag patterns where acoustic foams are placed along the way.
Doing so will greatly reduce the sound waves passing through it and let the air pass through it simultaneously.
This is the way to go rather than going for an expensive route while building a soundproof ventilator.
Step 5
Building a second layer of the wall over the initial wall. This step may or may not be required according to your needs, but it will be required most of the time.
Let’s say you haven’t properly blocked the sound from the outside environment after you have gone through the above steps.
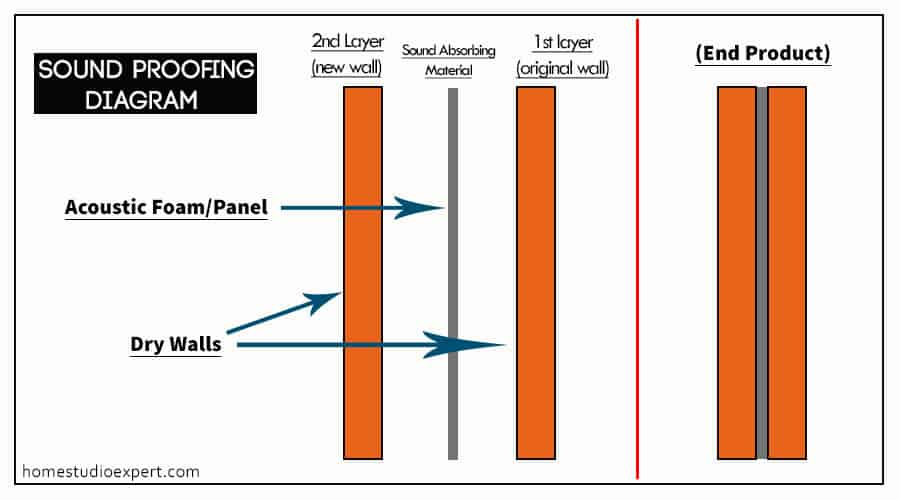
It might be due to the room’s thin, dry walls or structural problem where all the walls vibrate when children run or walk in the other room, when the garage door opens, etc.
All you have to do build a new layer of the wall over the original by adding a sub-layer between them.
This will provide the decoupling effect between the two layers of the wall. You can use acoustic foams or anything that has high sound deadening properties as the sub-layer.
Step 6
This is also an optional step. But a good alternative to the above step if you have space that you can give up.
It is to build a new room within your original room and is commonly known as isolation.
You have to put up a separate room inside the original one and do all your recording and other related things.
It will greatly dampen the sound waves coming from the outside world and achieve perfect isolation from other unwanted vibrations.
The soundproofing process ends here, and let’s move on to the next important step.
You can have a look at the process in more detail here – Sound Proofing.
4. How to do Acoustic treatment?
The next big part and one of the important steps that you need to take it seriously. Yes, you are going to need some cash for it but treating your room is a must (in my opinion)
And I can assure you that you will be able to produce a good quality recording.
There are certain steps that you need to follow while treating your room. This treatment will help you tune the space to the way you like.
You will control the number of reflections and absorption of the sound waves inside the studio until the desired level is achieved.
Step 1
The first thing we need to do is absorb unwanted sound waves inside the room, which can ruin the records.
Various frequencies of sound waves from lower to higher ones are present inside the room whenever we produce sounds.
The frequencies as stated above may be constructive or destructive depending on the nature of the room.
But most of the time, it will be on the destructive side. The rooms we live in are generally destructive in nature as they aren’t meant for recording.
So you need to install two types of sound absorbers – Bass Traps and Acoustic Panels.
Why Two?? Cause they are a bit different from each other and have different absorbing properties.
Low-frequency sound waves are hard to notice and control using only the acoustic panels. Therefore, we need a special type of absorber.
This is where bass traps come into action. It can absorb bass frequency and other low frequencies.
Bass traps are placed at the corners of the room.. and the reason is that bass and other low frequencies tend to build up the most at the corners where all the walls meet.
Step 2
After this, you need to add the acoustic panels, which would mainly absorb the mid and high range frequency sound waves.
You can put your acoustic panels on the opposite sides of the parallel walls. Parallel walls will produce repeated reflections of the sound waves.
Resulting in adding up or cancellation of the sound waves. This may also produce standing waves.
It will interfere with the initial sound waves, which will eventually ruin the recording or mixing process.
And remember not to overdo it. If you install many acoustic panels to deaden the sound waves, it may lead to a completely dead environment.
We don’t want that to happen. So, check by doing some test records as you go through the process until the desired level is reached.
Step 3
As I have told you, we don’t want a completely dead environment. Reflections are necessary to have a lively environment.
And we need to make the reflection to be natural as possible. We need diffusers; they will help reflect the desired sound waves uniformly inside the room.
Uniform and symmetric reflections around the room is a must to create a lively space inside the room.
On the other hand, you may or may not need diffusers inside your home recording studio. It depends on the level of liveliness you want in your room.
Your room might be perfect without it too. But adding a diffuser helps in making the recordings sound more natural.
By the way, you can mimic diffusers with a bookshelf (filling up a compartment for every two), but it won’t be as effective as the dedicated one.
Different acoustic treatments exist for different situations.
For example, Acoustic treatment for a live room and that of a control room are different.
But we are building a home-based one, and therefore most of us are going to do all the things such as recording, mixing, monitoring, etc., in the same room.
For this, we need to make the room fit for the main process like recording and mixing. What we can do is build a space which has two regions in it.
One Live region and one Dead region. The live region for recording stuffs and the other mainly for mixing and monitoring.
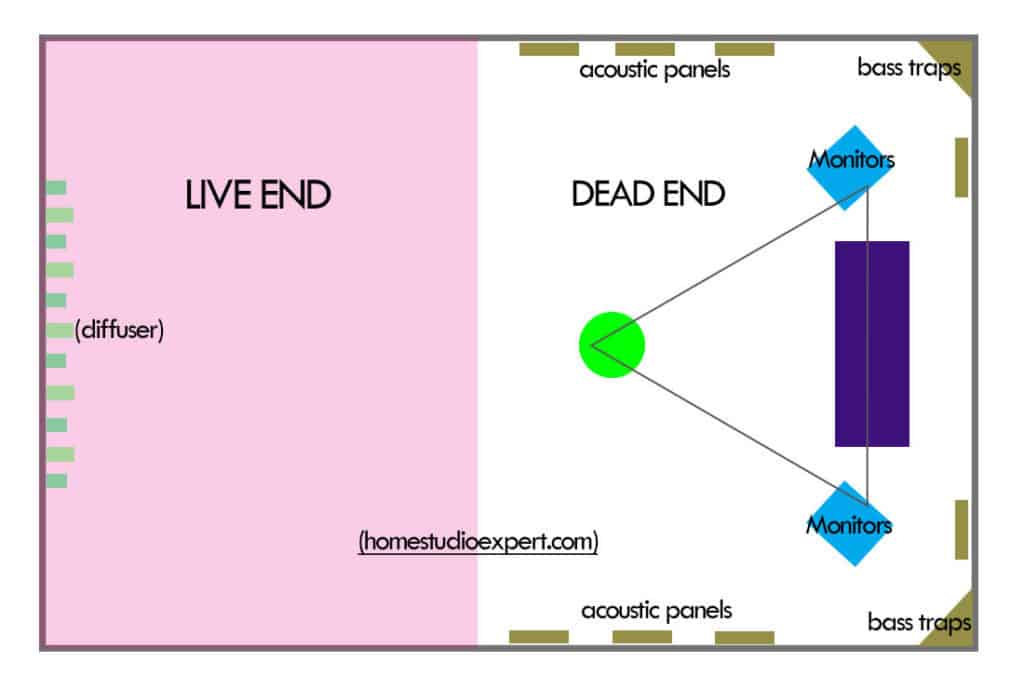
Here is a rough diagram on that.. and it is commonly known as LIVE END DEAD END (LEDE)
I suggest you check my article on acoustic treatment, which goes more in detail
if you want to know about it.
5. What every home recording studio needs?
Here are the most basic recording equipment needed for a studio
Audio interface
It is a device whose main function is to convert analog signals to digital signals, which can be fed to a laptop or pc or other consoles where you can mix, monitor, edit, etc.
I know most of you are going to use a pc or a laptop. And the interface will act as the sound card for your computer.
Check out whether you really need an audio interface at all here!
The built-in soundcards of your pc won’t be able to give a professional level of audio quality. With the help of an audio interface, you will connect professional instruments, microphones, etc.
It will greatly improve the quality of your record or music. An audio interface provides various input and output signals, where you can connect two or more microphones at a time and feed the output signals to other various sources.
If you are trying to record a whole band, you might need an interface with more input for various instruments.
So make sure you buy an interface that had enough inputs and outputs to your needs.
Two great audio interfaces are the Focusrite Scarlett 2i2 and the Behringer U PHORIA UMC404HD: check out which one is better here!
Digital Audio Workstation (DAW)
It is the software that you install on your computer where you can cut, edit, monitor, and mix the tracks to make it better.
It is the music recording software to put it in simple terms.
This software will help you mix multiple tracks, alter the tracks, and even add effects to them, giving you the final product.
Several different types of DAW are out there from different companies. Just choose the one you would like and master how to use it, don’t go jumping from one to another.
To name some few of them are – Ableton Live, Logic Pro X, Pro Tools, FL Studio, etc. Some of the Audio Interfaces come with them as a package.
So, you don’t need to worry about buying it separately. There are also free and paid versions, and you should have a look at them if you want the paid versions.
Some of the best free music studio software are Audacity, Garageband
, Traverso
, Jokosher, etc.
Laptop or PC
Yes, it would help if you had a laptop or a pc where you will do the editing, mixing, cutting, monitoring, etc., of the concerning tracks.
You really don’t need to get a new one if you already have it. A high-end pc or laptop is not compulsory in this case.
A medium spec one will do just fine if you are starting. You can upgrade it later when you have the money for it.
Make sure you check the DAW requirements too. Each one of them has its own requirements, and make sure you have the minimum specs as stated.
Working on Mac or Windows doesn’t really matter here. Both are good for music production; go with the one you are more familiar with.
The advantage of Windows is that they are cheaper compared to the Mac. After some research, here is a rough idea of some of the basic system requirements –
4GB Ram
2.2 GHz or more with Dual cores
512 Mb Graphics Memory
1TB HDD (more space.. the better it is for storage )
i3 processor
Having more RAM will also be better if you are going to use other plugins. Remember you have room for upgrades if you choose to build a pc while having a laptop doesn’t.
Don’t think too much about this.. get something that will work well. After all, making good music or audio doesn’t depend on the system. It will be on you mostly.
Microphones
You need good quality microphones if you want to make your music or audio sound good. The best part is that you can get decent microphones for about 150$.
The types of microphones you are going to use are called XLR microphones
and not USB microphones. Cause XLR microphones are the ones that work with Audio Interfaces.
And dedicated microphones exist for recording different audios. For example, a large-diaphragm condenser microphone is more suitable for recording vocals.
Like this – dynamic mics for the kick drums or condenser mics to record the whole thing, it can go on like this for electric guitars and acoustic guitars.
This article will help you find out more about different types of microphones for various purposes.
If you are on a tide budget, make sure you have the least needed two or three microphones to record the vocals and other instruments.
And I suggest you upgrade it later when you can.
There are also unidirectional, bidirectional, omnidirectional microphone types. You should go with unidirectional microphones for recording vocals as they are best suited and take up more sound from a particular direction.
Here are some of our recommended microphones.
A Pair of Headphones
A pair of headsets is a must for your studio. You are going to need this almost in every step of recording.
So invest in a decent pair of headsets that you can afford. You are going to need it in recording, mixing, monitoring, editing, etc.
Hearing through Headphones while recording will let you monitor if there is anything wrong with the live recording
It can be nasty unwanted background noise, disturbances in the circuits causing humming effects that would eventually ruin the process or anything that can mess it up.
Small background noises are hard to detect with our naked ears. But it will be very prominent when you hear the records, and headphones are the ones that will help you pick up these sounds.
Some of the different headphones are Open Back headphones, Closed Back Headphones, and Semi – Open back Headphones.
Some people prefer Open back while the others prefer Closed-Back headphones. But the important thing is that you should know how good music sounds like with the headphones you are using.
There is a bit of a learning curve to it, but you will get to it once you have some experience.
Monitors
You are going to need a pair of monitors to monitor your music or records effectively. When headphones help you monitor small things, they won’t give you the natural feel of the music.
What I mean is that headphones pump music right into your ears, and they don’t represent real-life scenarios.
In real-life situations, you need to consider things such as the needed reflections, mixing up of channels, time gap, etc., before reaching to our ears.
Every room also has a particular ambiance to it. And so we need to make it sound good in the real-life scenarios, too, and not only on headphones.
Mistaking low-quality music for a good one is easy if you use only a pair of headphones for your recordings.
More info on – Headphones and Monitors, Why you need both? And what are the steps you need to take if you are going to work with only one of them?
Pop filters
It is the piece of filter device that you put in front of the microphones. It acts as a shield to filter the popping sounds created by the breaking of fast-moving air.
It also protects the microphones from saliva, which helps prolong the life of the microphones. (Saliva contains compounds that corrode the surface over time).
6. Additional gears
Reflection Filters
This will help you block unwanted sounds from other directions or sources while recording your vocals.
Microphones are susceptible, and they tend to pick up even the smallest disturbance in the background. And reflection filters will help you reduce it by blocking these types of sound waves.
DI Boxes
A DI Box (Direct Injection) device converts high impedance unbalanced signals to low impedance and balanced signals.
It is a handy device if you are using electric guitars, bass guitars, keyboards, etc., which produce instrument-level signals (unbalanced).
These type of instrumental level signals needs to be converted to low or mic-level signals which can be directly fed to an input of mixing consoles.
It also reduces the humming and buzzing effects in electronic equipment, which are caused due to interference of the electromagnetic fields.
We highly recommend the Whirlwind IMP 2 DI Box, check out the review here!
Backup Power
Use a UPS as a backup power source for your recording studio. It helps you prevent losing your unsaved changes to the records or mixes under process during blackouts.
You never know when something like that will happen, and you should be prepared for it. It is effortless to lose all your work in one swoop.
And you have start all over again. So, have a back-up plan for that.
Power Attenuator
This device will help you cut off the excess signals from the amp before going into a speaker.
If you are using an electric guitar then, this will help you reach maximum tonal potential while keeping the volume low at the same time.
I wrote a review on a Power Attenuator, and you can have a look at it.
Check out our comprehensive guide to home studio recording equipment for entry-level to high-end in this article here.
Tips on improving your studio
1.Be realistic and try to manage with what you can get for your studio. Don’t go around buying all the expensive gears and setups.
You can always upgrade it later. And Keep about 50% of your budget for acoustic treatment as it will help your music sound better.
2.You can use everyday common materials that are soft and thick to deaden the sound waves inside your studio. Some examples are cushions, mattresses, etc.
Soft and porous materials are natural sound absorbers. You can add some of these if you don’t have a big budget in the treating process (I don’t recommend using all of this instead of acoustic panels)
3.Always position your monitors in an equilateral triangle with your seat. By doing this, you get the maximum efficiency from your monitors.
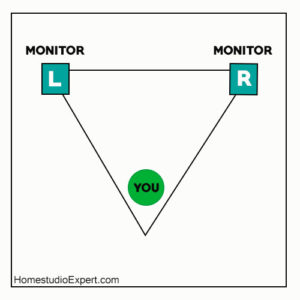
Here is a rough diagram on that.
3.Choose a pc or laptop that doesn’t make that much noise. They tend to make some background noise while recording.
And I suggest installing some acoustic panels at the wall just at the back of your pc or laptop.
4.Your room plays an important part in recording music, and I suggest you choose a room that gives you more space.
The feeling inside it will be shown on your vocals and recording. (as we know, music comes with emotions). And the environment you are in can influence you negatively or positively.
Therefore, try to be in a positive ecosystem.
5.Before you start recording, do some warm-up sessions by yourself. Calm yourself and try to be comfortable inside your studio.
I hope you gain some knowledge from it.
Here are More Tips on Improving Your Studio
Recent Posts
QuickTime is a vital app for many Mac users, and if you’ve recently bought a new microphone, you might wonder how to use it optimally. QuickTime cannot record audio content if it doesn’t have...
Every microphone leaves a unique signature on the quality of its output. If you’re a podcaster trying to melt your way into your audience’s hearts, a muddy, distorted recording won’t cut it....

