Mixing vocals in FL Studio can be overwhelming at first because vocals are so much different than other instruments. Vocals bring a whole new dimension to the mixing process. In this article, we’ll try to simplify mixing vocals in FL Studio to its basic parts in an attempt to guide you on your mixing while leaving you the creative freedom to improve your skills.
So, how do you mix vocals in FL Studio?
To mix vocals in FL Studio, you need to do three things:
- Know how to navigate through FL Studio
- Create your song’s “vocal chain,”
- Understand when and why to use certain tools and techniques
If you can’t navigate through FL Studio, you’re never going to have the means to work on music. If you don’t use certain tools and techniques in the right order, you won’t get their full utility. And if you don’t know when and why you should use certain techniques, tricks, and effects such as using multiple delays or reverbs or using compression, you’ll end up guessing your way through your music; like a ship without a rudder, which can be somebody’s work style no problem, but learning how to mix vocals in FL Studio properly will only enhance your music skills.
In this article, we’ll try to simplify mixing vocals in FL Studio to its basic parts in an attempt to guide you on your mixing while leaving you the creative freedom to improve your skills.

- How to Mix Vocals In FL Studio
- 1. Prepare Your Mix
- 2. Edit Your Vocals
- 3. Tune Your Vocals (If Needed)
- 4. EQ Your Vocals (If Needed)
- 5. Level Before You Compress (If needed)
- 6. Add Effects
- Panning
- Stereo Width
- Delay and Reverb
- Multiple Delays and Reverbs
- Other effects
- Conclusion
- Frequently Asked Questions
- Why Is Mixing Vocals So Hard?
- Should You Mix Before Vocals?
- How Long Does It Take To Mix Vocals?
- How Should You EQ Vocals?
- How Loud Should Vocals Be In A Mix?
How to Mix Vocals In FL Studio
1. Prepare Your Mix
The first thing to do when mixing vocals in FL Studio is to prepare your mix. The last thing you want to do while focusing on the sound of your mix is fix technical problems that mess up your creative flow. Some mixers even go as far as printing their instrumentals first before starting the vocal mixing process for even more simplicity.
Inside FL Studio, preparing your mix means to label, color, and most importantly, number your tracks either in the channel rack or by double-clicking the tracks in the arrangement view and choosing the track number in the top right corner. This will save you a lot of time and make the mixing process easier.

You can also save presets of your mixer channels and load them into your current projects to streamline your creative process.

Check out:
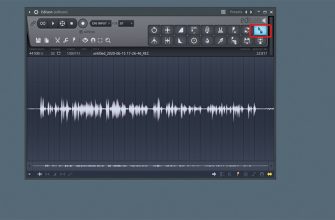
2. Edit Your Vocals
Editing your vocals consists of manipulating the timing so that the performance lines up correctly in sync with the rhythm of the song. You can do this by first using the slice tool, setting the snap to “(none,)” zooming into the arrangement view, and listening/adjusting the tracks in time with the beat. Whether you are working with verse vocals, chorus vocals, backing vocals, double, harmonies, etc., lining these up at the beginning stage of the mix is like setting the foundation of your house before you build. Alternatively, you could use a third-party plugin like Synchro Arts Vocalign to help automate this process.
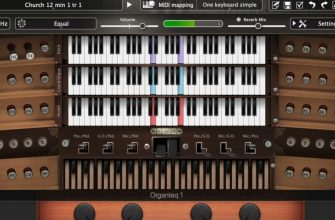
3. Tune Your Vocals (If Needed)
If you are working outside the hip-hop and metal genres, it’s a good idea to use pitch correction on your vocals. If you’ve bought the FL Studio Signature Bundle, you can use Image-Line’s native pitch correction plugins such as Pitcher or Newtone to tune your vocals.

Using Newtone to tune vocals
Alternatively, you can download free plugins such as Graillon 2 (free edition), MAutoPitch, GSnap, KeoVee, or Voloco, or purchase Antares Autotune Pro or Melodyne for the highest quality tuning on the market. Make sure to set the right key and read the manual first! For an in-depth guide on how to tune your vocals in FL Studio, consider looking at our previous article: (link to article #1).
4. EQ Your Vocals (If Needed)

EQing your vocals can help to alleviate some issues within each vocal track. One common technique is to use a low pass shelf or low cut filter to reduce or get rid of the lowest frequencies of the vocal. This will allow more space for the bass and the kick to cut through and reduce background noises. Fruity Parametric EQ 2 is a great free EQ to use, but if you want to get more precise and detailed, the industry standard for professional EQ is FabFilter Pro-Q 3. When EQing, it’s very easy to over-process and over-EQ your vocal. Remember that human-sounding vocals draw in human people and less is more.
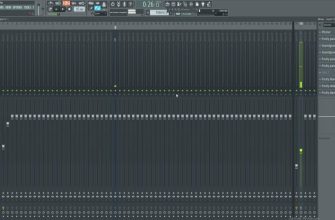
5. Level Before You Compress (If needed)

One helpful tip in the vocal mixing process is to even out the volume of your vocals before you compress. You can do this by manually automating the volume of your tracks in the arrangement view. Simply right-click on either your mixer volume or your track volume and click “create automation clip.” Alternatively, you can use a volume levelling plugin such as Waves Vocal Rider to automate this process.
Furthermore, a common problem many novice mix engineers make when working with vocals is overprocessing and overcompression. Remember, you don’t HAVE to use compression on your vocal because not every vocal needs compression.
If you’re unsure how a compressor works, use a common ratio between 3 and 4, slowly increase the threshold until it sounds right, slowly move up the attack from the slowest setting and then slowly increase the release from the fastest setting until it sounds right to you.
6. Add Effects
Distortion (if needed)
Distortion can be used in some cases on lead vocals. Typically, mixers will use distortion on a lead vocal![]()
![]() when they want the vocal to be aggressive, dominate the mix, or when they want the lead vocal to cut through a busy mix(and raising the volume isn’t working).
when they want the vocal to be aggressive, dominate the mix, or when they want the lead vocal to cut through a busy mix(and raising the volume isn’t working).
It’s common to use a low pass and a high pass filter when using distortion for optimal results; distortion in the very low frequencies doesn’t really work and distortion in the high frequencies doesn’t sound great.
FL Studio comes with six different free distortion plugins that you can use: Fruity Fast Dist, Fruity Blood Overdrive, Fruity Squeeze, Distructor, and Hardcore. Each of these plugins functions differently in how they apply distortion, so be sure to experiment with their sound. Alternatively, you can use third-party plugins such as Soundtoys Decapitator or FabFilter Saturn for a little more advanced distortion.
Panning
If you are using the same vocal, beware of panning the same track left and right, or else the two sides will cancel each other out due to phase issues. It’s always best to record a separate double-take if you want to pan two of the same audio samples left and right. Traditionally lead vocals are in the center, but every song is different and breaking the rules is what makes music music. Keeping the verse relatively mono will allow the chorus to sound wide and take the listener to a new place. To pan a track, simply hold and click the panning wheel in the mixer left or right in the amount you want.

Stereo Width

Stereo width can help you achieve a wider vocal sound. This is particularly useful in the chorus, but many mixers use stereo width on verses as well. It’s the contrast between the verse and chorus that really matters. One great free plugin I highly recommend is Ozone Imager, a two-control stereo width plugin with a great visual display. FL Studio also has a free native plugin called that can do a similar job called “Fruity Stereo Shaper.” Stereo width plugins like these do two primary functions that enhance the width of a sound. First, they raise the overall dB of the right and left channels while leaving the mono channel the same, which raises the sides of the sound. Doing this does not effect how the sound will sound in mono. Secondly, stereo width plugins also utilize the Haas effect, which duplicates the same sound but delays one duplicate between 1ms and 30ms, which widens the stereo image.
Delay and Reverb

In FL Studio and any DAW, it’s always best to use Delay and Reverb as send effects rather than insert effects. This means instead of loading up a reverb and delay plugin as an insert, make a new insert with exclusively your delay and exclusively your reverb plugin(s). Most mix engineers will also add effects and/or do creative automation tricks on their delay and reverb tracks. All you have to do is make a send and return track(s) for your delay(s) and reverb(s), tweak your settings, then set the percentage of delay and reverb you want at the bottom from 0-100%.
FL Studio comes with three free native plugins: Fruity Delay 2, Fruity Delay 3, and Fruity Reeverb 2, but there are also plenty of good third-party plugins to choose from including Echoboy, FabFilter Pro-R, Little Plate, and Valhalla Delay/Reverb.
If you haven’t tried it before, try sending your delay into your reverb! There are so many possibilities!
Multiple Delays and Reverbs
If you’re looking for a sound that has more depth, consider adding multiple layers of delays and reverbs with different sizes. The contrast between a small slap delay and a long delay, and/or a small room reverb combined with a large hall reverb adds dimension to your track. Sending certain delays into your reverbs may help glue the overall sound together. Any more than four delays and four reverbs is probably overkill.
Other effects
There are many other effects you can add to your vocal depending on the vibe you want to create. While some mixers choose to keep things natural most of the time, others like to get creative and add lots of vocal effects: chorus, flanger, filters, phasers, you name it. The mix is your oyster!
Conclusion
Mixing vocals is one of the hardest parts of mix engineering. Making mistakes is necessary and unavoidable. Hopefully, in this article, we’ve sped up your learning process by giving you a simple guide to mixing male vocals and female vocals in FL Studio. All of these steps are listed in order of where traditional engineers might place these parts in their vocal chain and some of them are my preference. For example, it’s not typically good to add compression after reverb, it’s always standard practice to tune your vocals before you add effects, and I personally prefer to EQ before any compression. Hopefully, in this article, we’ve helped to improve the way you mix vocals in FL Studio so your vocals and overall songs sound great.
For more on problems with FL Studio, check out:
Frequently Asked Questions
Why Is Mixing Vocals So Hard?
Mixing vocals is difficult because of how complex vocals are. First, you have to record them, then you have to solve countless problems that will likely arise during the mixing process. After that, you have to go back and forth with the instrumental to make sure they complement each other well. There are tons of mistakes to be made in this process, especially for beginners, but the more mistakes you make, the less you’ll make in the future.
Should You Mix Before Vocals?
Everybody’s mixing process is different. Some mix engineers exclusively separate the mixing process of instrumentals and vocals. They will only mix vocals after printing the instrumental. Others mix the instrumental and the vocals together. It is simply a matter of personal preference.
How Long Does It Take To Mix Vocals?
Mixing vocals can take anywhere between a few hours and a few days of work. Some vocals are more complex than others, but all-in-all it will depend on how many tracks you are working with, whether you are working with harmonies, chorus vocals, bridge vocals, etc.
How Should You EQ Vocals?
Almost every mix engineer will use a low shelf filter or a low cut filter on their vocals, but the rest is a matter of taste. It is generally good to avoid over-EQing your vocals and only EQing parts that are problems to avoid an overprocessed sound.
How Loud Should Vocals Be In A Mix?
It depends on what type of song you’re going for. If you are going for a vibe where the perspective of the lyrics come from a quiet/soothing character, then maybe you want the vocals soft in the background. If you are working with an aggressive hip-hop vocal, then you’ll likely want your vocals to be out in front.