There are certain things we always leave out when we set up our home studio. And those things are the ones needed to improve your home studio.
We didn’t think far and deep enough when we are just starting out with a couple of gears.
Yes, we can manage without minding those small details. But when we go deeper and want more quality out of our Studio, we need to take care of the smallest details.
Even the smallest details can make a big difference. And you will come to know of it when we go through these steps.
Some of the steps that I am going to mention here might have been known to you but you don’t pay much attention to.
On the other hand, you might know nothing about them if you are just starting out. For this you don’t need to worry.
There’s is nothing to worry about cause it won’t be that much of a headache to take in.
- How can they Improve your Home Studio?
- 13 Steps You can take to improve your Home Studio
- Step 1 : Check if you have prevented all the noise from entering
- Step 2 : Treating Your room correctly
- Step 3 : Treating the Dead region (Dead End)
- Step 4 : Treating the Live Region (Live End)
- Step 5 : Working only with a pair of headphones
- Step 6 : Positioning of the gears or Setups
- Step 7 : Ideal room type
- Step 8 : Use a Cross Feed Plugin (For using Headphones only when mixing)
- Step 9 : Use a Headphone amp
- Step 10 : Use a DI Box
- Step 11 : Add sound Absorbers to your ceilings
- Step 12 : Don’t forget the floors
- Step 13 : Add Bass traps
- Take action
How can they Improve your Home Studio?
- These steps can help you improve your Recordings. It can also help you in your mixing process.
- You will notice improvements in yours Tracks. It will help you in better positioning of the gears.
- It will give you an idea on how to combat high and low frequencies, how reflections of sound works inside a studio.
- What are the ideal type of Studio rooms, how you can improve your room even if it is not the exact ideal room.
- Overall improvement in the quality of the record you produce and less headache.
13 Steps You can take to improve your Home Studio
The first steps are the basic steps you need to check before doing anything else. You should always try to do the things in order. It makes the process much easier.
Step 1 : Check if you have prevented all the noise from entering
You might be thinking.. What!! I have already done that.. But wait… Even if you have done it (Sound Proofing), your studio might not be completely free from it.
As there are many factors that can affect this. High frequencies are easy to pick up with our naked ears but that’s not the case in low frequencies.
There are certain low frequencies which have the right frequency to vibrate the walls of your studio. This type of frequency will pass through your walls and hinder you from creating a good quality record.
So make sure you have the right amount of mass at your walls to prevent it. And also make sure your walls have no holes or cracks in it – even if it’s a small one.
Don’t forget to do it with the doors and windows (if you have any) too.
You can find out more about Sound Proofing from this article.
Step 2 : Treating Your room correctly
You should treat your room correctly if you have a pair of monitors on your studio.
Even if you don’t have it you should still consider doing it. Doing it will help you in the long run. You will surely need a pair of monitors if you are going to upgrade your Studio.
On the other hand, if you don’t do it while having a pair of monitors then it’s like you don’t have monitors – you will get nothing good out of it.
Because the sole purpose of a monitor is to bring about a real life scenario inside the studio.
Therefore, you can hear the record by yourself and see how it will sound in real life situations.
There are two main things included in the process of treating a room and they are –
- Treating the “Dead Region”
- Treating the “Live Region”
These two are commonly known as Live End and Dead End (LEDE)
Let us talk about these two in the next two steps
Step 3 : Treating the Dead region (Dead End)
Lets’ say you have your gears set up against a wall of your room, then half of the room including that wall will be the Dead End region.
Now, we need to place Sound Absorbers on some portions of the walls in this region. And you must remember not to overdo it.
Overdoing it will lead to a completely dead environment and we really don’t want that to happen.
So, what you need to do is cover about 25% – 35% of the walls with Sound Absorbers. You will also need to cover the back portion of the walls where the monitors are placed.
This is because of the fact that it’s hard to reduce the reflections of sound waves from every direction or control them. As they are of wide range of frequencies.
And for this we need dedicated absorbers like Broadband absorbers. After this let’s treat the Live End Region.
Step 4 : Treating the Live Region (Live End)
The other half of the room than the region mentioned above will become the Live End Region.
And for the information, we need sound reflections and bare walls too inside our studio. We need them to mimic a real life scenario.
On the other hand we need to evenly spread the reflections inside our studio. And for this we need to add diffusers at the walls inside this region.
You can make diffusers yourself but it won’t perform that well as compared to a dedicated one.
What we literally need is a zig-zag surface to spread the reflections on different directions. If you don’t have the bucks to get one, then you can use a book shelf as your diffuser.
And fill those compartments with books leaving an empty one for every compartment you fill. So, that it creates a zig zag surface.
But I recommend you to go with the dedicated diffuser – it works the best.
Step 5 : Working only with a pair of headphones
If you are going this way then the best thing you could do is to know what a good music sounds like at your headphones.
Basically, you have to have some experience on your headphones to know this .. right!!. You gotta know how it will sound like at a real life situation.
If you are a complete newbie on this then you can use some extra DIY ways to get a good quality track using only headphones.
All you have to do is mimic real life situations at your home and find out how your track sounds like at different places and situation.
To do this more properly, Read my post on Headphones vs Monitors which covers the topic plus some tips and tricks – It’s on the last portion of the article.
Check out our Favourite Recommended Headphones if you are planning to get one.
Step 6 : Positioning of the gears or Setups
 A lot of people ignore this when they are starting out but it is also one of the main things that matters.
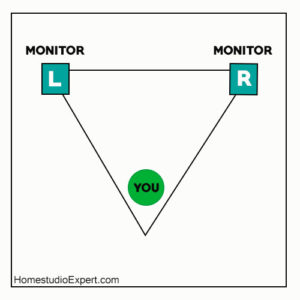
You should keep a distance from your walls when you set up or put your monitors. And the monitors should be oriented in a manner such that the way you sit – the way monitors are directed should be in an equilateral triangle.
You can get an idea from the figure shown here.
You should sit inside the region for better output. It’s the best you can get out from your setup.
You can check out this article from Proaudiofiles for better understanding.
Step 7 : Ideal room type
There is an ideal room type for a studio and that is a room that has no parallel walls. I know it won’t be the case for many home studios.
Almost all the home studios will have parallel walls and won’t be the ideal type at all.
And we can combat some of this by doing the above steps. Parallel walls create standing waves after the sound waves reflected from the walls gets mixed up.
Another thing to look out is how you place your gears at your room, it should be symmetrical in manner so that the sound waves are also reflected in symmetric inside the room.
If it’s not in a symmetric manner, the reflections will be messed up and create annoying ones.
You should also give some distance from the walls to give the desired decay time for reflections to occur.
Step 8 : Use a Cross Feed Plugin (For using Headphones only when mixing)
When you use only headphones when mixing it is very easy to misunderstand the quality of your record or mix.
So you need something that will give you the experience of a real life speakers with stereo. And this is where you the Cross Feed Plugin comes into play.
Search for the best one out there and use it. It won’t give you the full experience a pair of speakers will give you, but you can manage with it.
“Something is better than Nothing”
Step 9 : Use a Headphone amp
If you want the best out of your Studio Headphones then you really need to get a headphone amp.
Most high grade Studio headphones have High impedance and therefore you need a headphone amp so as to make them work to the fullest.
You are good without it if you have modern one which don’t need an amp.
But there are also cases where the in-built headphone amps inside audio devices are not upto the par. This is because the Built in amp are not that good.
For this you need dedicated headphone amps. It is also easy for you to get a headphone amp as there a lot of them for different price range.
You can get a decent one at a very low budget. So definitely check them out.
Step 10 : Use a DI Box
You should DI (Direct Injection) Boxes when recording acoustic, electric guitars, keyboards,etc. Instead of using a simple mic to record them.
This box is needed because the signals coming from this type of instruments are unbalanced and need to be balanced before fed into a mixing console.
And also some of the Mixing console can’t take in instrument level signals so they need to be changed into mic level – this is where it is needed.
Step 11 : Add sound Absorbers to your ceilings
Yes, You need it very much and so you need to add the absorbers as I have mentioned above on your ceilings too.
Ceilings are also just like the walls and they will reflect sound waves too, it won’t be that much as compared to the vertical ones.
But you need to combat it too.
Step 12 : Don’t forget the floors
Add sound absorbers to your floors like acoustic foams and something like a Platfaom to raise above the ground.
This will cover the bare floors absorbing the sound waves and limiting the transfer of waves from the floor if your studio is on the 2nd floor or something like that.
If your floor vibrates when someone run around in the next room or when the garage door opens (suppose you are just above the garage) then, this will help you a lot.
Step 13 : Add Bass traps
You should add bass traps at the corners of your room so as to absorb lower frequency acoustic energies.
Bass traps are usually placed at the corners of your room where the bass frequencies are the highest and where all the walls meet.
Simple acoustic panels can’t absorb these type of frequencies and you should definitely install them inside your studio.
Take action
This is the last and the most important thing you need to do. Even if you read all these articles but fail to take action, then you won’t be able to improve your studio.
Moreover, you will come to know how to improve your studio to get the best from it – if you take the above steps.
It is because of the fact that all the studio are different from each other.
Be sure to record and mix in a pleasant and cool environment. It will help you a lot in the process.